
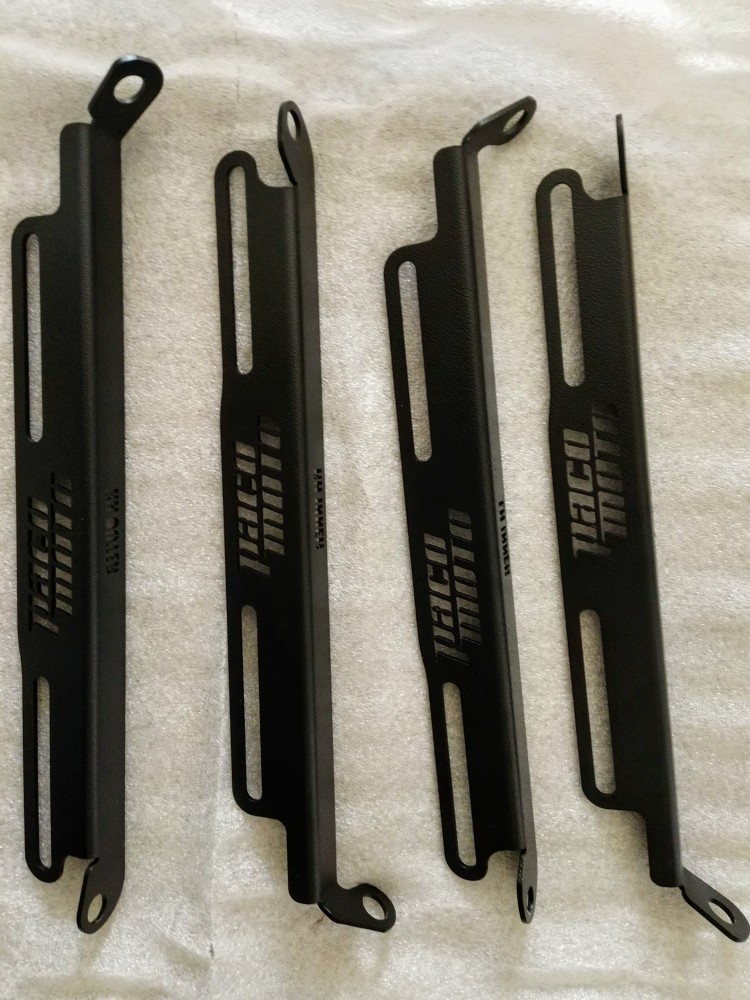
photo courtesy of james.today
Happy New Year!
The photo above in the “Seat Lowering Rails” thread on the 124Spider.org forum caught my attention, in that it appears that a good 2″ drop was accomplished on this driver’s seat, by substituting the factory seat slider rails with new brackets from Paco Motorsports, created expressly for taller drivers needing a little more headroom (or auto-crossers needing to wear helmets 😉 ). Although Recaro seat bottoms are said to sit a little taller than the stock seats, this could be a substantial improvement – regardless of which seats you have! You can get a good idea of what is involved in installing these brackets, by reviewing Paco’s installation instructions here.
I remember writing an article back in 2017, that involved lowering the seat height by “meshectomy”– unfastening one side of the load-bearing seat-bottom mesh, which essentially transfers all of the seat support to the outer covering only, allowing the occupant to sit only a ½” lower. By giving up the ability to readily adjust the position of the seat, these brackets provide a significant gain in headroom (along with a 6½ pound weight savings per seat), and seems to be a much more practical solution. You will need your wrench to alter the position of the seat with these brackets, but it can be done.
these photos courtesy of murix

I’m plugging in a link for a very informative guide for replacing the driver’s seat with a racing seat, since it has so much information regarding the electrical connections (did you know the wiring is there for seat warmers?), bolt hardware, etc.

Murix’s comments:
The good,
Feels really good, i need to test fit with my helmet but i’m sure i can fit with the top closed and pass the broomstick test. your butt is lower with your thighs higher, its alot like a fixed back racing seat, you feel “in” the car. no wiggles or rattles. feels like a sports car seat now. reminds me of the BRZ i test drove when i cross shopped these two. these rails and the 2in steering spacer makes the car feel so right. you are in the car and have a touch of recline.The meh,
I had to remove the plastic guard to the right of the recline lever. exposes this shiny tube thing, i think it has to do with the airbags from what the plug looks like. might need to trim the plastic or paint the “tube thing” black. aesthetically unpleasing.
The second meh has to do with adjustment. all the bolts that need to be loosened and tightened are in hard to reach area where you have to use and open box wrench to twist 1/32 of a turn at a time. not impossible but if you can stay focused i’d figure at least 5 min per bolt to loosen and then 5 min minimum to tighten. not alot of room to work.The ugly,
the bolts on the rear of the rails that bolt to the car. i would love if Paco can reply with the exact tool he recommends to tighten these. mine are half-arsed tight at the moment. you will need some sort of 14mm stubby open end wrench and alot of blue collar language. they are very hard to get started and you cannot see a darn thing.
Now Homer Simpson will fit 🙂 (art courtesy of Serge Maillet)


Hi, I have just finished ( last weekend) to install on my Fiat 124 Lusso the other alternative to Paco motor i.e the Aurora Auto design version of the lowered seat. I have chosen this solutions because I wanted to retain the full function of the seat ( move fore and back ) since I drive the car with my wife. I am 6.3 ( 191 cm) and found driving this car ok as far as confort is concerned , not ok at all if driven with an helmet on track. The modification requires quite a lot of work since the new rails that have to be installed need the seat to be fully separated ( back from lowerseat) and a piece of the original metal base cut with a grinder. The package is quite expensive but actually for the number of pieces they might produce and sells and the hours of work they have done, it s ok.
I like to work around my car and I have a certain knowledge of how to do things, but I have never used a grinder for example and I was terrified to ruin the original seat and not being able to go back should smething go wrong.
Well, I have to say that althought the job took me solid 12 hours of uninterrupted work ( wife is abroad, job done inside the house! for my confort),eventually was ok. Instructions are ok yet not that perfect. They are not a real dumb proof and not helping in all situations. I would have liked to have found a “how to disassemble” the big connector below the seat to start ( not that easy if you have never done it, terror is following you everytime you try pulling off connectors out of a box that governs airbag and stuff) and some too quick info like ” now reinstall everthing back following the same procedure you followed to dissassmbled” when you know that is not exactly the same).
The worst I though would have be the grinder and flames cutting operation, actually was the easiset ever. Just avoid setting on fire the house if you do it inside , and it takes not more than 10minutes. Anyhow , someone who is confortable with this things would fly over all step by step procedures, someone it is not…well, need to be very carefull, some bolts are tightned by Hulk in person and the risk of damaging something with a bad tool is waiting for you; take pictures of the before and after every step. I have kept all the cut off material snce I thougth if I sell the car, to weld it back and go back to original. Mmmh, actually , having seen used seats on sale for 250 euro, I would think twice if a plug in would be an option.
It was night when I finished the work, went to my garage, bolt the new lowered seat on the car and went for a drive. First, visually it is very little difference from the passenger seat heigh : when I sat , the difference was huge. I was in a cockpit. I took the car out and drove for uninterrupted 100 km to better feel the new car because that was the feeling.
I am quite happy. Incredible how a little difference such as 1 plus inche does. One negative thing though: the seat is making a bit of noise, sort of squeaking. Someting not so disturbing yet present. The structure on the other side is laking some parts below needed to lower the seat on the new rails and that might cause it.
LikeLike
This seemed like the most appropriate article to add a link to a great informative article I found, dedicated to replacing the driver’s seat with a racing seat, since it has so many details regarding the electrical connections and mounting hardware.
LikeLike