 Go directly to: Firmware Installation Instructions Hardware Installation Instructions Isolator Additional Tweaks Comments
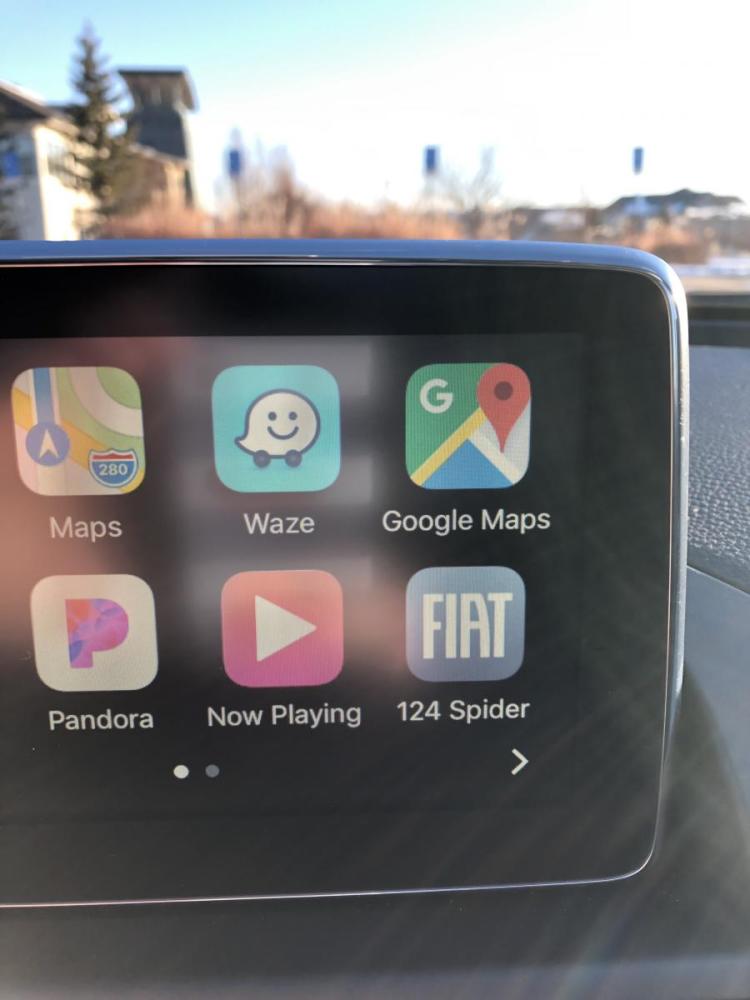
CarPlay on 124 Spider display
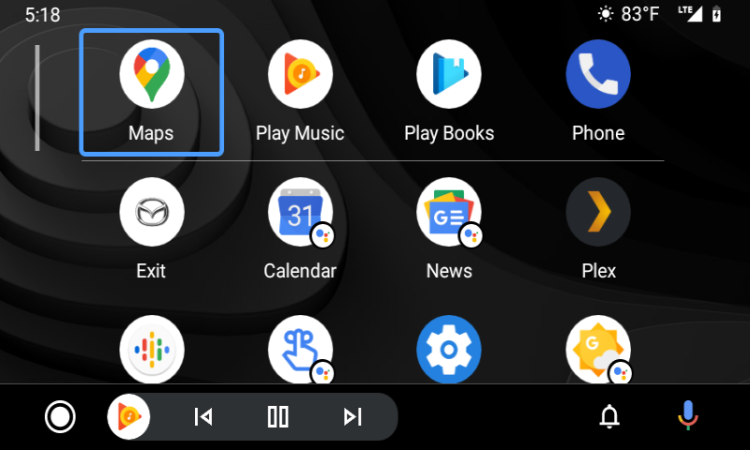
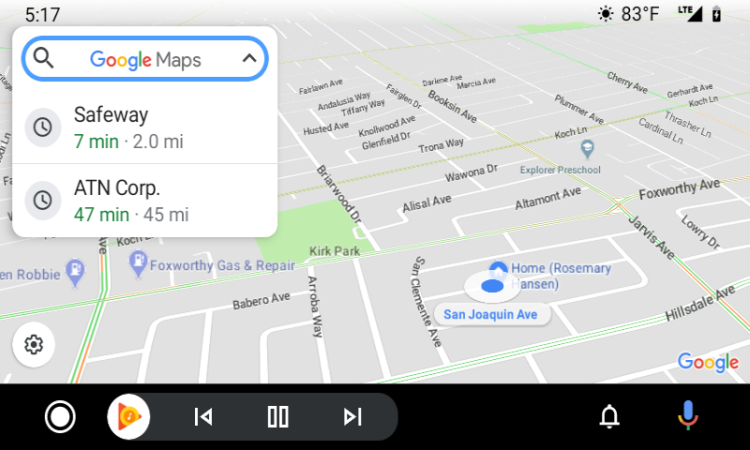
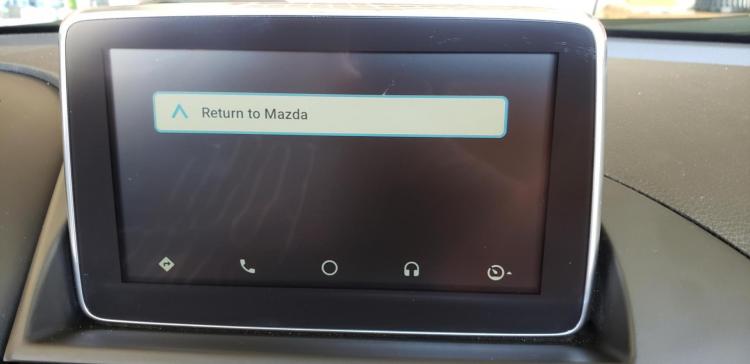
Android Auto screens on 124 Spider display
In conjunction with previous articles, where Fiat 124 Spider and Abarth 124 Spider owners are installing the CarPlay retrofit hub kit with Mazda’s version 70 firmware, which is needed to make it all work, since it seems that Fiat has not announced any plans to release version 70 firmware of their own, this article is hopefully the last regarding the transformation of the Mazda firmware into “Fiat-ized” firmware.

I had another idea, to resolve the last of the desired changes, and it too, turned out to be a winner! Since the vehicle name “Mazda” seems to be called out in xml control files within the jci/settings/configurations folder, by replacing the following 4 files…

✅ with our Fiat xml files, all of the vehicle naming for:
- Bluetooth pairing
- Texting reply footers
- Aha/Pandora/Stitcher
- and Bluetooth Emergency 911 calls
, will now read “124 Spider” once again.
✅ 68wooley has finished putting together a Universal Mazda-to-Fiat Version 70 AIO Tweak combining:
- my file substitutions mentioned above
- his Fiat & Abarth CarPlay icons (great job!!)
- my Fiat/Abarth boot animations
- the restoration of the OEM Navigation function with the Fiat SD card, which I also pioneered
, and published it today, available here.
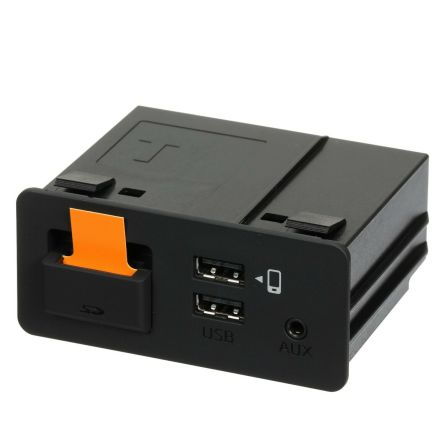
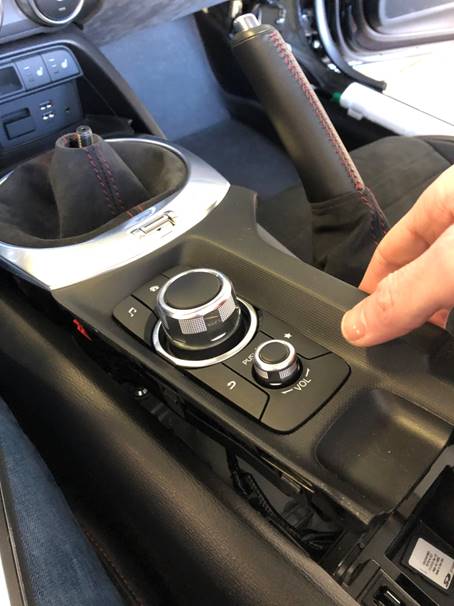
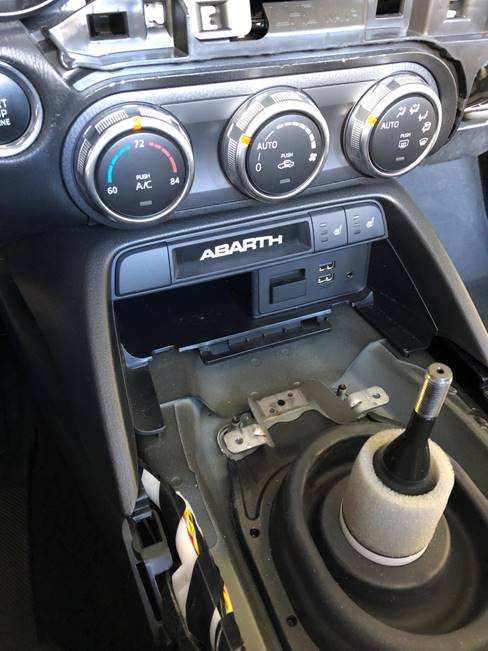
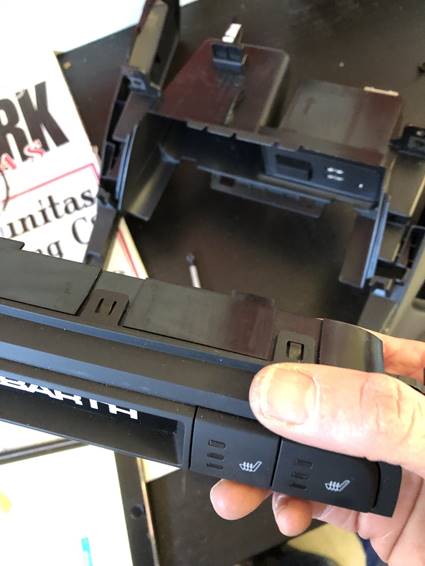
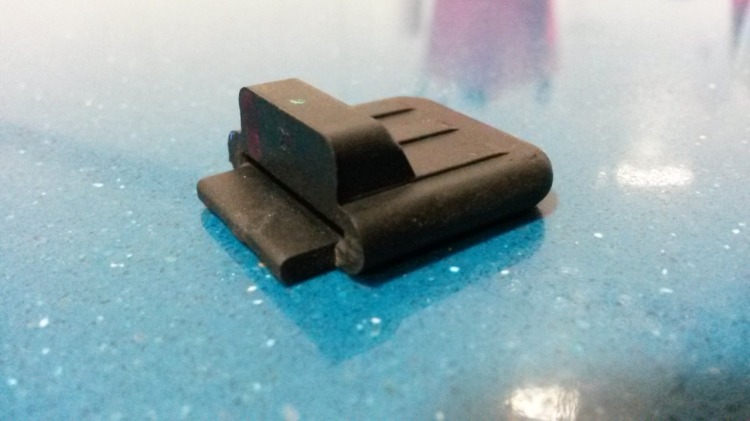
This is what the upgraded USB hub module looks like that will allow CarPlay to function (note the iPod icon adjacent to the upper USB 3.1 full-duplex port capable of charging closer to 2 amps, vs. the other USB 2.0 half-duplex port below it, that only puts out 500 mA, same as the pair of USB ports in the original hub) ⇓
The Universal Version 70 Fiat AIO tweak will not function with versions 70.00.335 and 70.00.352, as code was introduced ⇓
14 = Execute, "passwdupdate", "execute.ini", 12
19 = Execute, "neutralizeid7", "execute.ini", 4
20 = Execute, "systemupdateid", "execute.ini", 2
that although leaves the touchscreen tweak intact (if installed), is intended to:
- “neutralize” the id7 tweak, thereby disabling the ability to tweak
- remove the credentials needed to gain access via the serial method, thereby preventing you from reinstalling id7
For now, be sure to only use firmware 70.00.100 (link below has been fixed), should you wish to proceed with this tweak.
[ADDED 4/2/2021]
The only way to be able to proceed with these tweaks, should you find yourself at a firmware version that procludes tweaking via USB, is to install 70.00.100 with a laptop connected to the CMU via the serial input, as shown in https://mazdatweaks.com/serial/#process ⇓

photo courtesy of james.today
[ADDED 5/18/2021]
Rather than trying to find Sumitomo pins, it might be easier to solder wires directly, as shown here (just leave the wires in place afterwards). ⇓

click on photo to enlarge
[ADDED 4/11/2021]
If you choose to proceed with a version higher than 70.00.100, using the aforementioned serial method, see
https://www.124spider.org/threads/mazdatofiat70aio-and-cmu-firmware-70-00-335c-or-70-00-352b-success.38004/ for 124geek’s modification suggestions for allowing the Version 70 Fiat AIO Tweak to install afterwards:
· Start with a tweaks USB drive generated with MZD-AIO v2.8.6. Load a tweak into your CMU to make sure it works!
· Replace the config folder on the AIO USB with the config folder from MazdaToFiatV70AIO
· Replace tweaks.sh on the AIO USB with tweaks.sh from MazdaToFiatV70AIO
· Edit tweaks.sh on the AIO USB, by changing variables listed below (not sure if necessary, but didn't try without):

# AIO Variables
AIO_VER=2.8.6
AIO_DATE=2020.04.04
# Android Auto Headunit App Version
AA_VER=1.13
# Speedometer Version
SPD_VER=6.1
# AIO Tweaks App Version
AIO_TWKS_VER=1.0
In compatibility_check() change VER_EXT comparison at line 161 from 100 to [anything less than] 360:
159: elif [ $_VER -eq 70 ]
160: then
161: if [ $_VER_EXT -le 360 ]

· Save tweaks.sh, then safely eject the USB drive from your computer. Follow Ameridan's instructions to de-Mazda your CMU.
♦♦♦
Some additional notes
✅ Also, be aware that Google Maps will use the car’s GPS data, whereas Waze will use the phone’s, so keep that in mind when stowing the phone under your seat 😉
✅ If you miss being able to zoom with your Commander knob in Google Maps, download an older version (like 10.11.2) of Maps, until they fix that feature again.
✅ The Exit icon while in Android Auto mode still displays the Mazda logo, since that hasn’t been figured out yet.
✅ If your 2017/2018 124 Spider is switching countries (U.S. to Europe for example), the tuner will not function as expected, but you needn’t change any hardware. By following the entire firmware upgrade process described in this article, and choosing the appropriate regional version of 70.00.100 firmware, your CMU will be reprogrammed with the appropriate FM tuning, DAB or HD, etc.
✅ DO NOT install the Android Auto tweak once you are at version 70, as it will definitely corrupt the official AA install.
✅ Be forewarned that if you want wireless CarPlay, you’ll need firmware version at (or above) 74.00.200 – which means you will not be able to tweak via USB (including this Universal Version 70 Fiat AIO Tweak). You will also need the wireless version (Ver. P3) of USB hub ET-1594, as offered here.
✅ Apparently, the XM app has been updated in version 70+ firmware, and since album artwork should now appear in XM mode for many of the channels, the larger artwork tweak should function. Also, the HD Radio Traffic Map App is added, but it isn’t tied into the Navigation.


Start-to-Finish Vehicle Installation Instructions
Presenting 68wooley’s very detailed Step-by-Step instructions for upgrading version 56 firmware to version 70 (with updates by ameridan as I become aware of them):
- as preparation for a (Mazda) retrofit USB hub that includes a fast-charging USB 3.0 port, compatible with factory-integrated CarPlay and Android Auto
- and then “Fiat-izing” the installation so that Fiat (or Abarth) images replace Mazda’s boot and exit animations, Fiat (or Abarth) icons replace CarPlay’s Mazda icon and the Fiat SD Navigation card again functions.
Thank you so much for allowing me to include this valuable resource!
Fiat 124 Spider 2017+ Apple CarPlay / Android Auto Upgrade
Article and photos submitted by: 68wooley [edited by ameridan]
Part 1 – Firmware Update

photo courtesy of Victor Do
This is part one of a guide covering the steps required to install the ‘official’ Mazda upgrade to the CMU (what we used to call ‘the stereo’) to add Apple CarPlay and Android Auto functionality in your 2017+ FIAT or Abarth 124 Spider. This part of the guide covers updating the firmware in the CMU and must be carried out prior to steps described in part two. The version 70 firmware will run on your existing hardware quite happily so you can, for example, carry out the firmware update one weekend and complete the hardware install the following weekend.
A couple of caveats you should be aware of if you are contemplating this upgrade:
1. This update is only available if you have the 7” display. The 3” displays in some Classicas are not compatible.
2. FCA are being their usual useless selves and have not issued a FIAT / Abarth specific firmware version for this upgrade. This means we need to use a Mazda firmware for now. This has two consequences:
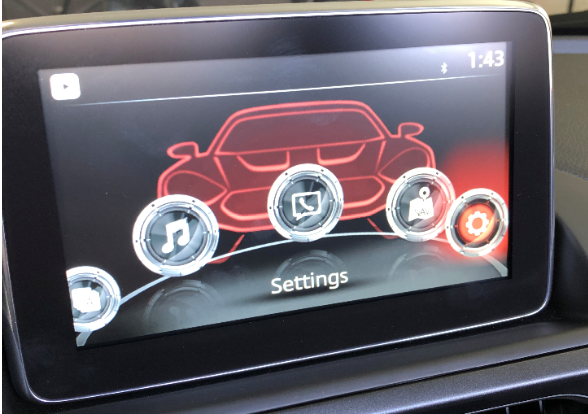
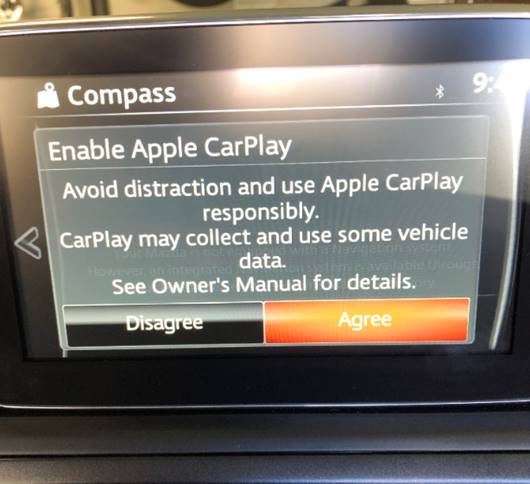
a. The startup and splash-screens and various other parts of the interface will reference Mazda rather than FIAT / Abarth (note the ‘Mazda’ icon in the screenshot above for example). Thankfully, this can mostly be corrected via Ameridan’s fantastic tweaks – we’ll cover this later.
b. The in-built navigation will stop working. The system does a lookup of your vehicle’s VIN as part of its security checks. Mazda firmware expects to see a Mazda VIN, FIAT firmware, a FIAT VIN. Because our cars present a FIAT VIN to Mazda firmware after the upgrade, the in-built NAV no longer works. Again, thanks to Ameridan, there is a workaround for this that we’ll cover, but you’ll also have access to Apple and Google maps, Waze etc after the upgrade so you may not care.
3. If you are taking your car in for service, insist that the dealership NOT attempt to update your CMU firmware – nothing good will come of it, and it will break your ability to install tweaks.
4. After the firmware update, the Bluetooth ID for the car changes to “Mazda”. I’ll see if we can fix that somehow, but for now, just be aware you will need to re-pair your phone with the car following the update.
5. Just to reiterate, you will not see CarPlay or the official Android Auto options by simply installing this firmware. Once the firmware recognizes the subsequent installation of the upgraded hub, that is when you will be presented with those options (decide beforehand which one you will be selecting, as the system might hiccup if you change your mind).
WHAT YOU WILL NEED:
To update the firmware, you will need:
· V70.00.100, which is Mazda’s certified upgrade.
· A blank FAT32 formatted USB stick – 8 to 16GB is recommended and please use a quality name-brand stick rather than the cheapest poc you can find. If the stick fails on you during the firmware flash, you could end up with a non-functional CMU.
· Ameridan’s id7 Tweak Package.
· Ameridan’s Abarth or Fiat Version 70 Boot Package and Version 70 NNG Fix Package OR, better yet 68wooley’s MazdaToFiatV70AIO package.
The download locations for the firmware files will be covered later.
USEFUL LINKS AND ACKNOWLEDGEMENTS
The information in this how-to has been pulled from a number
of sources and I hereby nod my hat to:
Ameridan and his fantastic blog and work on the All-In-Tweaks at https://21stcenturyfiat124spider.wordpress.com/blog
This is well worth checking out even if you never have any intention of doing the CarPlay / Android Auto update.
ASH8 for his how-to thread at https://mazda3revolution.com/forums/2014-2018-mazda-3-skyactiv-audio-electronics/230249-genuine-carplay-android-auto-all-here-now.html
I was inspired by rsmagee and TheSalamander – Fiat 124 CarPlay pioneers – in this thread: https://www.124spider.org/forum/26-electronics-audio-lighting/30666-carplay-up-running.html
The original Mazda All-In-One tweaks are at https://mazdatweaks.com/
ATTENTION – IT IS ESSENTIAL THAT THE FIRMWARE UPGRADE DESCRIBED HERE IS CARRIED OUT BEFORE THE INSTALLATION OF ANY OF THE NEW HARDWARE DESCRIBED IN PART 2.
In order for Apple CarPlay and Android Auto to be available, we have to upgrade our CMU’s to run the Mazda version 70 firmware (firmware is simply the software that controls the unit). Our Fiats and Abarths shipped with a Fiat / Abarth branded derivative of either version 56 (2017 and early 2018 cars) or version 59 (later 2018 and 2019 cars).
The version 56 firmware allowed tweaking of certain features via software developed by a group of enthusiasts – including things like enabling the touchscreen while the car is moving, changing background images and swapping FIAT logos for the Abarth Scorpion. Mazda, and presumably FIAT’s, lawyers got nervous about this as they considered some of tweaks to be bypassing safety features (obviously none of them had ever tried to use the command wheel to enter an address). As a result, starting with version 59 of the firmware Mazda blocked the ability to apply tweaks. FIAT started shipping 124’s with their derivative of version 59 firmware (59.00.524) mid-way through the 2018 model run, and subsequently 59.00.562.
Not to be beaten, the very clever developer id7, developed a patch (known as ID7) that allows the tweaks to continue to be installed on version 59 and later firmware, but only if the patch is installed BEFORE upgrading to version 59 firmware or later. As we’ll be upgrading to version 70 firmware, we need to install the patch before upgrading to retain the ability to apply tweaks. It is also this patch that will allow us to restore the built-in navigation function following the upgrade. As my car is a 2017 and shipped with the version 56 firmware, I was able to install the patch using the method described below. If you have a 2018 or newer vehicle with version 59.00.524 or 59.00.562 firmware already installed (or your dealer updated you to it during a service), there are two alternative methods of installing the patch:
- a very technician-type “Serial” method described at https://mazdatweaks.com/serial/ which is quite involved
or, you can downgrade your firmware to Mazda 59.00.502, which will then allow you to install id7 via USB tweak[EDIT 9/14/2020] >> this was based on bad info perhaps, because now I found this from Tristan-cx5:
You can only downgrade as far as 59.00.502 and from that version onwards, you have to do the serial access (www.mazdatweaks.com/serial) to install AIO tweaks via USB.
I haven’t tried either process, and the instructions below assume you are starting from version 56 firmware. You can check your firmware version on the CMU by going to:
HOME -> SETTINGS -> SYSTEM -> ABOUT -> VERSION INFORMATION


STEP 1 – DOWNLOAD REQUIRED FILES
We’ll start by downloading the required firmware files and Ameridan’s three tweak packages.
1. [Updated 7/19/2021, since the Hidrive source disappeared]
Find the 70.00.100 files @ https://mega.nz/folder/YWx3lCIT#6179hwSHeAaPeLF25wvlYQ and you DO NOT want to use the most recent versions, like 70.00.335, 70.00.352, or 74.00.230!

click to enlarge
2. Download: 2018 FIRMWARE CMU UPDATE PROCEDURE-WORLDWIDE.pdf (or get it here). This document is to serve as a guide, since it refers to version 59.00.502, rather than the version 70.00.100 that you will be using.
Then go to the folder relevant to your region of the world; NA N for North America, EU N for Europe, 4A N for Oceana. The following steps assume you’ve gone to the NA N folder – just swap in the corresponding files for other regions as appropriate.
3. Download the two version 70 files and the Mazda instructions PDF to your computer:
a. cmu150_NA_70.00.100A_failsafe.up (Don’t select 70.00.335 or 70.00.352!)
b. cmu150_NA_70.00.100A_reinstall.up (Don’t select 70.00.335 or 70.00.352!)
Download the files one at a time rather than use the ‘download all files’ options as the folder method compresses everything into a zip file which can corrupt the update (‘up’) files.
NOTE: If you wish to take the extra steps of testing the .up files prior to installation, the procedure for verifying the MD5 Checksum Hash, is called out in this pdf file.
NOTE: If you are OK with Mazda branded splash screens and backgrounds and have no desire to install any of the tweaks described on Ameridan’s blog or restoring the built in Navigation, you can skip ahead to “STEP 4 – UN-PAIR ALL PHONES AND PREP FOR FIRMWARE UPGRADE”.
Otherwise, proceed…
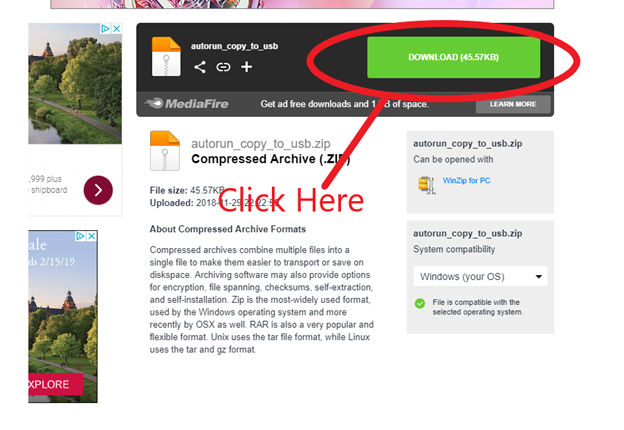
4. Download Ameridan’s ID7 Tweak Package and the MazdaToFiatV70AIO zip file from the following URLs respectively:
a. http://www.mediafire.com/file/0r6pzhongok9h0u/autorun_copy_to_usb.zip
b. http://www.mediafire.com/file/zj0cp690a7x5rq1/MazdaToFiatV70AIO.zip/file
At each URL, click the large light-green ‘download’ button, and no others (color may change though):
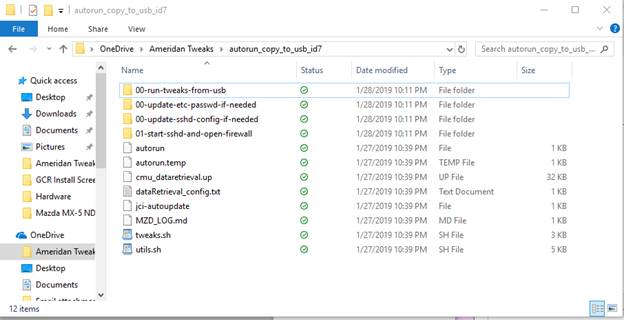
Unzip the contents of the zip files to folders on your computer. I put them in folders called Ameridan Tweaks/autorun_copy_to_usb_id7 and Ameridan Tweaks/MazdaToFiatV70AIO respectively:
STEP 2 – FORMAT YOUR USB DRIVE
1. Plug your USB stick in to your computer and back up any files on it you want to keep
for later – we are about to wipe it so you will lose any existing files you don’t back up.
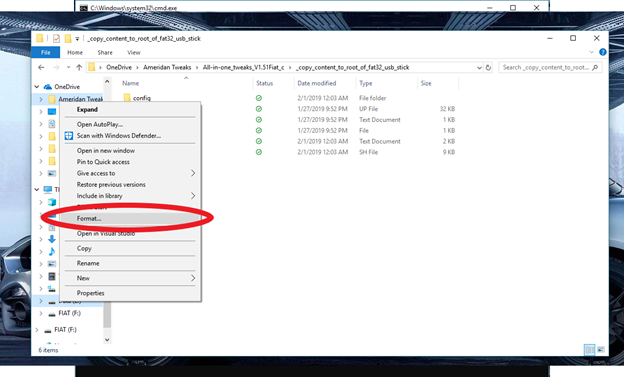
2. Format your USB stick as FAT32 – to do this, right click on the drive in Windows Explorer and select “Format”:
3. In the resulting screen, make sure the file system is set to FAT32 and enter a volume label (this is the label used to describe the drive in File Explorer). I set my volume label to “FIAT”. Click OK to begin the format and click OK on the warnings about losing any existing data on the drive.

STEP 3 – INSTALL ID7 PATCH
We’ll next install the ID7 patch on your CMU. This patch will allow us to replace much of the Mazda branding in the version 70 firmware and restore the built-in Nav function after we complete the firmware upgrade. If your car is currently on a version 59 firmware, you will need to follow the process described at https://mazdatweaks.com/serial/ The steps below assume you are on a version 56 firmware.
1. Copy the contents of the unzipped ID7 package (in forder “autorun_copy_to_usb_id7” on my computer) to your USB drive.

2. Safely eject your USB stick. We’re now ready to go to your car.
3. Turn off Bluetooth on any phones you have paired with your car.
4. Go to your car and unplug any connected USB cables and remove your navigation SD
card.
5. Plug in your USB stick.
6. Without touching any of the pedals, hit the start button once to put the car in to
accessory mode and turn the CMU on.
7. Switch audio source to FM.
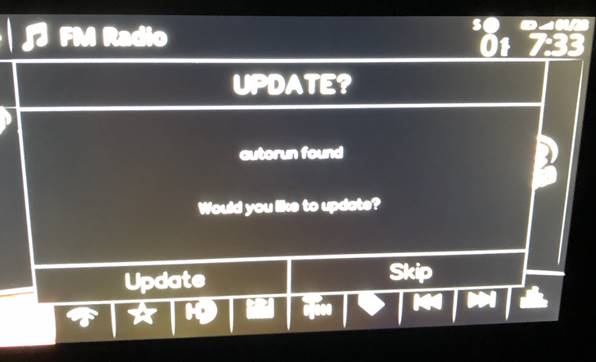
8. After a few minutes a screen will pop up asking if you want to select an installation
method. Use the touchscreen to click on Install.

9. You’ll then see a screen asking you to confirm you want to run the update. Click
Update.
10. After a minute or two, you’ll get a message saying the update is complete and asking if you want to reboot. Click reboot. When the screen goes blank, remove your USB stick.
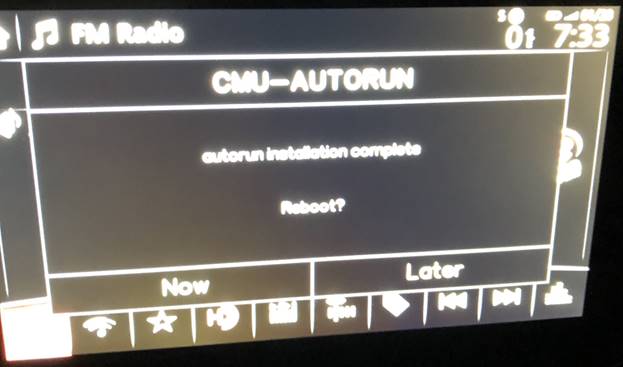
The ID7 patch is now installed. Go back to your computer.
STEP 4 – UN-PAIR ALL PHONES AND PREP FOR FIRMWARE UPGRADE
1. Un-pair all of the phones that you’ve linked to your car, in both your phone’s bluetooth menu AND THE CAR’S BLUETOOTH MENU before doing the update. YOU WILL NOT BE ABLE TO DO IT AFTERWARDS, and I’m unsure if a phone paired to ‘Mazda’ will still work once you switch it to ‘124 Spider’.
2. Also, it is recommended that large apps, like Speedometer, AA and CASDK, be uninstalled, and avoid reinstalling them until after you have installed the Mazda-to-Fiat version 70 tweaks, to insure sufficient memory is available for that tweak, especially if you are restoring the Navigation function.
STEP 5 – INSTALLING THE MAZDA VERSION 70 FIRMWARE
For the install of the version 70 firmware files, we’ll be following the official Mazda instructions. The process is very similar to the ID7 patch install we just completed. They are very clear with good screenshots so I’m not going to try and recreate them.
1. Plug your USB stick in to your computer and delete all existing files from it.
2. Copy the two update files to your USB drive:
a. cmu150_NA_70.00.100A_failsafe.up
b. cmu150_NA_70.00.100A_reinstall.up
3. Print off the Mazda instructions (CMU FIRMWARE UPDATE PROCEDURE.pdf). Read and familiarize yourself with them. There are thirty steps that must be followed in order.
4. Carry out the updates according to the Mazda instructions.
You’ll be installing the two files one after the other – the failsafe file followed by the main update file. The overall process will take about an hour – make sure you have enough time to complete it. Pay attention to the note about depressing the brake or clutch every 20 minutes during the install to prevent the CMU shutting down in the middle of the update.
Once the firmware upgrade is complete, we’ve done everything needed to support CarPlay and Android Auto.
STEP 6 – REPLACE ALL MAZDA STARTUP AND SHUTDOWN ANIMATIONS, CARPLAY ICONS AND BLUETOOTH PAIRING NAMING WITH FIAT / ABARTH EQUIVALENTS. ALSO RESTORES BUILT_IN (FIAT) NAVIGATION FUNTIONALITY.

photo showing Abarth logo courtesy of Victor Do
These last set of “tweaks” are optional, and only needed if you want to replace the Mazda startup and shutdown animations with Fiat or Abarth equivalents or if you want to restore the built in (Fiat) Navigation functionality.
As long as you didn’t skip Step 3, you can perform Step 6 at any time. You can also repeat the installation (#5 thru #9) to install one of the included tweaks that you may have previously skipped. To proceed:
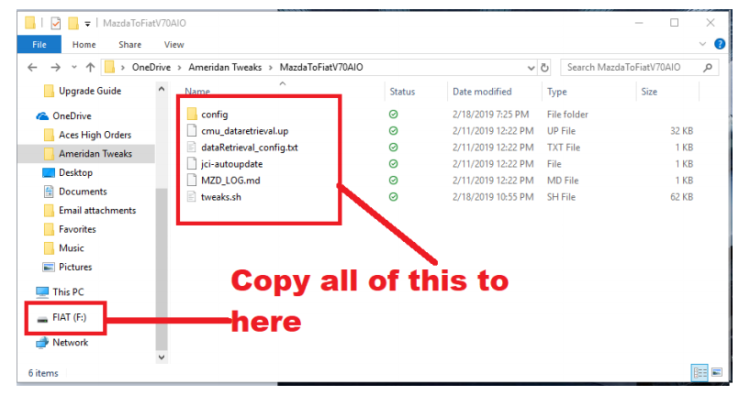
1. Plug your USB stick in to your computer and delete all the files on it.
2. Copy the contents of the unzipped folder (“Ameridan Tweaks/MazdaToFiatV70AIO” on my computer) to your USB Drive.
3. Safely eject your USB stick. We’re now ready to go back to your car.
4. The process of replacing the startup / shutdown animations on your car is the same as installing the ID7 package. Start by disabling Bluetooth on all phones paired with your car.
5. Go to your car and unplug any connected USB cables and remove your navigation SD card.
6. Plug in your USB stick.
7. Without touching any of the pedals, hit the start button once to put the car in to
accessory mode and turn the CMU on.
8. Switch audio source to FM.
9. After a few minutes a screen will pop up asking you to confirm the installation.
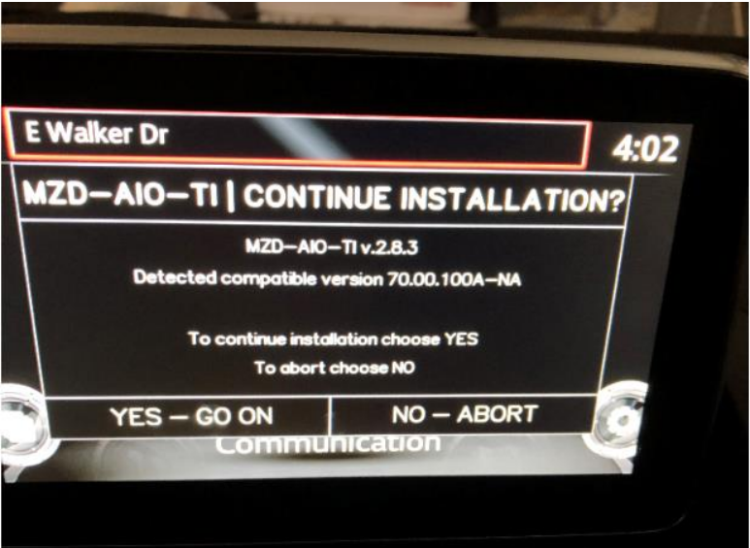 Click ‘YES’, and then you will be prompted with a series of questions asking what changes you wish to make:
- The first will ask if you want to use Fiat or Abarth logos and branding. Click on FIAT or ABARTH according to your choice – this will determine whether the later steps install Fiat or Abarth startup and shutdown animations and whether the Mazda CarPlay icon gets replaced with a Fiat or Abarth icon.
- Next, you will be asked if you want to replace the Mazda startup and shutdown animations. If you answer ‘YES’, the animations will be updated – this will take a moment to complete. If you answer ‘NO’, the system will jump to the next tweak. Note that even after installing this change, you may still see a Mazda screen briefly from time to time – particularly if you do a hard reboot of the system.
- Next you will be asked if you wish to replace the word ‘Mazda’ with ‘124 Spider’, ‘Abarth’, or ‘Fiat’ as appropriate throughout the system interface. If you answer ‘YES’, the system interface will be updated – this will take a moment to complete, but there still remains a ‘Mazda’ Bluetooth pairing, that hasn’t been figured out yet.
Note this should work for systems using UK, Australian and North American English, Italian, German, French (including Canadian French), Spanish and Dutch.
If you answer ‘NO’, the system will jump to the next tweak. - Next you will be asked if you want to replace the Mazda Icon in Apple CarPlay. This should result in an Abarth Scorpion or Fiat logo icon labelled ‘124 Spider’ being used instead of the Mazda icon in the CarPlay homescreen. If you answer ‘YES’, the icon will be updated – this will take a moment to complete. If you answer ‘NO’, the system will jump to the next tweak. Note that even after applying this change, the car will still be listed as ‘Mazda’ in your iPhone’s CarPlay settings.
- Next you will be asked if you wish to restore the OEM navigation functionality. If you answer ‘YES’, the navigation function will be restored – this will take several minutes to complete. During this process, depress and release the clutch or brake pedal to prevent the CMU being put in to sleep mode. If you answer ‘NO’, the system will jump to the next tweak.
- Next you will be asked if you want to change the vehicle’s Bluetooth ID from ‘Mazda’ to ‘124 Spider’. This is the name you will see when pairing your phone with the car. If you answer ‘YES’, the Bluetooth ID will be updated – this will take a moment to complete. If you answer ‘NO’, the system will jump to the next tweak.

- The final tweak you will be asked about makes a copy of your entire CMU system on your USB stick. In most cases, this tweak is unnecessary and should be skipped, but if you are trying to debug an issue or are simple curious, this could prove helpful. If you answer ‘YES’, the backup will be created – this will take up to 30 minutes to complete. During this process, depress and release the clutch or brake pedal every 10 minutes to prevent the CMU going into sleep mode. The backup will be written to config/full-backup on your USB drive. If you answer ‘NO’, the tweak installations will be complete.
10. A reboot message should appear. When the screen goes blank, remove your USB drive.
11. After rebooting, all your selected changes should be available. Note that under certain circumstances the Mazda logo may still briefly appear.
- Remember to re-pair your phone with the car.
12. If your Gracenote had already been updated to version 9 (or 12), you will have to upgrade it once again, as version 8 is installed as part of the Version 70 upgrade. See Ameridan’s article for the link and procedure at:
https://21stcenturyfiat124spider.wordpress.com/2018/10/16/gracenote-music-database-version-12-update/
13. If you have restored the OEM navigation functionality, put your navigation SD card back in the slot and start navigation. You should see maps launch as normal rather than the compass screen.
This is the end of the steps needed to upgrade the firmware. We can now move on to replacing the USB hub and cables, as described in part two of this guide.
14. If you are going to add the Speedometer tweak (use MZD-AIO 2.8.6+ , ensuring that the “Hide in Reverse” is enabled in StatusBar Speedometer Options), TheAmazingDave and 124Geek have modified the setInterval (function) code so that the status bar speedo works properly while in:
- reverse
- the Speedometer app screen
- the Fuel Usage app
- and when in either CarPlay or Android Auto mode.
Edit speedometer-startup.js with a text editor (not Office Word) in folder: _copy_to_usb\config\speedometer\jci\gui\apps\_speedometer\js
after compiling by choosing the appropriate block of code and pasting it in the setInterval (function) section.
JavaScript for Android Auto:
setInterval(function() {
    if (framework.getCurrentApp() === 'backupparking' || framework.getCurrentApp() === 'androidauto') {
      $('#SbSpeedo, #Sbfuel-bar-wrapper').addClass('parking');
      $('#SbSpeedo .SbVal1, #SbSpeedo .SbVal2').fadeIn();
    } else if (framework.getCurrentApp() === 'speedometer') {
        $('#SbSpeedo, #Sbfuel-bar-wrapper').addClass('parking');
        $('#SbSpeedo .SbVal1, #SbSpeedo .SbVal2').fadeIn();
    } else if($('#SbSpeedo').hasClass('parking')) {
        $('#SbSpeedo .SbVal2').fadeOut()
        $('#SbSpeedo, #Sbfuel-bar-wrapper').removeClass('parking');
    }
  }, 1000);
JavaScript for CarPlay:
setInterval(function() {
    if (framework.getCurrentApp() === 'backupparking' || framework.getCurrentApp() === 'carplay') {
      $('#SbSpeedo, #Sbfuel-bar-wrapper').addClass('parking');
      $('#SbSpeedo .SbVal1, #SbSpeedo .SbVal2').fadeIn();
    } else if (framework.getCurrentApp() === 'speedometer') {
        $('#SbSpeedo, #Sbfuel-bar-wrapper').addClass('parking');
        $('#SbSpeedo .SbVal1, #SbSpeedo .SbVal2').fadeIn();
    } else if($('#SbSpeedo').hasClass('parking')) {
        $('#SbSpeedo .SbVal2').fadeOut()
        $('#SbSpeedo, #Sbfuel-bar-wrapper').removeClass('parking');
    }
  }, 1000);
Also change this section of tweaks.sh install script, so that the compass will not be 180 degrees out-of-phase, by pasting in this replacement:
# change compass rotating depending on if NAV SD card inserted or not
if [ ! -d /mnt/sd_nav/content/speedcam ]
then
  sed -i 's/var noNavSD = false;/var noNavSD = true;/g' /jci/gui/apps/_speedometer/js/speedometer-startup.js
  log_message "===    Changed compass rotating, because no NAV SD card is inserted     ==="
fi
Save both files.
Copy contents of _copy_to_usb folder to USB drive.
ADDITIONAL TWEAKS
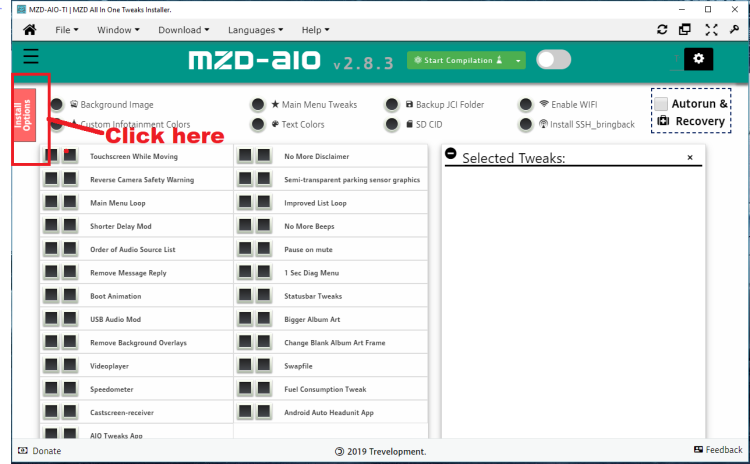
With Version 70 firmware, you are advised to use the MZD-AIO installer, version 2.8.6, along with the “Apps to Resources” install option, for installing additional tweaks, as it adapts to changes in the Home page that accommodate CarPlay and Android Auto, as well as making better use of the available memory in the CMU by installing to the resources partition, rather than the almost-full root partition.
[added 10/1/2023 > You may have to disconnect your PC from the internet to get the program to run properly]
Part 2 – Hardware Install
photo courtesy of Victor Do
This is part two of a guide covering the steps required to install the ‘official’ Mazda upgrade (at your convenience) to the CMU (what we used to call ‘the stereo’) to add Apple CarPlay and Android Auto functionality in your 2017+ FIAT or Abarth 124 Spider. This part of the guide covers installing necessary replacement hardware in your dashboard.
The first part of this guide covers updating the firmware in your CMU and must be carried out prior to the steps described in this part of the guide.
WHAT YOU WILL NEED:
For this part of the install, you will need:
- Replacement USB cables: Mazda Part C922-V6-605A
- Replacement USB HUB: Mazda Part TK78-66-9U0C
- Metric socket set with 10mm socket and 200mm / 8” extension.
- Cable ties (approximately 10)
- Scissors
- Flat head and Philips screwdrivers.
- Foam Tape
- Trim removal tools
I ordered the required USB hub and cables (with foam tape) on Amazon at https://amzn.to/2GRquAO – price at time of writing was $163.
The foam tape is used secure the excess USB cable behind the dash and to prevent it rattling, as the same replacement USB cables are used for other Mazda vehicles, all of which are significantly larger than the 124 / MX-5 and need a longer cable run.
Trim removal tools simply make it less likely you’ll damage the bits of trim that need to be removed to access the CMU. I have this kit: https://amzn.to/2V71sBw
You can also use a flat headed screwdriver with some electrical tape over the head (to protect the trim) for anything we’d be using a trim tool for.
USEFUL LINKS AND ACKNOWLEDGEMENTS
The information in this how-to has been pulled from a number of sources and I hereby nod my hat to:
Ameridan and his fantastic blog and work on the All-In-Tweaks at https://21stcenturyfiat124spider.wordpress.com/blog
This is well worth checking out even if you never have any intention of doing
the CarPlay / Android Auto update.
ASH8 for his original Mazda how-to thread at https://mazda3revolution.com/forums/2014-2018-mazda-3-skyactiv-audio-electronics/230249-genuine-carplay-android-auto-all-here-now.html
I was inspired by rsmagee and TheSalamander – Fiat 124
CarPlay pioneers – in this thread: https://www.124spider.org/forum/26-electronics-audio-lighting/30666-carplay-up-running.html
The original Mazda All-In-One tweaks are at https://mazdatweaks.com/
In order to support CarPlay and Android Auto, the USB hub (the little area of the dash where you plug in USB cables and your navigation SD card) needs to be replaced along with the cables connecting the CMU to the USB hub. The replacement hub can be identified by the phone icon next to the top USB ports – you use this port to connect your phone if you want to run CarPlay or Android Auto. That port is also capable of charging your USB device @ 2.1 amps.
The photos below show the replacement parts we will be fitting including the foam pads and cable ties my parts kit included.
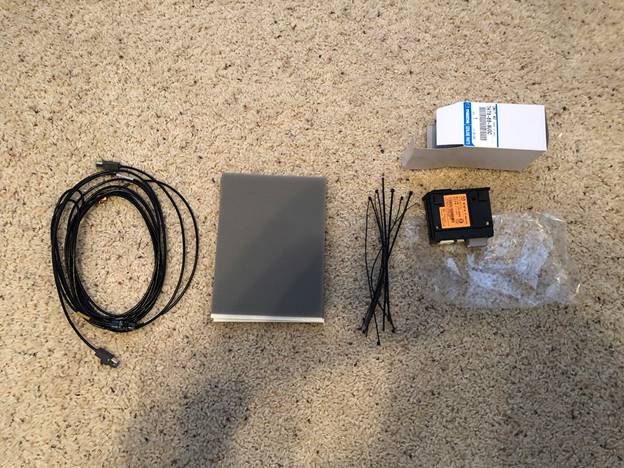

There are two USB cables in the kit, one with a gray and blue plug at one end and a brown plug at the other end, and one with a gray and green plug at one end and a black plug at the other end. Make sure you have both cables.
The foam padding comes already separated into 30mm by 100mm sections:
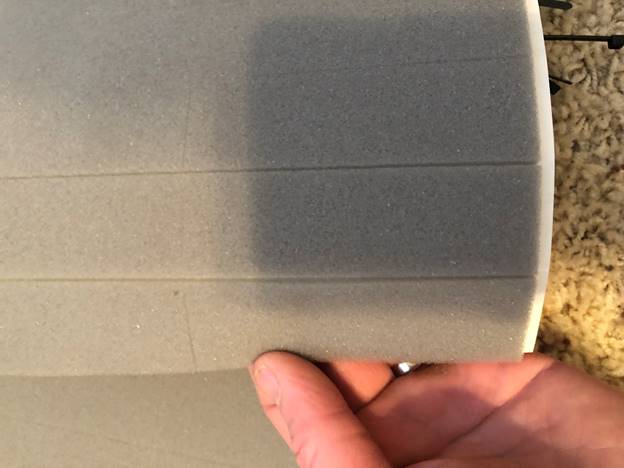
The following diagram shows the routing of the cables we will be installing:

In order to be able to access the back of the CMU and to replace the hub unit, we need to remove a number of pieces of trim. This will seem intimidating at first, but in reality, it’s pretty straight forward. Most pieces simply pull off and clip back on.
A full list of shop manual instructions for each piece of trim to be removed, as well as the Mazda cable installation instructions and videos of an installation can be found at:
https://my.hidrive.com/share/hsodpqja.l#$/Mazda_Firmware/-CarPlay-AndroidAuto%20INSTALL
That link no longer seems to be available, so I’ll post this link to the Miata workshop manual as an alternative, to be used in conjunction with the following list of trim pieces that need to be removed in the following order:
1. Passenger Side Scuff Plate
2. Passenger Side Front Side Trim
3. Shift knob
4. Shift Panel, Console Panel and Upper Panel (these are listed separately in the
official Mazda instructions, but can actually be removed as one piece)
5. Parking brake boot panel
6. Passenger side A-pillar trim
7. Passenger side lower trim
8. Rear console
9. Front console and Front Console Panel – again, these are listed separately in the
Mazda instructions but can be removed as one piece.
10. Center Panel No. 2
11. Meter (Gauge Cluster) Hood
12. Center display (this is the display screen and actual CMU unit).
The following diagram shows the location of each item:

Overall, it took me roughly two and half hours to complete the installation, including stopping to take pictures.
Eddie Clark also posted a video of his CarPlay installation on his YouTube Pistons and Petrol channel:
STEP 1 – TRIM REMOVAL
1. Start by lowering the convertible top and windows. While this isn’t entirely necessary, I find it much easier to work with the interior of the car as exposed as possible.
2. Make sure your car is parked somewhere where you can fully open both doors.
3. Designate a space for your removed trim pieces. I laid out a packing blanket on my garage floor to put the pieces on. You may also want to put a towel or similar down on the floor beside each door to kneel on as you will be working in those areas.
4. Use a 10mm socket to disconnect the negative terminal of your battery. Note, the black plastic piece on the terminal is rather fragile – do not strike or pull on it:

5. Move to the passenger side door and remove the scuff plate. This is just attached
with clips. Start at one end, slide your hand underneath, pull up to release the clips at that side and slide your hand forward until all the remaining clips release:
The picture below shows the underside removed piece with the location of the clips:

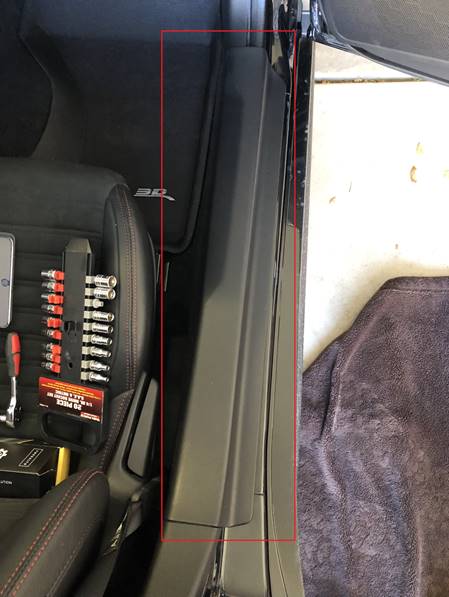
6. Remove the passenger front side trim. This is the piece in the foot-well shown in the
following picture.
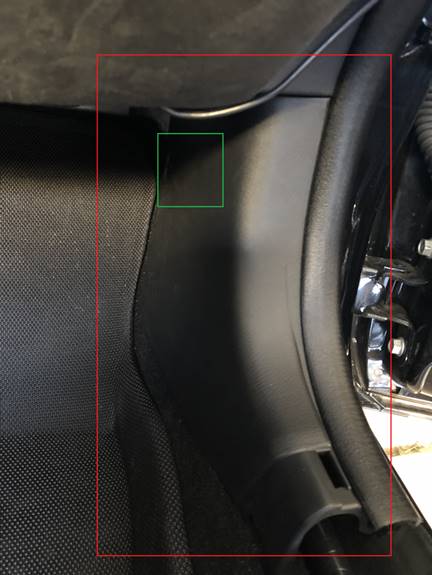
The piece is secured by a pop-clip roughly where the green square is. Use a trim tool or flat headed screwdriver to pop up the center section of the clip and then pull the whole clip out.

Put the clip somewhere safe. Note, the center pin is only loosely attached to the outer section – be careful they don’t become separated and get lost.
Remove the seaming strip – this just pulls off:

You can now remove the trim piece by pulling it backwards towards the rear of
the car. It is secured by a single clip that will just pop out.
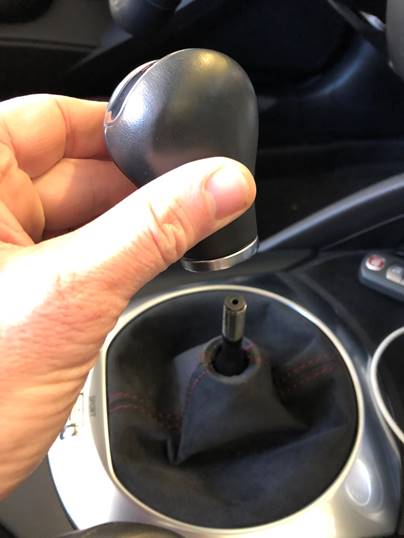
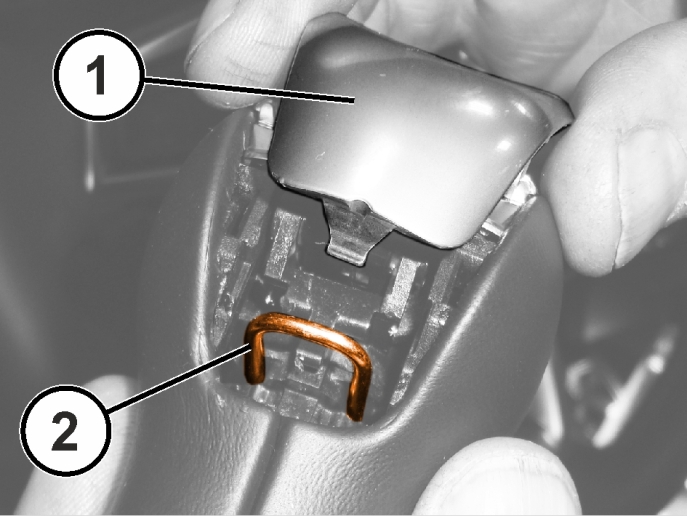
7. Remove the shift knob. On the manual cars, it simply unscrews – if you have an
automatic, you’ll need to pop the retaining clip (refer to Ameridan’s automatic shift knob article for a detailed comment regarding expending special attention to the linkage parts within, although it’s possible to do it without removing the shift knob. Just move shifter into drive and you will have space to rotate the center piece 90 degrees. You will have enough space to get the job done).
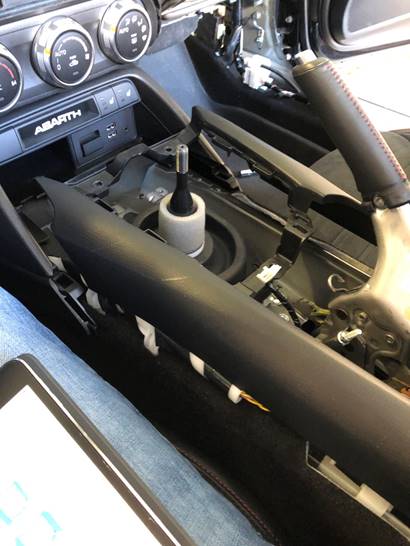
8. Next, remove the center console. This is listed as three separate pieces in the Mazda
instructions, but it actually comes out as a single piece – this includes the trim surrounding shifter, the rubber cubby space under the AC controls and the piece containing the command knob controls:
The trim is held in by clips that just pop out. Start by lifting the silver bezel of the shifter surround at the rear passenger side. Once the first clip pops, work your way rearward down the passenger side, around the back of the trim, and up the driver’s side until all
the clips release (lift the rear cubby lid to get it out of the way).
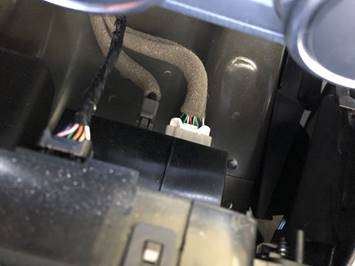
Once all the clips are released, gently lift the trim and look underneath – there are two (three, if automatic) cables under the command knob unit that need to be released. DennyA reports that because there are other cables taped to the automatic shift console, it’s much easier to leave the connections in place, slide the trim up over the shifter, and just rest the attached trim on the driver’s-side floor.
If unplugging though, push the retaining clips on the plugs in and slide them out. For some reason, I found it difficult to locate the retaining clip on the larger of the two plugs. The following picture shows where it is:

Once the cables are unplugged, slide the trim up over the shifter and remove from the car.
9. Remove the parking brake boot panel. This is held in by two clips – one at the front
and one at the rear. I used a trim tool to pop the clips out:


Once both clips are released, slide the boot and trim up and over the brake lever to remove:
10. Remove the passenger side A-Panel trim – this is the panel running up the side of the windscreen. To start, use a trim tool or flat headed screwdriver to remove the piece highlighted below:

This piece should pop out by prying it backwards towards the rear of the car. Once it is removed, remove the rest of the A-Pillar trim by starting at the top and pulling towards the center of the car. Work your way down the trim as each clip pops out in turn. Note that there is a tweeter speaker attached to the trim. Rather than try and release the speaker cable (which is a bit tricky), I just laid the disconnected trim on top of the dashboard. The following picture isn’t very clear (lots of reflection from the windscreen), but it’s taken from outside the car and shows the trim lying on the dashboard:
11. Next remove the passenger side lower trim:

This is held in by a single 10mm bolt and a series of clips that just pop out. The bolt is in the passenger foot-well:

Once the bolt is removed, the trim can be removed by starting at the passenger
side and pulling back towards the rear of the car, releasing each clip in turn.
12. Remove the rear center console – this includes the trim surrounding the transmission tunnel and the rear cubby. Start by removing your cup holders if you have them. Next, use a Philips screwdriver to undo the two screws just in front of the shifter:

The panel is now held in by pop out clips. Slide your hands under each side of
the front of the panel and lift it upwards to release the clips. Slide your
hands backwards down each side of the panel popping each clip out in turn until
panel is released:

Remove the panel from the car.
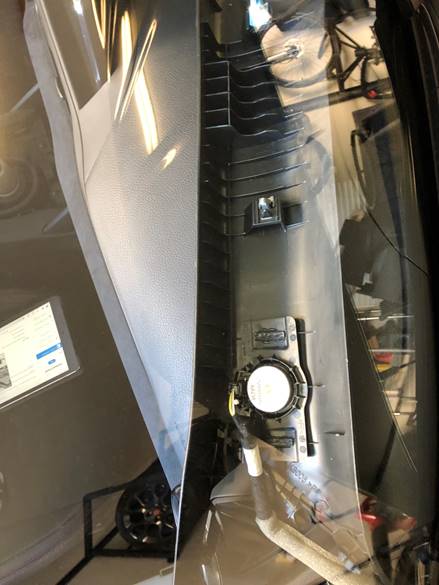
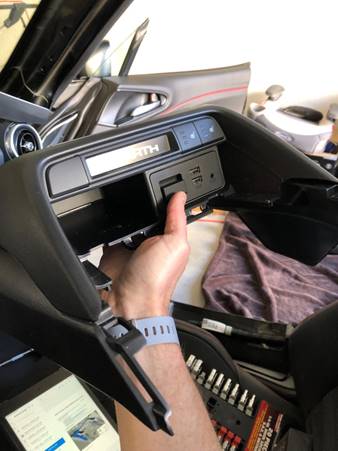
13. Remove the front console and front console panel. The Mazda instructions described this as a two-step process, but I found both pieces came out as a single unit. This is
the existing USB hub, the panel with the seatbelt and airbag warning lights,
the seat heater buttons and the surrounding trim:
Put one hand on either side of the trim surround and pull back – the entire unit should release as one:
Note that there are three cables on the back of the unit that need to be released. Push down on the locking tab of each and slide it out.
In the picture above, the foam wrapped cable with the small black plug will be
replaced with our two new cables. The cables with the larger black and white
plugs will be reused. Take note of which cable is which before moving on. We’ll
be replacing the USB hub in the removed unit shortly so keep it handy.
14. Remove ‘Center Panel No. 2’. This is the panel with the hazard warning lights switch and central air vent in it. It’s simply held on with pop out clips. I found it easiest to start
at the passenger side of the panel and work my way back to the center of the
car popping out each clip in turn:

There is a single cable for the hazard warning lights that needs to be released
on this piece.
15. Pop out the meter (gauge cluster) hood. Note, you don’t need to actually remove this, just pop it out and move it to the side far enough that we can get access to the CMU.
Start by lowering the steering wheel as far as possible. You can then pop the
hood out by pulling it straight back towards the rear of the car. It is held in
by two clips immediately on the steering wheel side of each air vent. Once
released, move the hood rearwards and towards the driver side of the car, out
of the way of the CMU:

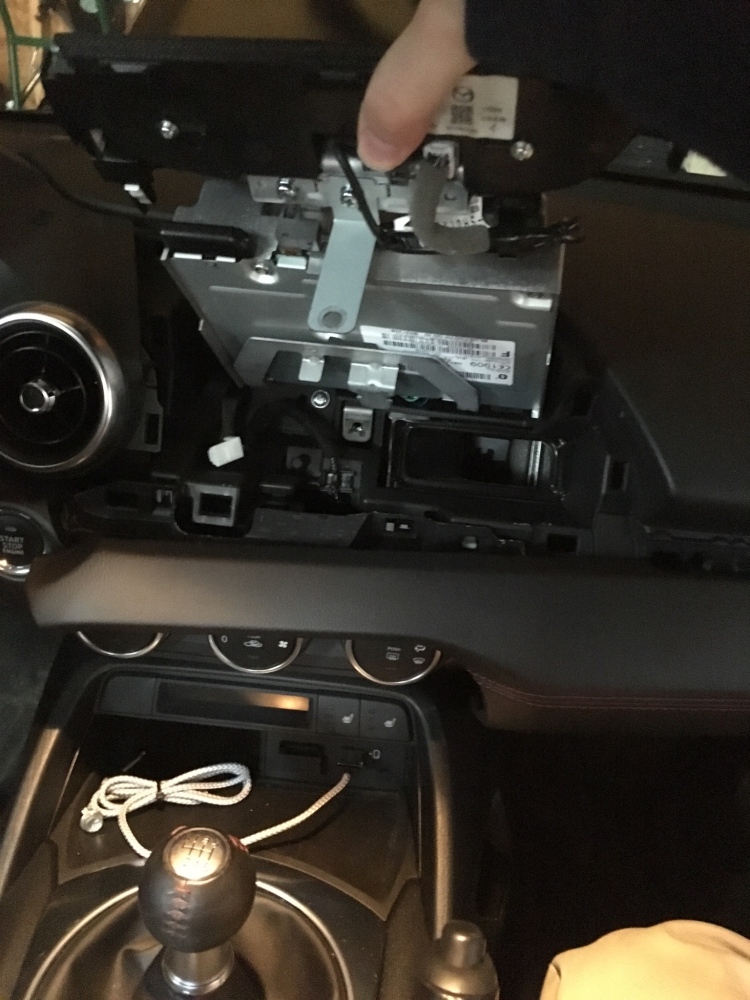
16. Remove the display screen and CMU. This is attached with a single 10mm bolt:
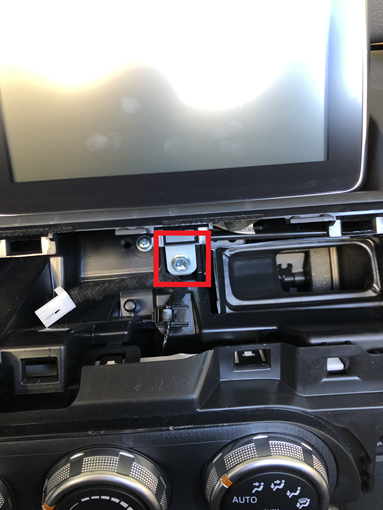
Once the bolt is removed, pull the unit back to release:

There are five cables on the back of the unit that need to be released. The cable with the black and green plug will be replaced by our new cables. The other cables will be reused. Pay attention to which cable comes out of which socket as you are releasing each.
We have now removed all necessary trim pieces.
STEP 2 – USB HUB REPLACEMENT
We’ll now replace the original USB hub in the front console with our new unit.
1. Separate the front console trim from the rest of the unit by pulling it backwards until
the retaining clips release:

2. Remove the airbag / seatbelt warning light unit by undoing the two Philips screws on
each side:

3. Pop out the old USB Hub by pushing down on the 4 retaining tabs, one at a time.
Slide the old unit out and then slide the new unit in in its place. (Sorry – I
somehow forgot to take pictures of this).
4. Once the new unit clicks in to place, reassemble the front console by screwing the
light panel back in place and clicking the trim back on.
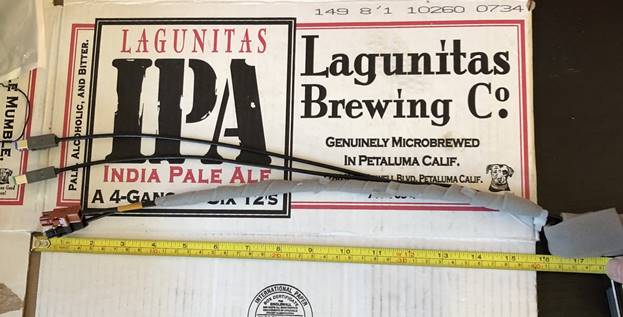
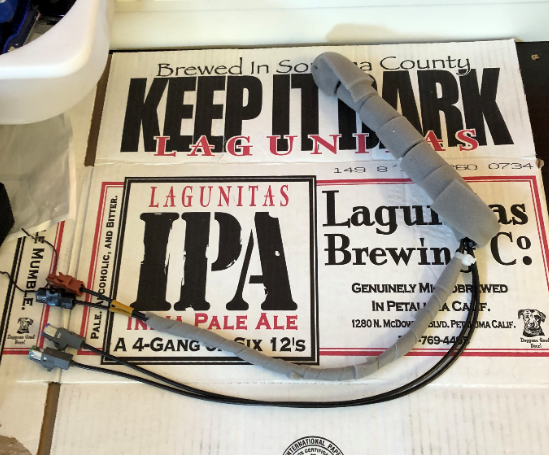
STEP 3 – USB CABLE PREPARATION
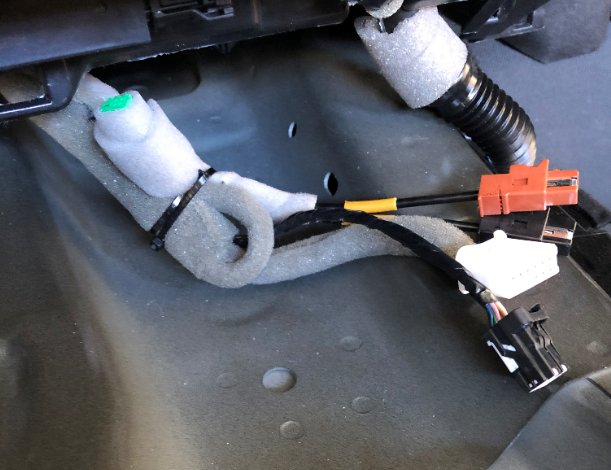
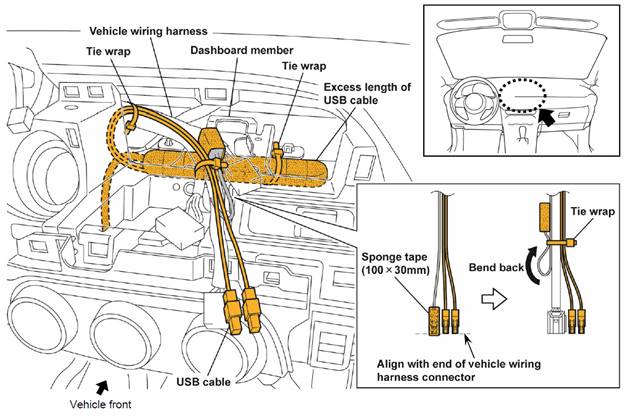
We’re now going to prepare the USB cables for installation by lining up the plugs on each cable, measuring out the required run, and tidying up the excess cable with cable ties and foam. The Mazda instructions provide the following diagram showing what we are trying to do:
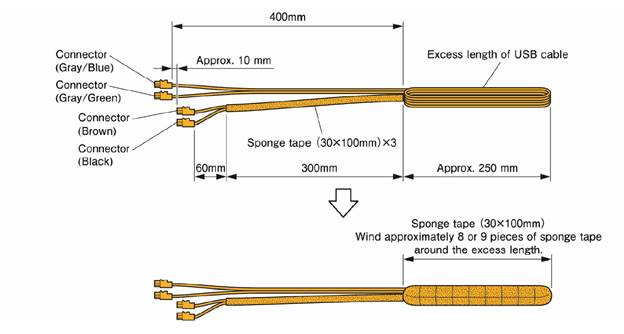
The measurements in this are pretty good. I found by following these I had just enough cable to work with without large amounts of excess in the way as I was reinstalling everything. My prepared cables looked like this:
STEP 4 – USB CABLE ROUTING
1. Move your prepared USB cables to the car.
2. Route the end of the cables you wrapped in foam tape (with the black and brown
connectors) from the top of the dash down to the bottom:

I found there was enough of a gap in the area shown to be able to route the cables down quite easily:
3. Once you have the cables routed, align the new USB cables with the existing cable
(black plug with foam wrapped cable), wrap the existing plug with foam so it
doesn’t rattle against anything, bend it back out of the way, and attach the
new cables to the existing wiring harness with a cable tie:

4. Tuck the excess USB cable that you wrapped in foam under the upper dashboard member:
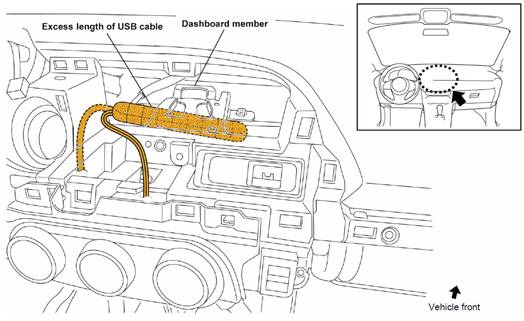
Secure the excess cable to the dash member with a cable tie:

5. As with the lower USB cables, align the new upper USB cables with the existing
cable, wrap the existing cable in foam, bend it back out of the way and secure
the cables to the existing wiring harness with a cable tie. :

6. Secure any excess length of the new USB cables to the dash member with a cable tie. I
didn’t grab a photo of this, but you can see it in the wiring diagram above.
STEP 5 – RECONNECT USB HUB AND CMU
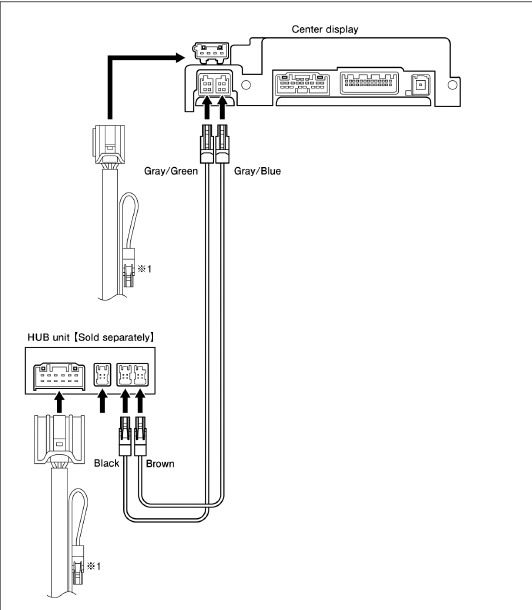
1. Place the CMU / display unit and front panel containing the new USB hub close enough to their respective connectors to be able to plug them back in, but do not
fully reinstall the units just yet.
2. Connect the USB hub and CMU according to the following diagram. Any cable not on this diagram should be replaced in the plug it was originally removed from. One of those discreet connections is the GPS antenna cable, that has caught many by surprise by not getting plugged back in in securely (audible click of the connector latch), and not realized until everything is buttoned up and they’re on a test drive (or perhaps a few weeks later), wondering why the Navigation isn’t working. There are two additional cables that need to go back in to the CMU, and a cable for the airbag /seatbelt warning lights in the front panel. Each plug will only fit in the socket it is intended for, but double-check that each have been clicked into place.

3. Once everything is plugged in, reconnect the negative terminal on your battery and
push the start button once to put the car in accessory mode. Plug your phone
into the new USB socket with the smartphone icon and confirm CarPlay or Android
Auto starts up (make sure you are running iOS 12 on your iPhone for the best experience.
I believe on Android phones you may need to download an app to enable Android
Auto, but I’m not familiar enough with it to say for sure):
- If everything starts up – congratulations, the install is complete.
- You have a choice between AA and CarPlay. Don’t experiment, but rather decide which will it be. If AA has been selected, DON’T UNCHECK THAT BOX! There seems to be a glitch whereby you won’t be able to get AA working again if AA has been de-selected, requiring you to reinstall the firmware. Not sure if CarPlay behaves the same, or not.

- If there are any problems, double check to insure you have plugged the new USB cables in to the correct sockets securely, and try again.
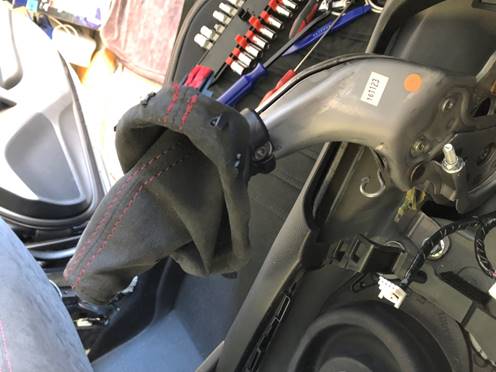
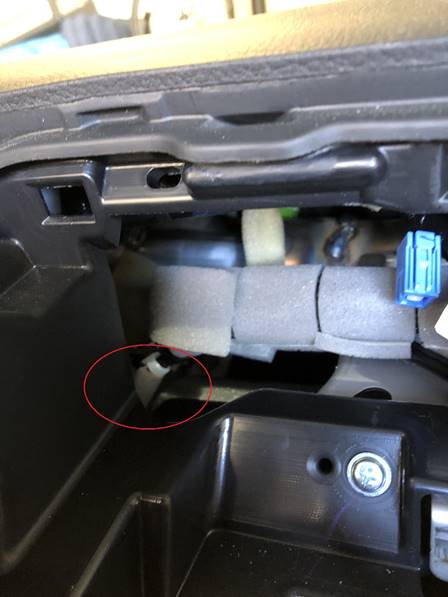
- Switch off the car by hitting start twice, and then button everything back up by reversing the trim removal instructions, paying attention to the CMU isolator ⇓ that may be hiding on your floor mat…
Chances are very good that the anti-rattle isolator that slides onto the tab at the rear of the CMU will detach itself while sliding the CMU out of the DIN slot. Just be aware of this as you are assembling the CMU back into position.
courtesy of poniliu

courtesy of anderml
Switching to Apple CarPlay™ with Version 70+ firmware
source: Mazda6 web owner’s manual, with ameridan’s edits/corrections

Switching to Apple CarPlay™
Connect the iPhone® by inserting the Apple®-compatible connector cord to the USB port indicated by the ![]() mark.
mark.
-
When you switch your iPhone® connection from Bluetooth® to the vehicle’s USB port, the system switches to Apple CarPlay™. The applications which were being used via Bluetooth® connection can be used continuously. However, the available functions of the applications using Bluetooth® connection and those on Apple CarPlay™ may differ.
-
If the iPhone® is connected to the USB port not indicated by the
 mark, the system operates in USB mode instead.
Display of Apple CarPlay™ Screen
Use any of the following methods to display the Apple CarPlay™ screen in the center display.
-
Select
 on the home screen.
 -
Long press
 on the commander switch panel.
 -
Select
 on the home screen, and select
  from the Applications screen.
Apple CarPlay™ home screen

The icons and icon positions displayed on the Apple CarPlay™ home screen may differ depending on the connected iPhone® and iOS version.
|
No. |
Icon |
Explanation |
|---|---|---|
 |
Icons representing apps installed on the connected iPhone® |
Launches the Apple CarPlay™ application. (Refer to the help information available with each application for the method of using each application.) |
 |
 |
Switches to the Mazda/Fiat Connect home screen. |
 |
 |
Displays the Apple CarPlay™ home screen. |
Convenient Ways to Use Apple CarPlay™
|
Item |
Operation method |
|---|---|
|
Activating the voice recognition function (Siri®)*1 |
Activate Siri® using any of the following two methods to operate Apple CarPlay™ by voice.
|
|
To display the Now Playing screen |
When music is playing in Apple CarPlay™ and a screen other than the Now Playing screen is being displayed, press |
|
To display the MAP screen |
When using map route guidance in Apple CarPlay™ and a screen other than the MAP screen is being displayed, press |
|
To return to Mazda/Fiat Connect screens, including Navigation |
Press and hold |
 on the commander switch panel to display the MAP screen.
*1 The voice recognition function of Mazda/Fiat Connect cannot be used while Apple CarPlay™ is connected.
To End Apple CarPlay™
To end Apple CarPlay™, disconnect the Apple®-compatible connector cord from the USB port.
Switching to Android Auto™ with Version 70+ firmware
source: Mazda6 web owner’s manual, with ameridan’s edits/corrections

How to use the Android Auto™ mode
Insert an Android™ Smartphone-compatible connector cord into the USB port indicated by the ![]() icon to connect the Smartphone.
icon to connect the Smartphone.
-
When you switch your Android™ Smartphone connection from Bluetooth® to the vehicle’s USB port, the system switches to Android Auto™. The applications which were being used via Bluetooth® connection can be used continuously. However, the available functions of the applications using Bluetooth® connection and those on Android Auto™ may differ.
-
If the Android™ Smartphone is connected to the USB port not indicated by the
mark, the system operates in USB mode instead.
Display of Android Auto™ Mode Screen
Use any of the following methods to display the Android Auto™ mode screen in the center display.
-
Select
 on the home screen, and select
  from the Applications screen.
 -
Select
 on the home screen.
 -
Press and hold
 on the commander switch.
Android Auto™ mode home screen

The media displayed on the Android Auto™ home screen may differ depending on the use conditions and version of the connected Android™ Smartphone.
|
No. |
Icon |
Explanation |
|---|---|---|
|
- |
Displays the use history of each application. The displayed contents differ depending on the application that has been started and its status. |
|
 |
Switches to the map application. |
|
 |
Switches to the call mode. |
 |
 |
Displays the Android Auto™ home screen. |
 |
 |
Switches to the Music application. |
 |
 |
Switches to the Mazda Connect home screen. |
Convenient ways to use Android Auto™ mode
|
Item |
Operation method |
|---|---|
|
Operation using voice recognition*1 |
Any of the following methods can be used to start the voice recognition mode and operate Android Auto™ by voice.
|
|
To display the Now Playing screen |
When music is playing in Android Auto™ and a screen other than the Now Playing screen is being displayed, press |
|
To display the MAP screen |
When using map route guidance in Android Auto™ and a screen other than the MAP screen is being displayed, press |
|
To return to Mazda/Fiat Connect screens, including Navigation |
Press and hold |
*1 The voice recognition function of Mazda/Fiat Connect cannot be used while Android Auto™ is connected.
To End Android Auto™
To end Android Auto™, disconnect the Android™ Smartphone-compatible connector cord from the USB port.

Grazie Per la tua guida dettagliata.
ho un Problema non ho fatto il PASSAGGIO 6, e ho istallato il modulo hardware senza aver fatto questo passaggio , posso farlo successivamente?
LikeLike
Good question. I reworded my article to comply with the answer:
LikeLike
Hello,
Just starting with my new Fiat 124 Spider 2017, I am very interested by Carplay integration. Your tutorial is very complete and detailed. Thank you for sharing this good guideline!
Unfortunaltely your first link to 70.00.100 on mega site is empty of file (I am looking for this version for EU N, I am currently in 56.00.530 EU N). Where can I find this version ? Do you propose another network host ?
Regards
Pipo
LikeLike
I don’t have those files, so you’ll need to search harder. Sorry.
LikeLike
puoi scrivermi su fanclub124spideroffical su facebook, contatto diretto ho bisogno di te
LikeLike
Scroll a few comments back to my reply, link still works.
LikeLiked by 1 person
I cannot understand if , in order to use Android auto connecting the phone by wire, the hardware mod has to be carried out, or if it could be done just following step 1 only (software mod). Could somebody please explain me ? Thank you so much in advance for your help!
LikeLiked by 1 person
Officially, Android Auto requires that EVERY step be carried out in the specified sequence. What you might be referring to is the Android Auto tweak, but that has nothing to do with Step 1, but rather is installed using https://mazdatweaks.com/ if your firmware is tweak-able.
It functions reasonably well, but don’t expect the same integrated performance as the official version.
LikeLike
Thanks for a great guide!
I was wondering if I install the ID7 patch, does it allow me to update to a higher stock Fiat firmware version, without jumping to Mazda 70, and retain the ability to jump to 70 later if I want to proceed? Or must the patch always be followed by the jump straight to Mazda 70 to be sure of being able to do so safely later?
My second question is whether it is possible, or worth it, to perform the patch and then go to the Mazda firmware, without changing the physical unit, retaining the stock Fiat one? What features/tweaks/etc are provided with just the Patch+Mazda firmware+tweaks, without replacing the CMU? Does doing it this way prevent installing a Mazda unit later on, or can it be done in any order?
Thanks a lot for any guidance, and for the guide and tools. Cheers!
LikeLike
1. Installing the patch will enable the ability to tweak, as long as you stay below 70.00.100.
2. If you aren’t going to replace the hub, just do the patch, and then install the tweaks you want on top of your current firmware (I’m still on 56.00.521 with no issues). You can always upgrade at a later date, if you want CarPlay.
LikeLike
I installed the Mazda -based Carplay upgrade back in 2020 with no troubles for 3 years. Until today. On first car start, screen displayed “No Carplay Device Detected”. On all car starts since, not even that message. It’s still on my phone but the car doesn’t detect it. Has this been experienced by anyone else?
LikeLike
September 2023 installed the patches and updates prior to installing car play module. Huge thanks to everyone who had a part in putting this together and keeping it accessible.
– 2017 Classica in San Juan, PR
LikeLiked by 1 person
Regarding MZD-AIO, I added a note:
You may have to disconnect your PC from the internet to get the program to run properly.
LikeLike
Thank you for such a detailed explanation of the process, but I tried all of the links in the comments and I was not able to find one that was still active for the upgrade from 56 to 70. I just bought my 124 Abarth this year and my retrofit kit is on the way now. Does anyone live in SoCal and still have the software uploaded that I can use?
LikeLike
Let me describe my implementation history:
1. Implemented ID7 in 2019
2. Upgraded from 56 to 59 EU in 2019
3. Used All-in-One-Tweaks in 2019
4. After all that Fiat Navi did not work anymore in 2019
5. De-activated all All-in-One-Tweaks to get more space (today) with USB
6. I followed your instructions and upgraded from 59 to 70 (today)
7. Tried with USB to run MazdaToFiatV70AIO. I gave up after 15 minutes. Nothing happened.
Why do the tweaks don’t start on USB anymore ? I feel lost. What can I do ?
LikeLike
5. De-activated ALL...
First of all, you don’t de-activate tweaks – what you are actually doing is restoring back to (close to) the original condition. I also clearly state that you should never uninstall ALL.
My guess is that you somehow messed up the ID7 when you did this, which of course means that you can’t tweak via USB. You probably should have reinstalled ID7, as stated in the instructions, prior to installing v70 (and you didn’t need to make more room anyways, because you were installing a new version of firmware, which overwrites all but the ID7).
You may have to start over using the serial method.
LikeLike
Thank you for your prompt reply.
By the way I tried to install your new ID7 before I upgraded to 70. It failed. I guess because I was already on 59. My thought was that if I could open the All-in-One-Tweak and do settings, the ID7 is installed.
OK understood, I need to go the serial way 🙂
LikeLike
By the way, what version of 59 did you install? I’m not aware of any Fiat v59 available; only Mazda, which is probably why the Nav stopped working. Also, v59 after 59.00.502 will corrupt the ID7. If you would have followed my instructions, you would have avoided these issues.
LikeLike
Yes it was 59.00.502 !
LikeLike
Finally I did the serial tweak on the MZD EU 70.00.100 and all works fine. Also the AIO 2.8.6 and then after the MazdaToFiatV70AIO tweaks. Thank you for the excellent documentation and guideline !
Another question: My original FIAT SD card for navigation is not working. Can I fix that with the “Fix ver70 NNG” tweak ?
LikeLiked by 1 person
I’m glad you are good again!
If you are referring to the step:
Next you will be asked if you wish to restore the OEM navigation functionality. If you answer ‘YES’, the navigation function will be restored – this will take several minutes to complete. During this process, depress and release the clutch or brake pedal to prevent the CMU being put in to sleep mode. If you answer ‘NO’, the system will jump to the next tweak.
then, yes. That fix was incorporated into the MazdaToFiatV70AIO step to restore the OEM navigation functionality.
LikeLike
As I implemented the MazdaToFiatV70AIO the navigation should work, as I answered YES (unfortunately it does not). When I start Navigation it does an endless loading.
Can I do the “Fix ver70 NNG” tweak again ? Or would it corrupt some settings ?
Can I also do the MZD AIO 2.8.6 again (I fear it would overwrite then the FIAT settings) ?
LikeLike
“You can also repeat the installation (#5 thru #9) to install one of the included tweaks that you may have previously skipped.” So reinstall Nav by inserting the USB with MazdaToFiatV70AIO, and answering Yes to that prompt (or I guess you could instead do the “Fix ver70 NNG” tweak, but that should be exactly the same tweak).
You can do MZD AIO 2.8.6 anytime as well – it only installs tweaks that you’ve selected (don’t select ALL).
LikeLike
Amazing work!
FYI It looks like the link to the Mazda firmware installation pdf under PART 5 step 3 actually opens the USB test guide instead, so needs a link update. Also, if you look to where the MD5 Checksum Hash test guide is linked in PART 1, the link is dead. Might update as well. I’m assuming the target destination stuff got moved.
LikeLike
Thanks Keith. I uploaded my copy of the CMU_Software_Update_Procedure.pdf and fixed the link. I don’t know where the hashtag test guide might be though.
LikeLike
Finally took the plunge and installed the carplay kit together with retrofitting a backup camera (german Abarths didn’t come with one, wasn’t even an option. Was only available on normal 124s).
Took me a bit more than 5 hours to do a mostly neat install, with a bit of overengineering of the camera wiring loom.
Geeting the cable through the trunk wire boot was the most nerve wrecking.
Only need to add some plastic tubic for parts of the wiring that are currently not covered in foam, notably the parts in the trunk and before / after the white box behind the door sills.
Software wise, just sticking to this guide worked perfectly, no issues.
Just one little tinny thing I observed. Installed the id7 autorun script a few weeks earlier on a 56.x firmware and noticed that on a few rare occasions the screen would stay black when starting the CMU. Never seen that before, reboot fixed it everytime though. Haven’t seen it on 70.00.100 yet.
Gonna try out a wireless Carplay adapter today.
Also some stuff I learned about how Carplay works, why you’d need an updated hub and why it wouldn’t work on the old one.
You can have a look at an older presentation from Apple which describes that, oddly, the CMU and iPhone swap roles when working in Carplay mode, where the iPhone is the host and the CMU the device and not the otherway round as normally
https://devstreaming-cdn.apple.com/videos/wwdc/2016/722x2eefo3u2rp8k8qs/722/722_developing_carplay_systems_part_1.pdf?dl=1 (Slide 98)
To give as more insight into this. For some reason the chinese knockoff-hub sellers like to boost about how recently the USB chip was manufactured giving is some detailed pictures of the chip itself including its’ model numer 😀
So they mostly seem to solder a Microchip (former smsc) usb84604 on in. Having a look at the datasheet highlights a very distinct feature:
https://ww1.microchip.com/downloads/aemDocuments/documents/OTH/ProductDocuments/DataSheets/60001295D.pdf
“FlexConnect: Downstream port 1 able to swap with upstream port, allowing master capable devices to control other devices on the hub”
This also seems to be the reason why we now have two cables running between CMU and hub instead of only one.
LikeLiked by 1 person
Is there a possibility to install the tweaks for Android Auto also after the hardware install? My predecessor already built in the new hardware but there’s no tweak running for Android Auto. I ask because you mentioned that at the beginning.
LikeLike
I’m not sure about what you are asking. What firmware do you have? If you have ver 70, then you should already have the genuine AA (it’s not a tweak).
LikeLike
I’m asking about that: earlier on this page there’s written “ATTENTION – IT IS ESSENTIAL THAT THE FIRMWARE UPGRADE DESCRIBED HERE IS CARRIED OUT BEFORE THE INSTALLATION OF ANY OF THE NEW HARDWARE DESCRIBED IN PART 2.“
I have already the new hardware (upgraded USB hub module) in my Spider (2027) – installed by the owner before me – but no “Fiat 124 Spider 2017+ Apple CarPlay / Android Auto Upgrade”
Or do I understand somethimg completely wrong?
LikeLike
OK, but you still haven’t stated what your firmware version is. I’m always assuming directions are followed, but as you are hinting, that might not be the case here. If the hardware was installed prior to the firmware upgrade, then it is my understanding that an old version hub needs to go back in, firmware upgraded, and then the new hub can be reinstalled and recognized.
LikeLike
If the firmware is V59 or below, then the new USB hub will NOT work properly.
The old USB hub MUST be used to upgrade to V70 firmware
LikeLiked by 1 person
Hi, finally I have hardware AA unit and I would like to make an update of CMU suftware before installing it. is there anyone having V70 firmware and can share the link? I need european version of this file: 70.00.100
LikeLike
Hello Arturo
I made this upload myself. Find it here:
https://drive.google.com/drive/folders/1D4nWCaE9X4G2d8vKiB8KAY-buFVr2vU5
LikeLiked by 1 person
And here are the md5 checksums that each file should have:
cmu150_EU_70.00.100A_failsafe.up: cc485f4f16541cd803f615df42dc3512
cmu150_EU_70.00.100A_reinstall.up: d5c042588b5de7f0d72e02b03ec78590
I would advise to verify those after you have copied them to your USB drive. You want to be sure that nothing did go wrong during data transfer, however unlikely it might be.
LikeLike