first two photos by Mark Booth (used with permission)

⇑ Because the revised visors have been introduced in MY 2018 MX-5 vehicles, they were expected to be seen in MY 2018 124 Spiders as well, but that apparently didn’t happen. The re-design may not function any better than the first year’s version (they still can not be pivoted to the side or above the header), but there is no doubt that they not only look better, but the cover for the enlarged mirror seems to be much more robust.
Note: If the 1st generation visors are closed aggressively without first closing the mirror cover, the covers tend to catch on the anti-rattle rubber bumpers, eventually breaking one or both of the plastic lid hinges.
⇓ The familiar MY 2017 visor for comparison…

repair photos courtesy of Dani Doni

broken plastic hinge pin can be drilled out (3 mm) to allow for a metal pin in its place. Super-glue and trim off to complete.
 For those that may feel the need to upgrade the visors, it appears that since the mounting configuration of the restyled 2nd-generation header trim assembly (which includes the visors) hasn’t been altered, know that it is an expensive direct replacement installation in our 124 Spiders, but you’ll have to source it from a Mazda parts distributor.
The new header is the same color (black), and for LHD vehicles, the Mazda part # is ND1F-68-09Z 02 (thanks Tobias). This particular part # comes with English airbag warning labels on both sides of the passenger-side visor (none on the driver’s side; see the slide show below). There are other part #s that accompany RHD, airbag labels in other languages, and assemblies that have the intrusion alarm bits included, but if you are replacing your header, chances are you can transfer those parts yourself.
[UPDATE 5/3/2020]
Tobias observed that the airbag vinyl label removal process that works so well on the first-generation visors, doesn’t work so well on the new vinyl-wrapped visors, as the bonding is much stronger.
[UPDATE 3/14/2021]
Apparently not satisfied with his first attempt at replacing the factory vinyl wrap on his second-generation visors with Alcantara to complement the rest of his interior, Tobias has committed to disassembling the entire header piece to allow for a proper job this time. He has provided details, along with additional disassembly photos of the visors in his new comment below, and I expect we’ll see a nice photo of the completed job in the near future. 🙂

[UPDATE 3/23/2021]
Well, Tobias submitted photos of the finished product – him and his dad went over the top, and covered the entire header assembly with Alcantara! He states that the visors were pretty easy, but the rest proved to be pretty challenging. His Spider is one-of-a-kind now. See his comment for more photos and details. Thank you Tobias.

[UPDATE 6/13/2021]
magoffin posted photos of his new header (see slide show above), and MikeL found an online source, that sold him the unit without requiring a Miata VIN # (they accepted Fiat 124 as the intended vehicle). Per TX_Bandit:
♦ Drop the top.
♦ Pull off the left and right pillar covers – they just snap in and out.
♦ Remove (6) star drive screws in the header: (2)T40 and (1)T30 on each side.
♦ Give the header a light tug and it will come free, but be sure to unplug the interior courtesy light when the wiring is exposed.

As much as I’d like to replace my cheap-ass visors, it looks like there’s a LOT deeper space there. The right side on both is flush with the roof guides, but the 2017 drops back down in the middle where the 2018 doesn’t… Got a feeling it’s not going to be an easy swap.
LikeLike
That’s why I mentioned replacing the header assembly, not just the visors themselves. I’m not planning on doing this project; I just posted it in case someone out there feels strongly enough to get rid of the minimalistic visors.
LikeLike
I have a 2018 Lusso and the visor is just like the 2017 model. The gauge cluster is the same as 2017 as well. Could this be a midyear production change?
LikeLike
Well Martin, you’ve stumped me. The gauge change for the 2018 124 Spider was announced, but the visor change was an assumption on my part based on the MX-5.
Does the VIN # indicate that your Lusso is in fact a 2018? (what letter is the 10th digit?) H is 2017 and J is 2018.
I just looked at some photos of a 2018 Lusso in Blu Scuro, and sure enough the gauge is the same as 2017, so it appears that my article is incorrect on both counts. It seems that other than some colors, perhaps for logistical reasons, Fiat didn’t want things to change afterall.
LikeLike
That being said – what’s the multi-function display in the gauge cluster look like on the 2018? I heard there was a new one?
LikeLike
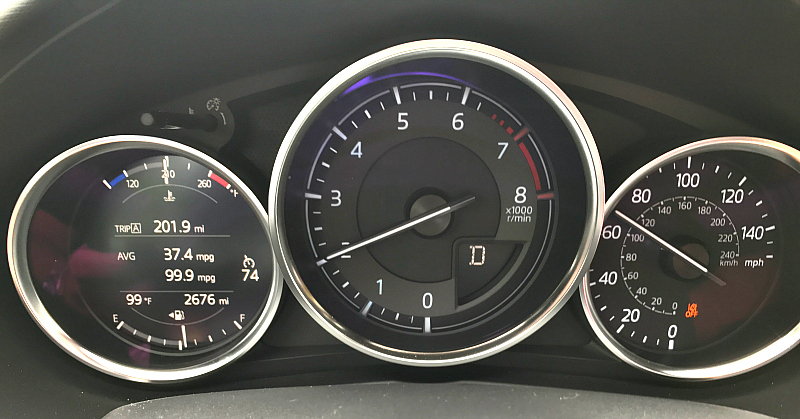
I have photos of the new gauge – see the last 3 photos in this article.
Here’s another shot (in a MX-5). Note how much more useful the temp gauge is?
LikeLike
I like the revised temp gauge. On my 2017 Abarth 124 Spider, the reading never gets to 100C, which is the first number after the solid bar at the far left hand side of the temp display. So from cold start, to having driven 1000km at highway speed, the reading never gets past the solid bar. Which is good in that the engine isn’t overheating, but why in the good Lord’s name did they create a huge temperature range going from 100C to 200C to 300C. 95% of that gauge display for temp will never be used to display operating temperatures. At least with the one in this photo, the regular temp is in the top middle of the value range curve. Much better…
LikeLiked by 1 person
My Lusso is a 2018. The tenth letter of the VIN is a J. I think there were a few changes that Fiat was touting for 2018, but then changed their mind. Originally, when I was thinking about ordering a 2018 back in August, there was a $100 dollar price increase, and XM radio was going to be offered as standard. That did not happen as the 2018’s are the same price and you still have to upgrade to the Bose/Nav package for XM. At first, I was a little disappointed in the lack of colors for the gauges, but now I think they look pretty classic on the car. Maybe red indicator needles would add a little contrast.
LikeLiked by 1 person
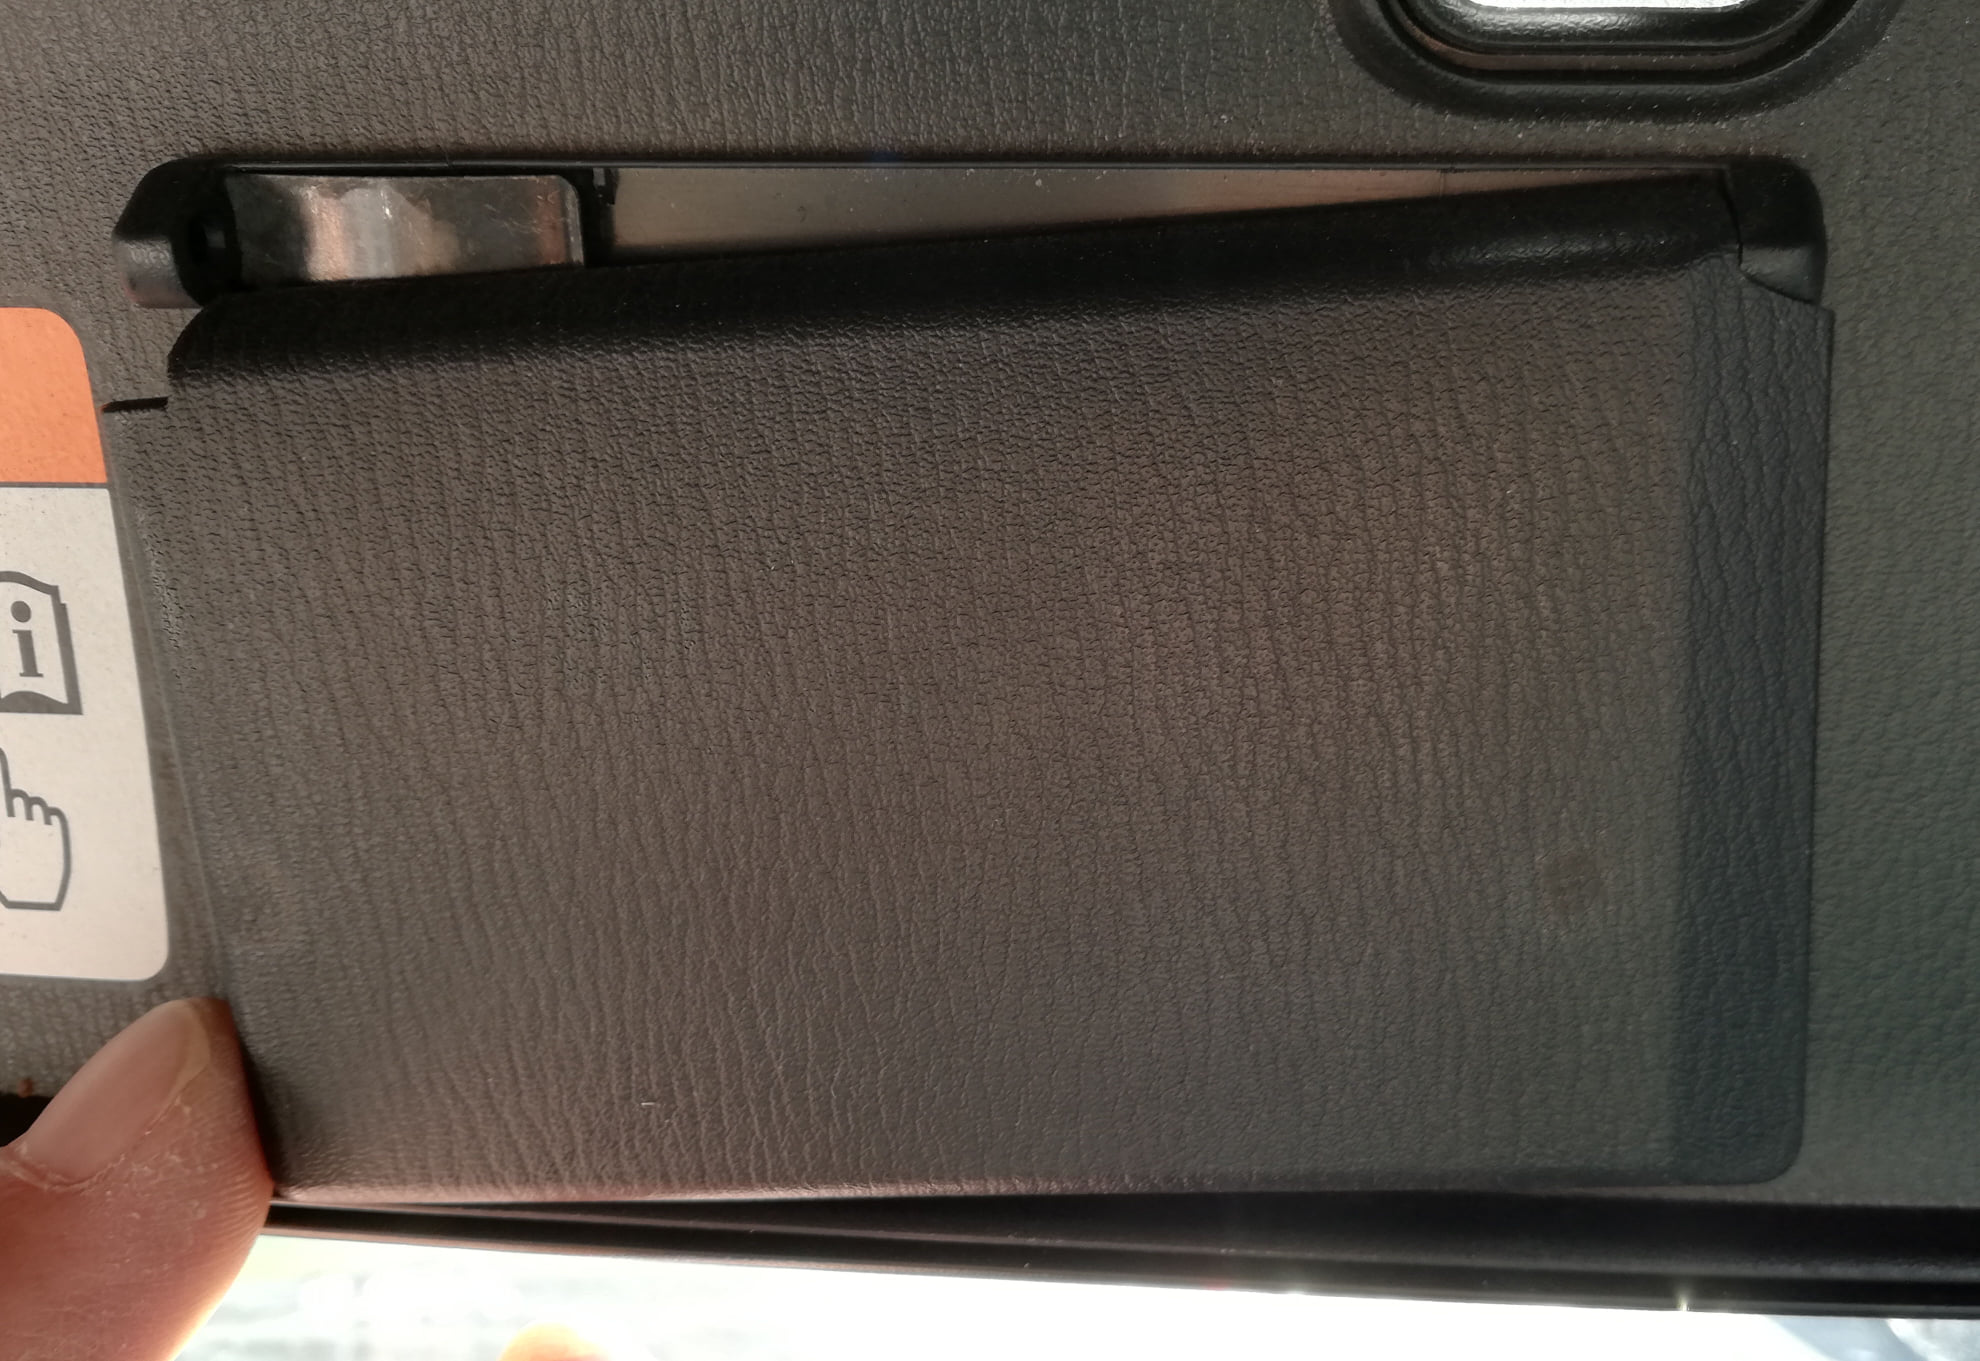
I have a GT Blu Esse, which to me looks the same as the Blu Scuro. Although the fixed roof version was presented recently at the Geneva motorshow, the sunvisors are also the 2017 model. Also in the manual I found an orange card testifying that the car was produced on 2017-01-11(I’m not sure if the date is mm/dd or dd/mm). So apparently, for the first batch of GT’s(called series 01), cars already on stock were used. Mine is not numerated and also does not have the 124GT(red lettering) as was shown in Geneva.
LikeLiked by 1 person
Peter, use the link at the bottom of the page to print your build sheet. If it states that you were supposed to get a 124GT emblem, the dealer will get one for you, if you want it. Pretty sure the date is dd/mm as the new blue is a MY 2018 color, and November was definitely 2018 production.
See my latest article for a photo of Peter’s gorgeous car and details regarding the hardtop.
LikeLike
Does anyone know which Mazda Rear view mirror w/autolink is interchangeable with the 2018 Fiat spider
LikeLike
Standard Mazda self dimming Mirror is the Gentex/Mito GENK40A but that doesn’t come with homelink.
There is a very good thread on the Miata board that describes on how to replace it with a Series 8 (framless mirror) https://forum.miata.net/vb/showthread.php?p=8500339
However there are some more points to keep in mind depending on where you live:
– Homelink frequencies are different around the world. In the EU homelink operates at 433Mhz while in the US I think it’s somewhere around 3XXMhz. I haven’t found any information about which Gentext mirror supports which frequency or if you can configure this somehow, so…
– some markets don’t have the correct cable loom to power these mirrors. What is important here is the C-17 connector behind the left A-pillar trim.
I.e. 2017 German 124s were never sold with an auto-dimming rear view mirror, so they only have the Miata “Club” cable loom there, which means that no cables (for the rear view mirror) run to the C-17 connector and none run up to the header trim. So you’d have to run these wires yourself.
I’m currently sourcing parts to retrofit a Gentex Series 8 mirror into my Abarth. Ordered the mirror this week but since you can’t get one from retail here I had to get it from the US. Should arrive in a few weeks. Already have the fuse taps.
Read on the Miata board that you should get Lumision taps since these will have a proper fit in the fuse box. But guess where I had to import these from 😉
LikeLike
Splurged myself to the updated Miata header assembly. Because of the temps outside installation will have to wait until spring. Seems like you can’t remove this trim if you have the hardtop mounted. Too much pressure on the two metal brackets.
However this gives me time to get the header and side trim wrapped in alcantara.
For anybody else interested, part number is ND1F-68-09Z 02 and it cost me 360€ + tax.
LikeLike
Last time I tried, a few months back now, it wasn’t available. Also, I was given part ND0Z rather than ND1F, maybe a colour thing.
Did it come complete with visors?
LikeLike
Hi Mark,
that was also the case with my order. Had to wait a few weeks for it to get delivered. Ordered it beginning of December and it arrived today. Markings say that it was produced in December, packed before Christmas and shipped just after it.
Seems to me that it is a made to order item.
The thing with the part number seems to be a bit of a mystery. ND1F is used on the package, invoice and on a sticker behind the driver’s sunvisor.
However there are a few more markings on the inside:
-6809Z
ND0H(HOLE W/ ,DTV W/O)
N315 (HOLE W/O,DTV W/ )
N314 (HOLE W/O,DTV W/O)
So I’m guessing that one part can have multiple numbers?
If I understand it correctly the color code is represented by the 4th block (in this case 02).
Yes, i got the complete header assembly, incl. visors and dome light.
LikeLiked by 1 person
Thanks Tobias, when I tried it just wasn’t available full stop, even to order, although there was a price on the system. The fact that you have managed to get one looks promising and I’ll try again. Thanks for the info.
LikeLike
Hi Tobias,
Just found this on Mazda online https://www.mazda-parts.com/oem-parts/mazda-trim-front-header-nd1f6809z02 and just wanted to double, double check that the part you ordered is black?
LikeLike
I just found yet another site that helps clear up the part numbers. No matter which interior you have, the header only seems to come in one color (black). And yes, it’s the same part # for standard burglar alarm or none, The premium burglar alarm system header assembly simply includes additional parts (intrusion sensor).
LikeLike
Yes. Matches perfectly. Glad I did the swap. And the airbag label is only on the passenger side visor, so I don’t even see it.
LikeLiked by 1 person
Well this is interesting.
I found this site, showing 4 different versions of the trim in Europe, depending on whether you have a burglar alarm system or not, and want either hard plastic visors, or vinyl visors. The diagram shows the extra parts (intrusion sensor) that come with the burglar alarm system version (which aren’t shown for the Japan Roadsters).
My guess is that perhaps one country in Europe mandates soft vinyl visors, although I’ve never seen a photo of those. Or, more likely, the new visor design is the “vinyl” version?
LikeLike
Gets even more interesting.
In addition to the link Dan posted for Miatas from 10/2017 onwards there is also an entry for 11/2017 onwards.
This lists
– ND1F for vehicles with and without burglar alarm system and airbag warning stickers
– ND1H which does not seem to have the stickers but might come with intruder sensor and siren?
– ND2F with airbag warning stickers for the Taiwanese market.
Wondering if vinyl visors just refers to the new design and hard-pp means the old design. Possible that Mazda sold both version back in October 2017.
My ND1F has some mounting holes on the inside in the area surrounding the dome light. Guess that this is where the burglar alarm system goes.
LikeLiked by 1 person
I ordered my new header 2 weeks ago and I patiently await. Did you have any issues with color or fitment?
LikeLike
No issues at all in this regard.
Unfortunately couldn’t get it wrapped in Alcantara because i couldn’t find a shop that would do it. So i tried it myself with self-adhesive fake-suede fabric. Worked out pretty well.
Oh, and don’t even think of removing the airbag sticker from the visor. After 3 hours and 2 credit cards I managed to get rid of it, but still ended up with a very visible outline of where it once was.
Whatever this sticker is made of, it bonds really well with the visor and it also resists white spirit and isopropanol.
Well now it’s wrapped anyway ^^
LikeLiked by 1 person
Are the visors hard plastic or a softer material?
LikeLike
Hi Chris,
a bit of both. I’d say the touch and feel is similar to the upper part of the interior door panels (just a bit softer).
It consists of a somewhat hard core (my guess is polyurethane) with a textured vinyl layer on top.
Seems to me that the vinyl is just shrink wrapped around the core. Found this out when i used a blow-dryer on the visor in order to even have a chance to remove the airbag sticker. The vinyl gets quite soft and you can push and pull it around a few centimeters.
LikeLiked by 1 person
I added a note to both of my visor articles regarding the label removal. Thanks Tobias, and glad to hear your interior customization worked out well.
LikeLike
Currently in the process of reupholstering the header assembly, this time with genuine Alcantara.
Decided to completely disassemble the visors. As already suspected the vinyl surface is just wrapped around a plastic core. Just wrapped, no glue used anywhere.
Like most of the plastic parts used in the interior of the ND / 124 it’s made out of Polypropylene.
As far as I can make it out you can’t remove the vinyl cover without cutting it.
The mirrors are just clicked into the visors with 2 hooks at the bottom and 2 clips at the top, all around 1″ from the edges.
The visor core is made out of two parts which are also just clipped together.
I attached two pictures of the individual parts. The yellow circle highlights a pair of latches that have to be unhooked first. Thereafter you can use a small trim removal tool to gentle pry the two halves apart.
Footnote: Upholstering the header trim is a major pita. Be prepared to waste a lot of fabric or pay a small fortune to get it done by a professional. And choose fabric that can stretch A LOT in all dimensions. If you -like me- still want to use Alcantara, you chose… poorly
LikeLiked by 1 person
First of a shoutout to my Dad for helping me out with this one. Overall me must have spent around 20 hours on it.
These pics are of our second attempt and while it is far from perfect I’ll roll with it for the time being.
As already mentioned the header trim is really difficult to work on due to its complex shape and the properties of the fabric. At first we tried sewing but the results weren’t very pleasing. The idea was to to put the seams in the edges but this this didn’t work out very well. Let’s just say that they generated a somehow bumpy surface.
With our second attempt we just glued the individual fabric pieces on top of each other. This might at first sound like a bad idea and you can cleary make out these areas in the pictues. However almost all of them are not in line of sight.
The visors, in contrast, are easy to wrap. It’s a bit of a time consuming task but not a difficult one.
Some further piece of advice: Get the right glue for this.
At first we used the stuff that you can get in hardware stores but it ended up and not being very good at keeping stuff stuck to PP plastic. Often the tension of stretched Alcantara pieces was just too much for the glue to handle and we ended up with areas where the fabric separated from the trim.
We ended up with this and were really satisfied with it: https://www.ebay.de/itm/Lederkleber-615g-MAH-800×213-Spezialkleber-bis-160-C-Sattlerkleber-Kontaktkleber/182164092638?hash=item2a69d376de:g:M0UAAOSwcGtgOLK5
Some Alcantara tips:
The color of the OEM Alcantara trim is 9002 ‘Black’. Yes I know, it looks more like charcoal and there are indeed Alcantara colors named ‘Charcoal’. Still 9002 ‘Black’ is the correct one.
Also, you can get several versions of Alcantara:
♦ panel (unbacked) > this is the version to buy, that you can stretch the most!
♦ cover (textile or foam backed) > you can hardly stretch the textile backed variant so don’t buy this for this job. It’s sufficient for flat parts or shift / handbrake boots. Also good for applications where you’d want the extra reinforcement like seats.
The finished product…
LikeLiked by 2 people
added today:
magoffin posted photos of his new header (see slide show above), and MikeL provided his online source, that sold him the unit without requiring a Miata VIN # (they accepted Fiat 124 as the intended vehicle).
(also added TX_Bandit’s handy instructions.)
LikeLike
added today:
Dani Doni posted photos and instructions (in Italian) on how he repaired a broken mirror cover on his visors. Apparently, his wife also closed the visors one too many times, without first closing the mirror cover.
https://www.facebook.com/groups/234776936999899/
LikeLike
(PSA) update on the quoted online source: while it offers a discount on the part, and it does not require a VIN, the shipping is prohibitive: for Austin, TX I was quoted $477.82, for a $238.62 part. https://www.realmazdaparts.com/oem-parts/mazda-trim-front-header-nd1f6809z02 offers the part for a substantially higher price ($331.48), but more than makes up for the with quoted $16.60 shipping (also to Austin, TX). Both sites do not require a VIN for ordering. YMMV, depending on your shipping location.
LikeLiked by 1 person
Stephan, thanx for the feedback. I am going to simply remove the link, that was OK at the time I published.
LikeLike
Does anybody know if you can only exchange the visors? Or don’t they fit properly?
LikeLike
No you can not.
LikeLike