

Although I started this page in August of 2016, it is kept up-to-date on a regular basis, and I’m proud to claim that following my step-by-step instructions, of the hundreds of my readers tweaking their 124 Spiders, I’m not aware of anyone that has “bricked” their system. I was surprised to hear that some dealers are even installing these tweaks!
Welcome!
I recently (July 2016) purchased a “bianco gelato” white Classica version of the new 2017 Fiat 124 Spider from the first U.S.-bound boatload to arrive at the Baltimore port, built on the 4th generation (ND) Mazda Miata MX-5 platform, and on the same assembly line in Hiroshima, Japan. My Classica has the “Technology” option that adds advanced keyless push-button entry (AKE), a rearview camera, an additional USB port, HD radio, Navigation capability (SD card slot) and a 7-inch touchscreen.
It’s even more fun to drive than my dune buggy was – I love driving it!!
Zoom – Zoom – Fun – Fun!
Up until a few days ago, every time I started my new Fiat Spider, I observed an annoying disclaimer “nag screen” that appeared to be awaiting an OK response, although I later noticed it disappeared after about 4 seconds on its own – but still annoying. Then my wife, as navigator, wondered why she couldn’t use the touch screen keyboard for address entry (or even change the radio station) after the vehicle was moving. Mazda claims that it programmed that “feature” for safety concerns – did they ever try to enter addresses using the Commander knob? I firmly believe that method is significantly more distracting than tapping it out on the virtual QWERTY keyboard.
Well, after following some of the Miata forums, since our cars use the exact same system as the MX-5 (and all of the electronics for that matter other than the ECU/PCM), I realized that these annoyances were shared and that tweaks had already been written not only for the MX-5, but for every Mazda built with Visteon’s head units (what we used to call radios). Apparently the whole Infotainment system is run by a small embedded Linux system that runs an Opera browser to display stuff on-screen. Think of it as a Raspberry Pi built into your car.
It turns out, I was tweaking the same navigation software (NNG’s iGO) when I had a Mio C230 GPS unit ten years ago (2007), and I may have to refer to the blog I was writing back then, if I feel the need to customize that portion of our firmware.

One user named Siutsch from Germany has packaged many of these tweaks written by various authors, into a user-friendly “All-in-One” package that can be installed on a USB stick (at your your own risk of course) and installed without “hacking” into the system. All of his details for each tweak and other install information for version 1.5x in his AIO github account no longer seem to be available as of 3/11/2017. Unless you feel you are a hacker, I would strongly advise you not trying all of the available options (like Android Auto, CastScreen or ALL), since some of the options are more than ‘tweaks”, are not totally integrated, and the contributors have only written uninstall code for OS versions they are familiar with (currently they aren’t familiar with the Fiat/Abarth versions of our Mazda Connect systems). Some of the options simply don’t work and you’ll read about those later in this article. You don’t want to “brick” your Infotainment System so soon after purchasing your new Spider 😉 . You’ll note that there are plenty of warnings on that website indicating that the package is only for certain versions of Mazda systems.
Apparently, I presumed correctly, that the Spring 2016 version of Mazda Miata MX-5 firmware (most likely 56.00.511) was used as a basis for our OS, and that by simply changing:
- the initial boot animation from the Mazda logo to the Fiat 124 Spider logo
- the VIN checking routine for the Navigation SD card from Mazda to Fiat
- some Miata graphics (maintenance screens, parking sensors screen, etc.) to Fiat 124 Spider
- and disabling FM Radio Data System (RDS) data for traffic alerts (which was left intact and appears to work in parts of Europe)
– that would become our initial Fiat version of the OS (56.00.521) for the MY 2017 Classicas and Lussos.


So, I then decided to take a chance and try some common tweaks that appealed to me, again making the assumption that the lines of code for the simple tweaks would be exactly the same between our sister vehicles.
Notes:
- If you are reading this blog a few months from now and your OS version is not 56.00.521 NA N*, or 56.00.521 EU N*, or 56.00.521 4A N*, or 56.00.530 NA N*, then you may need to investigate further, or hopefully I will have done that for you in future updates to this blog.
If you have version 59.00.524, you will not be able to tweak your firmware. - Abarths are expected to also have their own initial release of firmware 56.00.530 EU N*, or 56.00.530 4A N*, or 56.00.530 JP M* that feature Abarth 124 Spider themed initial boot animation and graphics (as in this video). The Abarth 124 vehicles in North American are simply a trim level of Fiat vehicles with only some of the Abarth goodies.
- If after tweaking, some functions with your paired phone don’t work (such as email notifications, as one user reported), try un-pairing your phone and then re-pairing it with the vehicle. This is a good suggestion – anytime the phone isn’t behaving properly with the vehicle interface.
- If you are using my instructions as a guide but own a MX-5 rather than the 124 Spider, simply download the most recent All-in-One, which is supposed to even accommodate 59.00.xx firmware (up to 59.00.502).
- The next major versions of Fiat firmware are 59.00.524 and 59.00.562/563, and unless you’ve already installed the ID7 autorun tweak, it is reported that you will no longer be able to install tweaks via the USB ports. Until then, my AIO 1.51Fiat should satisfy our tweaking needs.
- There is an iteration level as well (A, B, C, etc.), but that is normally hidden from view.
- You can find your OS firmware version / region (not iteration though), along with your SatNav hardware version, by selecting Settings > System > About > Version Information.
* Region & SatNav Suffix Legend
example: 56.00.521A NA N
A is the iteration level (normally hidden and ignored)
NA is for North America – USA, Canada, Mexico, Puerto Rico ⇐ mine
EU is for Europe – United Kingdom, Russia, Germany, France, Italy, Greece, Poland , Portugal, Turkey, Spain
4A or ADR is for Australia, New Zealand, Latin America, South Africa, Thailand, Philippines, Taiwan, Vietnam, Oceania regions
JP is for Japan
N is the ‘SatNav’ protocol belonging to NNG (for all regions except Japan) ⇐ mine
M is the ‘SatNav’ protocol belonging to Matsukone (exclusively for Japan)

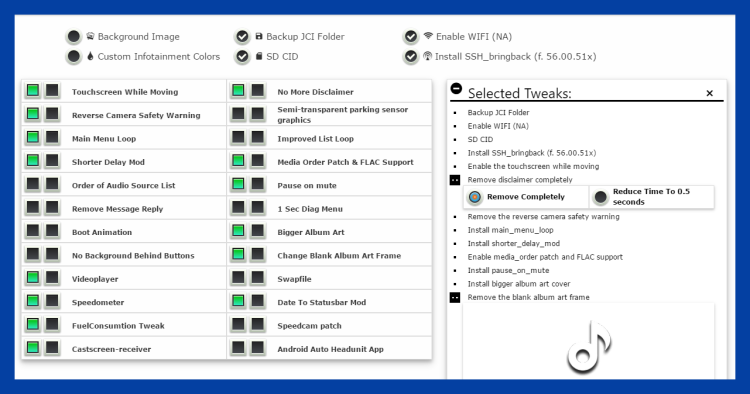
Listed below are the AIO tweaks which I’ve verified all work thus far for the NA (North America) region – except for one minor known consequence **, but if you don’t want the dealer to notice an obvious difference in the screen display, you might leave the background image alone, or at least change it back (more on that here) before visiting the dealer for your oil change, when they may upgrade your firmware without even telling you beforehand (if an update is ever released).
The option letters [ß] correspond to the selection list in the “All-in-One” install package.
- Enable touch screen while vehicle is moving more than 5 mph [A]**
- Remove initial disclaimer (4 seconds long) [M]
- Remove safety warning from bottom edge of reverse camera screen [C]
- Change background image to your choosing (800×480) [E] (more on this here)
- Remove blank album art frame [D]
- Install bigger album art graphics [Y]
- Install small date (mm/dd) to status bar above the time [G-4th option] (which also decreases the size of paired phone icons (WiFi, Bluetooth, battery level, etc), uses 80% transparent background for status bar, removes unnecessary red border for status bar messages, and smaller font size for all statusbar text)
- Enable Main Menu Loop so that when you are at the last Settings menu icon with your Commander knob, you can proceed right to the first Applications menu icon, rather than having to change direction [L]
- Enable List Loop so that as an example, you can scroll backwards with your Commander knob from the “A”s in your folder list and go directly to the “Z”s [K]
Details for many of the Tweaks (in no particular order)
** Option [A]
which disables the speed restriction options while your vehicle is moving more than 5 mph, seems to freeze the compass in the “no-navigation” screen, but you won’t see this screen once you enable Navigation. If you make use of the simple compass on that screen, or other compass displays within the cluster, heads-up display (HUD, which the 124 Spider doesn’t have), or in other Navigation screens (?), then avoid fully implementing option [A]. See this comment for partial implementation if you would like some of the touchscreen options, yet also need your compass fully operational.
~~~~~~~~
Speed-restricted items that are disabled (after this tweak is enabled), while vehicle is moving more than 5 mph include:
- Disable touch screen input capabilities, even for the passenger
- Bluetooth devices can be paired only when the vehicle is parked
- Disable viewing of Text messages; the system will only read the message to you
- Ability to access and alter Personalization settings
- Disable responding to Text messages with the predefined short answers


Option [L]
enables Main Menu Loop so that when you are at the last Settings menu icon with your Commander knob, you can proceed right to the first Applications menu icon, rather than having to change direction. With the Commander knob in mind, I feel that the looping features of options [L] & [K] should have been included in the factory OS, so that the selection process is more fluid and natural while driving.
Option [K]
enables List Loop so that as an example, you can scroll backwards with your Commander knob from the “A”s in your folder list and go directly to the “Z”s and offers an additional feature as well – a shorter scrolling delay response between pages using the Commander knob (from 1.5 seconds down to .3 seconds), but you need to answer Ja instead of Yes for the install to function. I found myself scrolling past selections with this option though, as it is almost too quick, plus the option introduced beeping for each selection (that can’t be turned off in settings) which I found annoying, so I returned to the original delay response by uninstalling [K] and reinstalling it, but answering No.

Option [D]
gets rid of the blank album art frame, but it substitutes it with a ♪ icon instead (and makes available two other images), but in my personal opinion, if there is no album artwork displayed, I prefer a true unframed blank spot.
To do that, copy all of the no_artwork_icon files in my AIO 1.51Fiat_d Updates Folder into the choose/config_all/blank-album-art-frame.jci/gui/common/images folder of the AIO package on your PC, and Option [D] will result in a true blank image, if no album art is called for.
(whichever image is named no_artwork_icon.png, becomes the default image when no album artwork is available)
no_artwork_icon.png
Option [Y]
increases the size of the album art, as shown below, while playing music in radio or USB mode. Apparently, the XM app has been updated in version 70 firmware, and this tweak should also apply to the album artwork that may appear in XM mode, as well.

Option [I]
which is “Pause-on-Mute”, and pauses the USB / Bluetooth audio track currently playing when Mute is activated. Note that:
- Mute will only pause when the audio track screen is displayed – not if the audio is playing in the background while other screens like Navigation are displayed.
- If the video player app is installed, “Pause-on-Mute” also works while videos are being displayed.
If you are muting your audio, it seems only natural that the audio streams should be paused as well, so this too, seems to me like it should have been included in the factory OS.
Option [M]
Removes the annoying disclaimer screen at bootup.

Option [E]
If you do choose a different background image, and you wish to revert back to the original background that comes with our systems at some point in the future, you can use option [E] and simply select “background_013” – or – using the proper Uninstall feature [2], simply select option [E] and {esc} out of the list selection.
Although a File Explorer screen showing you thumbnail examples pops up, make sure you make your selection in the “Choose” (vertical list, black background) screen that look like this ⇓

If the screen above does not reveal itself, you probably have a space, ‘ , or & in your when you set-up your PC, or the file name that you installed your tweaks package in. DOS doesn’t like spaces (or special characters) in the path’s folder names, so the path should be something like:
C:\\Documents\All_In_One_Tweaks
If you find yourself in this situation, you can proceed with Option [E] using whatever image you are able to select, and then manually substitute your chosen background image for the one in the Config folder of the Installation package on your USB drive. Delete the “background.png” that is already there, Copy & Paste the one you want in it’s place, and then rename it “background.png”.
⇓
⇓ Yes, background_013 (shown below) is the default background image that Mazda chose for everyone. To me, it ends up looking like you have a dirty screen! 😉

⇓ Here’s a plain black background for those that have requested it to replace the “dirty screen” background…

⇓ background_059 (shown below) is currently my favorite, as the splash of vibrant colors show off the color screen, rather than looking like a monotone LCD screen (like your left odometer gauge screen), yet none of the information is obscured as most of the background is dark…

⇓ Here’s an Abarth background I image I created to go with the Abarth animations…

⇓ It’s been brought to my attention that background_fiat_spider (shown below) is 799 wide (instead of 800), resulting in a white line on the side. Here is a proper 800 x 480 file to use in it’s place…

See this article for some more Abarth background screens.
Option [S]
I also chose option [S] to back-up the entire JCI folder (took an additional 4 minutes), to the USB stick prior to installing tweaks since I felt I was probably the first person to attempt these tweaks in the Fiat 124, just in case some backtracking might be necessary. So far, the tweaks have played nicely 😉 However, if you are going to experiment beyond the common tweaks I’ve tried, you may be advised to do so as well (although there is no restore function that uses this backup file). You would have to supplement the uninstall routines with the desired data yourself, as in the case of Option [U].
Option [Q] ~ Castscreen Receiver
This tweak has actually been ignored by most of us, including myself, yet it may be the safest alternative to CarPlay and Android Auto in some instances where you simply want your phone’s screen contents relayed to your car’s 7″ screen (not interactive). The Android app is included, and can be found in the choose\config-all\castscreen-receiver subfolder on your PC within your All-in-One folder (a newer version 1.0.2.5 is available @ AllCast Receiver – Apps on Google Play).
Your phone must be in adb debugging mode for it to run. After installing the tweak:
- Plug in your phone to the USB cable. You might get the adb debugging message at this point, though I think that happens when you launch Castscreen and start the program.
- Launch Castscreen and use the following settings:
- H264
- 800×480@160
- 1 Mbps
- 127.0.0.1
- Click Input Receiver
- Now hit start.
- Definitely by this point you should get the “Allow USB Debugging” message. Allow it, and you should be able to start casting.
captainship offers these instructions, if you’re having trouble getting the adb debugging authorization request:
- Connect your car to your home wifi network (same one as your phone)
- Download a SSH client on your phone. I used JuiceSSH
- Go to your routers admin pages to find the IP address of your car. For me it was 196.168.0.87 (it should be called cmu)
- In your SSH app connect to root@192.168.0.87 (or whatever your IP is)
- If it asks you for a password it is jci
- Enable ADB debugging on your phone and connect your phone by USB to the car
- In your SSH app run the command /jci/scripts/adb devices
- Your phone will come up on the list but it’ll say unauthorized. That’s good!
- Unplug your phone and run these commands in the SSH app:
-
- mount -o rw,remount /
- /jci/scripts/adb kill-server
- /jci/scripts/adb devices
- Plug your phone back in. You should now get the adb debugging authorization request straight away. Click OK and your all good! If there’s no message it should come up when you start casting.
- Now reboot the CMU just in case
Here is a sample video of Castscreen in action.
If navigating, the navigation is visible on the car’s 7″ screen, and the navigation instructions can be heard in the headrest speakers (adjust volume to preference). The audio of your radio/music will be interrupted with each instruction of the navigation (just like with a phone call).
MalteseMartens is experimenting with a USB CarPlay dongle to see if he can feed his Apple device ⇒ thru an Android device ⇒ and then into the Castscreen receiver, as a primitive CarPlay alternative.
Option [4] ~ Video Player
The video player is expecting H264 video codec and MPEG-4 AAC audio codec files and they need to be placed in a root folder “Movies” with no sub-folders, along with one mp3 file, on a USB 2.0 or 3.0 thumb drive formatted in FAT32, and NOT larger than 64GB.
If the video’s audio doesn’t work, play the mp3 file, pause it and then play the video file again.
I’m not sure if my tweak installs the latest version of Video Player, but if not, install this tweak from the MZD-AIO package instead, which should allow you to control the player as shown below. (source: https://mazdatweaks.com/videoplayer/)
Multicontroller Actions:
| Multicontroller Action | [ In Video List ] | [ During Playback ] |
|---|---|---|
| Press Command Knob | Select video | Play/pause |
| Tilt Up | Video list pgup | Toggle fullscreen(next video) |
| Tilt Down | Video list pgdn | Stop |
| Tilt Right | Scroll Options | Next |
| Tilt Left | Scroll Options | Previous |
| Rotate Command Knob CCW | Scroll video list up | RW (10 seconds) |
| Rotate Command Knob CW | Scroll video list down | FF (10 seconds) |
ScreenTap Actions [ During Playback ]:
| Action: | Play/Pause | Stop | Prev | Next | RW | FF | Shuffle | Repeat All |
|---|---|---|---|---|---|---|---|---|
| Tap Area: | Center | Bottom Center |
Top Left |
Top Right |
Bottom Left |
Bottom Right |
Top Left Center |
Top Right Center |

If you want the Video Player to default to FullScreen mode, you have to modify videoplayer-v2.js (with a text editor), which is in \config\videoplayer\jci\gui\apps\_videoplayer\js directory on your USB drive. Around line 71, you should find this line:
var FullScreen = JSON.parse(localStorage.getItem(‘videoplayer.fullscreen’)) || false;
and you’ll simply need to change false to true:
var FullScreen = JSON.parse(localStorage.getItem(‘videoplayer.fullscreen’)) || true;
Option [H]
Installing different color schemes from red (default) to a choice of:
- blue
- green
- orange
- pink
- purple
- silver
- or yellow
changes button colors in various menus, and if the speedometer is installed, the theme of that app screen as well. It may also select a color-coordinated Mazda themed background, so if you desire a different background image after installing the color scheme change, simply select and install your desired background afterwards.


these photos courtesy of wlcmlc
Option [5]
This is the fuel consumption tweak that offers KM/L as the metric equivalent to MPG, and in addition to the average fuel economy for this drive, shows the average fuel economy since the last reset.

Option [U]

Removes the automatic footer signature caption “Sent from my 124 Spider” (and all of the other variations in other languages) at the bottom of predefined text message replies. By the way, as a bonus, if you would like to exchange one of the canned responses for one of your own (in any language), you can by editing this file on your PC, which the tweak will overwrite the original in your firmware with:
/choose/config_all/message_replies/jci/settings/configurations/blm_msg-system.xml
These are the default U.S. English responses:
- “OK”
- “Yes”
- “No”
- “Thanks!”
- “Can’t talk now.”
- “Please call me.”
- “Call you later.”
- “Driving now.”
- “Stuck in traffic.”
- “Be there in 10 minutes.”
- “Be there in 20 minutes.”
- “Why?”
- “Where are you?”
- “I need more directions.”
The uninstall currently may not revert back to your original Fiat version, but rather uses a Mazda firmware file if the backup copy isn’t found, resulting in the footer signature caption “Sent from my Mazda quick-text system“. If this is the result of your uninstall, you can find the correct file in your jci backup (option [S]) or in my AIO 1.51Fiat_d Updates Folder. Copy blm_msg-system.xml into the choose/config_org_all/message_replies/jci/settings/configurations folder of the AIO package on your PC, so that the Uninstall will then function properly.
Option [O]
Changes the order of audio sources so that the more often-used inputs are shifted upwards:
- ‘FMRadio’
- ‘DAB’ (not visible outside Europe)
- ‘USB_A’ (grayed out if USB not inserted)
- ‘USB_B’ (grayed out if USB not inserted)
- ‘BTAudio’
- ‘CD’ (not visible)
- ‘SatRadio’ (not visible in Germany)
- ‘AhaRadio’
- ‘Pandora’ (not visible in Germany)
- ‘Stitcher’
- ‘AuxIn’ (grayed out if device not plugged in)
- ‘AMRadio’
- ‘DVD’ (not visible)
- ‘TV’ (not visible outside Japan)
Option [2] for UNINSTALLATION
After you select option [2], the menu is pretty much the same, but you are selecting those items that you want uninstalled, instead of installed. Do not attempt to mix! You are either installing one or more options –OR– you are uninstalling one or more options.
Think of Uninstall as basically another “tweak install”, that returns your system back to the original configuration. If you are using a Mazda-oriented AIO uninstall tweak, do you think your system will reflect the original Fiat configuration? (Now you know why I had to modify many of the Uninstall tweaks, and why you should always uninstall using my tweak package, rather than the Mazda AIO!)
Option [8]
I’d advise against choosing Option [8] (which is ALL) for either Install [1] or Uninstall [2]. Best not to uninstall any option that hasn’t been installed.
Wi-Fi
In North America, the disabled Wi-Fi connection option is automatically undone (Wi-Fi is re-enabled) by AIO, but don’t expect much if you do connect. The CMU has very poor shielding, and rather than improving that ($$), Mazda chose to simply disable the Wi-Fi, but in other markets, like Europe, more robust CMU units work with Wi-Fi quite well.

Reboot & Reset
Anytime your system isn’t behaving properly, it’s a good idea to first REBOOT the system, by simply pushing both the Commander Mute + Nav buttons for 10 seconds.
♦♦♦♦♦
If that doesn’t result in the desired behavior, you can also try a RESET:
- Select SETTINGS from the Home screen.
- Select SYSTEM
- Select Restore All Factory Settings to reset system to original settings, press Yes to confirm.
The “Restore All Factory Settings” is a misnomer of sorts, but it can indeed fix some settings that have somehow been messed up. Other than the touchscreen speed restriction tweak, it will not undo other tweaks that are installed, nor does it change any files in the jci folder; it just resets options in the data folder using the firmware’s Failsafe file as the source.
TWEAKING UPDATES
[UPDATE 10/5/2016]

Option [F]
Also included in the package, is a new Speedometer / Compass app that I tried after writing this article. The speedometer app (version 4.4) screenshot below, is from the developer’s European vehicle and includes:
- a digital reading of the current speed in the center
- a speedometer gauge with a large red needle indicating your current speed and a white needle (not showing in screen shot) indicating your top speed for the current trip
- a rotating compass
- a tachometer gauge with a red needle indicating top rpm for the current trip, and a white needle indicating the current rpm reading
- a panel on the right side with more data from your current trip
- an option to also enable the display of a “mini-speedometer” widget in the status bar, primarily for when you are displaying a screen other than the speedometer app.
The Speedometer / Compass app is option [F], and for North American vehicles, I recommend selecting 2, b, n, 0.5 to get the best results. If the mini-speedometer option is selected, option [G] will also be automatically selected for installation, so that the additional information doesn’t overlay the Bluetooth, battery and cell phone signal strength icons, which will be relocated above the clock, rather than the default location to the left of the clock.
Even better is that that your current speed, as well as your current compass heading and altimeter readings show up in the mini-speedometer when it is displayed outside of the speedometer app screen. By tapping the clock display, the mini-speedometer can be toggled on and off.
Sometimes, all you need to know is whether you are heading in the right direction or not.

Although right after installation, the mini-speedometer app readings seemed to be incorrect, on 10/1/2016, when I decided to get screenshots to document this for the app’s author (Diginix), I instead found that the app was working perfectly (at least that day) using the comparison method discussed in the 11/10/2016 update below. 😀
[UPDATE 10/10/2016]
I’ve tested a new beta version of the AIO scripts that accommodates Fiat 124 Spider systems, and it works great thus far. For example, option [I] which is Pause-on-Mute when playing USB, Bluetooth, etc. and didn’t work before, now installs and works properly (for North American vehicles only). The options that interested me and that I’ve tried successfully thus far: WiFi, A, C, D, F, G, I, K and W.
The other two options that are OS version specific and should now work with this version are speedcam-patch [P] and track-order / FLAC support [N]. I haven’t tried them yet though.
[UPDATE 11/10/2016]
I really like the Speedometer app, however, based on my experience and feedback from others, I wouldn’t base my travels on only the compass headings displayed on either the app screen, or the mini-speedometer until verifying beforehand during that trip! The displayed GPS data is simply not reliable when this tweak is installed with our current Fiat firmware.
A good way to compare the speedometer app GPS related data with the Nav system, is to select the “Where Am I ” screen (Nav > Info > Where Am I) which will show your compass heading and altimeter – and compare those readings with the mini-speedometer display, which toggles current compass heading and altimeter readings every few seconds in the top right corner of that same screen (see example below).
I submitted a copy of my 56.00.521 firmware to Siutsch for his compatibility review and he has determined that it our Fiat firmware is very likely based on Mazda’s version 56.00.511, which doesn’t work reliably with the Speedometer app, so it is very probable that this statement found in his readme file applies:
### Important for MZD firmware version 56.00.511/512/513
Fix not confirmed: Have navigation as last opened app before switching off ignition. Next time you start the car the speedo is more likely to show correct GPS values.
⇓ My speedo app was working properly the day I took this screen shot.

Where Am I screen
[UPDATE 12/30/2016]
A new Windows version of AIO (version 2) is in Beta and looks very promising, but at least as of today, the actual scripts are the same as the latest Mazda 1.51 update. Other than the fact that everything is written to revert to Mazda settings rather than Fiat, it is primarily the GUI that is different, with a little more control of the default and combined options, as shown below…
NOTE: According to the website for this version, no Fiat versions of the firmware are supported with this software. That’s when I decided to customize AIO so that all of the tweaks work for the Fiat versions of our CMU firmware. ⇓⇓⇓
AIO_1.51Fiat Tweaks
[UPDATED 1/19/2017, 1/31/2017, 3/11/2017, 3/16/2017, 4/22/2018, 9/25/2019]

I see that the download for version 1.50 (which is limited in function for 124 Spiders anyways) is no longer available, and I imagine it may be a while before the various developers bring Fiat 124 firmware versions on board into version 2.0+, so in the mean time, I’m modifying ver 1.51 (which is out of Beta now,has all of the most recent tweaks, but also seems to be no longer available) into AIO 1.51Fiat_c to work exclusively with the following versions of our Fiat firmware:
- 56.00.521-NA (for Fiats in North America, USA, Canada, Mexico)
- 56.00.521-EU (for Fiats in Europe, UK, Germany, France, Spain, Italy, Russia. etc.)
- 56.00.530-EU (for Abarths in Europe, UK, Germany, France, Spain, Italy, Russia. etc.)
- 56.00.530-4A (for Abarths in Australia, NZ, Thailand, Philippines, South Africa-America, Oceania)
- 56.00.530-NA (for early 2018 Fiats in North America, USA, Canada, Mexico)
- 56.00.530-EU (for 2018 Fiats in Europe, UK, Germany, France, Spain, Italy, Russia. etc.)
…and not these subsequent versions (although Options A, C, D, E, J, S, U, Y and Z should work fine if id7 has been installed):
- 59.00.524-NA (for 2018 (after mid Nov. 2017) Fiats in North America, USA, Canada, Mexico), along with -EU and -4A >>> these tweaks will not work without id7
- 59.00.562/563-NA (for 2019 Fiats in North America, USA, Canada, Mexico), along with -EU and -4A (this version disables changing the brightness settings of your rear camera to meet a compliance requirement) >>> these tweaks will not work without id7
- 70.00.100² (Mazda firmware that some are installing on their own, in order to take advantage of the CarPlay retrofit hub >>> these tweaks will not work without id7. Best to use the new Version 70 tweaks and MZD-AIO 2.8.3+ tweaks, once you are on Version 70 firmware.However, do not upgrade to version 70.00.335+, as code was introduced to:
- “neutralize” the id7 tweak, therby disabling the ability to tweak
- remove the credentials needed to gain access via the serial method, thereby preventing you from reinstalling id7.
In other words, a 2017 & early 2018 Fiat 124 Spider & 124 Abarth tweak package.
- Unlike the 1.51 Beta which was an update “add-on” to 1.50 software, this is a standalone download that installs as per the instructions below
- The same precautions that I write about apply however; tweaking is at your own risk, especially for those options that haven’t been verified
- Based on feedback from North American & European users, listed below are the results of this AIO package for each individual tweak
- Ideally, keep track of all the tweaks you’ve installed, so that you will easily be able to uninstall some of the obvious ones prior to visiting Fiat dealers that could raise an objection prior to upgrading the firmware
- For more details regarding many of the individual tweaks, click on the Option [ß], linking you to previous notes
- The reference documents and source downloads for Siutsch’s AIO 1.51 have all been removed as of 3/11/2017
In appreciation of the many hours I have dedicated to this project, it has been kindly suggested to me that I should make the link to my current version of AIO 1.51Fiat available (along with any future updates) in return for a nominal donation to my coffee fund. I liked the idea, but unless individual donations are at least $3.00, PayPal® is the only one making anything, so please consider at least enough for one cup-a-joe 🙂 and I’ll promptly reply with a link to your download.

click to donate to my coffee fund, and thank you!
Based on feedback from my blog readers around the globe, here is what you should expect with the AIO 1.51Fiat_c Tweaks applied to 56.00.521 and 56.00.530 firmwares for the 2017 & 2018 Fiat 124 Spider & 124 Abarth:
Click on the option [ÿ] for even more details than what is presented in each short description
[~] WiFi option is added by default for North America, so that you have the option of attaching to your phone’s hotspot ⇒ (WORKS, but almost useless)
[~] The hidden CID number that the SD manufacturer has assigned to the inserted card, is saved in a txt file on the SD card by default ⇒ (WORKS, but unnecessary since we will not be hacking Nav cards)
[A] Enable the touchscreen while moving ⇒ (WORKS¹ ²; This tweak removes ALL speed restrictions)
[B] Reduce boot-up disclaimer time from 3.5 to 0.5 seconds ⇒ (WORKS, but it may break the Apps menu; use Option [M] instead, which eliminates disclaimer altogether)
[C] Remove the safety warning text from the reverse camera screen ⇒ (WORKS¹ ²)
[D] Remove the blank album art frame ⇒ (WORKS¹ ²)
[E] Change your background image ⇒ (WORKS¹ ²)
[F] Install speedometer by Diginix ⇒ (WORKS¹, but displayed GPS data not always reliable with our Fiat firmware versions – see my update for more; if compass is 180° off, see the last section of step 6-14; large digital alternative version available)
[G] Install date_to_statusbar_mod by Diginix ⇒ (WORKS¹, but here’s a more recent alternative of the tweak; enable GPS sync in Settings > Clock, to set the correct date)
[H] Install custom_color_scheme ⇒ (WORKS, but don’t select CarOS, as Uninstall does not properly replace the Home Menu icons)
[I] Install pause_on_mute ⇒ (WORKS¹ while in media screens)
[J] Install semi-transparent parking sensor graphics on the backup camera screen ⇒ (WORKS¹ ², if you have the Parking Assist proximity sensors, an opaque overlay is displayed at the top right corner of the reverse camera screen, blocking the camera view in that area – this tweak changes that overlay to semi-transparent)
[K] Install improved_list_loop (with optional shorter_delay_mod) ⇒ (WORKS, but need to answer Ja instead of Yes if you want shorter delay response for commander knob option)
[L] Install main_menu_loop ⇒ (WORKS¹)
[M] Remove boot-up disclaimer completely ⇒ (WORKS¹)
[N] Enable media_order patch and FLAC support ⇒ (have not tested; music will be sorted alphabetically rather than by date with newest entries first; FLAC music files will also work but seems to be limited to 2GB max)
[O] Change order of the audio source list ⇒ (WORKS¹)
[P] Install speedcam-patch ⇒ (no longer available with versions since AIO 1.51Fiat_c)
[Q] Install castscreen-receiver ⇒ (caution – have not tested; here’s a nice article from someone using Castscreen to display his Android gpx-tracks)
[R] Install Android Auto Headunit App (version 0.93A) ⇒ (caution – have not tested; has been reported to disable the internal GPS (and Navigation) and choppy performance. Installing AA changes permissions on /data_persist/dev/bin/* to 755 (instead of 777), which blocks “user” from being able to edit the folder using ssh access. The solution is to create another folder like “/data_persist/dev/bin2” then and copy files there, then ‘mv’ that folder to “/data_persist/dev/bin”. Instead of this version, you are advised to seek out AA Tru_Go 1.14b, as that is the best hacked version available (thanks 124ScottishAbarth!), available within the MZD-AIO program, but you are advised to not mix tweaks and limit your selection to the generic (non-Mazda) tweaks. Another source: email ⇒ Radarwild at hotmail.com
[S] Do backup of JCI folder before installing tweaks ⇒ (WORKS¹ ²)
[T] Install SSH_bringback ⇒ (caution – have not tested, allows you to login as the root: cmu (password jci) instead of user, giving you root privileges)
[U] Remove footer from message replies ⇒ (WORKS¹ ²; but uninstall replaces with Mazda’s signature, rather than Fiat’s)
[V] Generate swapfile on your mp3 USB drive (intended for media player v2, but may help with overall slowdowns) ⇒ (have not tested; the kernel of the linux in the CMU has a memory management bug in it, so by using the swapfile there is less chance of out-of-memory issues, however the specific USB drive is used for additional memory and must remain plugged in)
[W] Install 1 sec. diagnostic menu shortcut ⇒ (WORKS, but you have to press clock for about 5 seconds in Settings > Display screen; most people have no need to access these screens which are for technicians to use in diagnosing CMU issues as well as upgrading firmware. Back in version 55, this option was popular because from this menu, you could enter JCI test mode, and toggle the speed restriction of the touchscreen, but that selection has since been removed.)
[X] Replace Fiat 124 boot animation with Abarth 124 boot animation ⇒ (WORKS¹,
Updated versions since AIO 1.51Fiat_b accommodate North American Abarth owners that didn’t get all of the Abarth goodies – NF platform can get the NE boot animation now!)
[Y] Install bigger album art cover ⇒ (WORKS¹ ²)
[Z] No background behind buttons ⇒ (WORKS¹ ², transparent background for buttons)
[4] Install video player ⇒ (WORKS; place an mp3 file in the root of USB and play/pause to focus the audio of your mp4 files)
[5] Install Fuel Consumption Tweak ⇒ (WORKS¹ ², offers KM/L as the metric equivalent to MPG, rather than L/100 KM)
[6] Install Background Rotator (cycles thru 10 images @ 1 min. each) ⇒ (WORKS, but it may cause flickering while in the reverse camera mode)
[7] Change menu language
[2] UNINSTALLATION ⇒ (WORKS¹ ², the menu is pretty much the same, but you are selecting those items that you want uninstalled, instead of installed. Think of Uninstall as another set of tweaks that “undo” and replicate the original configuration. DO NOT UNINSTALL “ALL”
[8] Install “ALL” ⇒ (DO NOT USE THIS OPTION)
¹ Also WORKS with the autorun install (it will take a while to populate this info as feedback is received via this blog and other forums)
² Also WORKS with Mazda’s Version 70 firmware for those that want CarPlay without waiting for Fiat’s release, but now that Mazda AIO 2.8.3+ has been released with Version 70 in mind, that is the recommended source of tweaks not Fiat related. For Fiat/Abarth tweaks and restoring factory Navigation, see the new Version 70 tweak. If Fiat ever releases the respective firmware version for CarPlay & Android Auto, in conjunction with the retrofit hub, it will take a while to populate this info as feedback is received via this blog and other forums, but so far we know:
♦ Do not install Pause-to-Mute (Option[I]), as that will already be incorporated.
♦ Although the touchscreen tweak works (for CarPlay too), it is totally disabled for Android Auto, even when the vehicle is not moving.
♦ Do not install Option [B] or [M], as you may lose your Home/AA/CP buttons.
♦ Do not install Option [N], as it isn’t compatible
♦ Uninstall should only be used on options that were allowed for Version 70.
♦ Version 70 uses much more memory, so options like Video Player, Cast Screen and Speedometer, probably will not be install-able, unless some memory is made available. Probably better to use Mazda AIO 2.8.3+ instead.
♦ Option [R] (Android Auto app) will not work, as it will conflict with firmware AA.
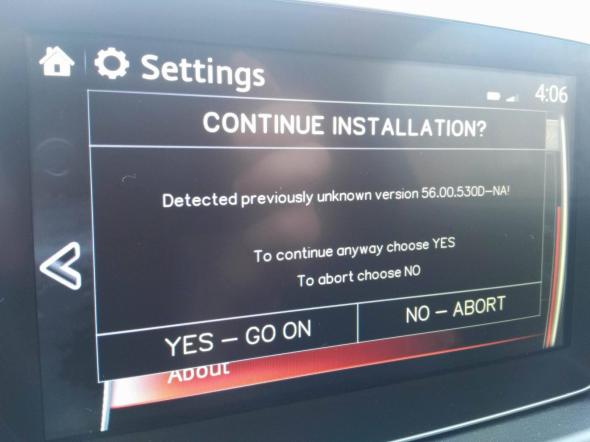
[added 4/22/2018]

I received emails from Greg B. on 4/22/2018 wondering why he can’t install tweaks to his 2018 Fiat Abarth 124 Spider built late in November 2017 for the U.S. market. His photo (shown above) is evidence that the equivalent of Mazda firmware 59.00.502 (and higher), which among other changes like updated USB drivers, prevents tweaks from being installed via the USB ports, are showing up in recent 2018 Fiat vehicles now, so if your vehicles comes with 59.00.524 or 59.00.562/563 firmware, don’t bother seeking tweak software from me, as it will not do anything, unless you are willing to do a convoluted firmware downgrade first to Mazda 59.00.502, which will then allow you to install id7 via USB tweak, and then upgrade to 70.00.100, as detailed in my article: https://21stcenturyfiat124spider.wordpress.com/2019/02/18/universal-version-70-fiat-tweak/.
Again, you can find your firmware version by starting at the main menu and selecting Settings > System > About > Version Information.
This could also be forewarning that Fiat dealers may start upgrading the firmware in our cars as we bring them in for service, in which case (if you appreciate the improvements enabled by installing tweaks), you may wish to install the ID7 autorun prior to that visit, as that will allow you to continue installing tweaks regardless.
Changelog
AIO 1.51FIAT_C CHANGES (3/16/2017):
✅ Option [P]: Removed Speedcam-patch
AIO 1.51FIAT_C supersedes and replaces the 3 previous versions of the 2017 Fiat 124 Spider & 124 Abarth tweaks.
Although I haven’t been asked to, I’m proactively following actions demanded of the original developers of AIO, by removing Option [P] (the speedcam-patch) and all of what were deemed “illegal copies of NNG code and data files”, along with the NNG_Tool and NNG_patcher folders, both of which allow the use of pirated maps. My whole goal in making this tweak package available is to make it easy for my blog followers to be able to tweak certain display characteristics of the Infotainment system in the Fiat and Abarth 124 Spiders, period.
In other words, tweak, not hack (yes, there is a difference).
✅ Option [F]: Improved Speedometer App
Install: Altered the code to prevent the mini-speedometer from appearing in the backup camera screen, if that sub-option is chosen.
✅ Option [T]: Without this AIO script package, the only other way to access and tweak your CMU firmware requires you to have SSH access to the Linux system used in the MZD Connect. After this tweak, you should be able to establish a network connection between your Computer (or your Mobile) and your CMU @ 192.168.43.109:22 using either a USB ethernet adapter (or perhaps WiFi), with root privileges: User cmu and Password jci .
Install: Modified the SSH_bringback routine to work with 56.00.521 and 56.00.530 firmwares per Trezdog44.
Uninstall: There is no uninstall for SSH_bringback.
AIO 1.51Fiat_b changes:
✅ Option [G]: Improved “date_to_statusbar_mod”
Install: Changing status bar background of version 2.2 from 100% light transparent to 80% dark transparent so that items are more easily readable in the Daytime Navigation screens or with background screens that are not dark-colored. For the most current Option [G] install, see this article.
Uninstall: Will return status bar to factory settings.
✅ Option [X]: Replace Fiat 124 Boot Animation with Abarth 124 Boot Animation
Install: I’ve rewritten this tweak so that rather than crudely “removing” the animation sequences by replacing them with an image file (no animation), this option will now substitute the Fiat 124 animation with the Abarth 124 version (obtained from the European firmware), although you may witness the occasional brief display of the Fiat logo prior to the start of the Abarth animations sequence.


Uninstall: Will restore the Fiat 124 animation (instead of the Mazda logo animation).
Note1: I’ve only changed the wording in the English version though, since I don’t know the other languages. But in Europe and elsewhere, despite the wording, although my changes will work, those Abarths already have the proper boot animation anyways.
Note2: If for some reason an Abarth owner would rather have the Fiat 124 animation, simply “Uninstall” option [X].
Note3: As a bonus, custom boot animations can also be substituted in the config\bootanimation\jci\resources folder of your compiled install USB drive and the tweak will install those instead.
Note4: You may not always witness the entire animation sequence, since depending on the amount of time between shutdown and restart, I think the CMU first goes into a suspend/sleep mode when you shut off your vehicle and then actually powers down the CMU after an unknown amount of time (a few hours?). Since the power-up from suspend mode is so much quicker, the “filler” boot animation sequence  {LoopLogo.ivf / TranLogo.ivf / TranLogoEnd.ivf} may be cut short. A Mazda3 forum reader has discovered (April 2018) that the boot sequence is affected by waking the CMU out of sleep mode:
I discovered by a fluke the clock to the CMU apparently begins to tick once you unlock the car. So on those occasions where the infotainment home screen, radio, nav would appear immediately at startup, it was because I first opened the hatch for a while to put things in or pull things out, get the dog baskets out and take a minute or two to get them attached in the back seat…you get the idea
The times I went to the car, unlock the door and immediately start the car were the times I had to wait for the Mazda logo to disappear.
Bonus added 10/3/2018: An Abarth shutdown animation has been created, and is now available in my AIO 1.51Fiat_d Updates Folder. By following the instructions in the Read_Me file, the Option [X] tweak can be modified to install both bootup and shutdown Abarth animations.


✅ Option [E]: Changing Screen Background Image
Install: I fixed the default background image that results if you’ve selected this option, but didn’t actually make a proper selection of an actual image. Although a File Explorer screen showing you thumbnail examples pops up, if you don’t choose an image selection in the “Choose” (vertical list, black background) screen, you’ve set the script to install a default image which the developers had inserted (a fiery red cloud with Mazda logo) rather than our factory default background.
Uninstall: I fixed the default background image, which the developers had inserted (a fiery red cloud with Mazda logo) rather than our factory default background.
✅ Adjusted the scripts to accommodate 56.00.530D-EU, rather than 56.00.530A-EU. So now, the following options should work for the Abarth European firmware.
- Pause-on-Mute [I]
Speedcam-patch [P]- Track-order / FLAC support [N]
Apparently, I need to modify some more code to accommodate various iteration levels (i.e. Abarth firmware was actually published as 56.00.530D-4A and 56.00.530D-NA, rather than iteration level A). Until then, just answer YES when you see the following screen (all options will install fine as the individual Option [I] and [N] scripts have already been modified):
AIO 1.51Fiat_a changes:
✅ Option [A]: No Speed Restrictions for Touchscreen
Install: Your Infotainment system will totally lose all of Mazda’s Speed Restricted tasks and [your passenger] will gain the ability to have full use of your touchscreen while travelling more than 5 mph.
Uninstall: Will return Speed Restricted tasks to factory settings.
✅ Option [P]: Speedcam patching
Install: Allowed Speedcam tweak to install for NA firmware as well (I guess you would use your own database).
Uninstall: There is no uninstall for this tweak.
AIO 1.51Fiat changes:
✅ Although Siutsch modified the AIO 1.51 tweaks to accommodate 56.00.521-NA and to properly process the following options (which AIO 1.50 will not do),
- pause-on-mute [I]
- speedcam-patch [P]
- track-order / FLAC support [N]
the other regional versions, as well as the Abarth versions needed to be addressed. I’ve modified the code to also work with:
- 56.00.521-EU (for Europe, UK, Germany, France, Spain, Italy, Russia. etc.)
- 56.00.521-4A (if this version even exists; for Australia, NZ, Thailand, Philippines, South Africa-America, Oceania)
- 56.00.530-NA (for North America, USA, Canada, Mexico ONLY)
- 56.00.530-EU (for Europe, UK, Germany, France, Spain, Italy, Russia. etc.)
- 56.00.530-4A (for Australia, NZ, Thailand, Philippines, South Africa-America, Oceania)

If you wish to update your Gracenote music database, see this article of mine…
Installation Instructions
[Steven Park posted a nice tutorial on YouTube on 7/14/2017]
- The All-In-One program is a DOS program that only runs in Windows up to version 10 (do not use a Mac computer, but if you do, see ◊ note below).
- Create a folder within your Documents folder on your PC (I called mine All_In_One_Tweaks, as DOS doesn’t like spaces or special characters in the path’s folder names).
- Extract the contents of the downloaded compressed zip file to that new folder – not to the USB drive.
 From within the folder you created, right-click choose.cmd ³ (has ⇒ this icon next to it), select Properties, and within the General tab, if the Security box is unchecked – check it, then Apply, then OK.
- Double-click choose.cmd ³ (acknowledge any permission issues, if any) and you should now be presented with your tweak AIO menu.
- Click anywhere on the AIO window (with your mouse) to insure it is active, otherwise selections may be ignored.
- Put an empty FAT32 formatted USB ¹ 2.0 or 3.0 drive (not larger than 32GB) in your Windows PC ².
- Make your individual option selection(s) using the keyboard (not your mouse), each followed by Enter, and your chosen selections will turn yellow to indicate that they have been selected. When you are finished, select “0” (zero).
- Allow the program to write directly to your already inserted USB drive ², then remove it from your PC*.
- Insert the USB drive into your car USB port.
- Tap your Start button once (without touching the brake pedal) to put the car in ACC mode.
- Be patient and wait for the first message (could take as long as 5 or 6 minutes), acknowledge the OS version message (using the touchscreen) and wait while the progress messages scroll by. As long as you have a variation of 56.00.521 or 56.00.530 firmware, just answer YES if you see the following screen (all options will install fine).

- If by chance the update is taking longer than 15 minutes (it shouldn’t), be sure to momentarily step on the brake pedal to insure that the system doesn’t go to sleep as this will corrupt the process.
- Acknowledge the reboot prompt (using the touchscreen).
- After the screen turns black (system reboot), pull out your USB drive and…
- Enjoy! Repeat the process (starting with step 4) to try other options, or to uninstall (using option [2]) any combination of options using the same USB drive (best not to “uninstall” any option that hasn’t been installed though). Note: there is no need to delete files that the program copied to the USB drive, as you repeat these steps.
¹ Many larger USB drives are pre-formatted ExFAT, not FAT32 (especially the larger drives), so to be sure, right click on the drive in Windows Explorer, and choose “Format…”, FAT32. Windows may not offer FAT32 option for larger drives, in which case you’ll need a separate utility like this one from HP (that you must run as an administrator). For some, it’s just easier to just use smaller USB drives.
² By having the USB drive inserted and allowing the program to write the files directly, this saves you the step of manually copying files from the newly compiled All_In_One_Tweaks /_copy_content_to_root_of_fat32_usb_stick folder to the USB drive.
³ Optional: You might want to create a desktop shortcut to choose.cmd for easier future access. Easy way to do this – right click on choose.cmd (it’s in the folder you created) and select create shortcut. Then drag that shortcut to your desktop and rename it Fiat AIO and click that instead.
* If installing tweaks using ID7 autorun and the USB method still works, it was presumed that you would need to rename the tweaks.sh file to run.sh, but apparently that isn’t necessary.
◊ bspielman recommends using Funter to clean up USB drives that were formatted using a Mac.
Some more tweaks that I would like to see added…
1. Guidance Mute
I wish the system had a Guidance Mute option…

Guidance Mute does not currently exist ~ it’s a feature I wish for though
I consider this a safety feature since you aren’t supposed to be programming your destination while driving, so that by entering it prior to starting your trip so that you will be offered the needed guidance as we get closer to your destination, you have a simple method to “shut her up” without cancelling the route, while driving what you consider to be a much more sensible route that currently varies from the system’s recommended route, at least in the initial portion of your trip.
As you’ve probably already discovered, just lowering the volume doesn’t eliminate the annoying music interruptions in your headrest speakers (left channel) during each announcement, UNLESS (as reader Mark has discovered) the volume is lowered all the way to ZERO.
2. Compass
Be able to select the No-Navigation “Compass” screen (minus the “You don’t have a Navigation SD card” message). Or better yet, I feel that the display of the already created compass button from the map manipulation screen, should be affixed to the bottom right corner of the 3D cockpit view, when the Menu bar is hidden (as shown below). For more details on this suggestion, go here.

3. FM/HD Radio RDS Live Traffic
(thanking muserltd for the suggestion)
Rather than depending on an XM subscription for real-time traffic data, which is how the Infotainment system is currently setup for the U.S., be able to switch the function back to the FM Radio Data System (RDS) data that is…
- presumably already programmed into the Infotainment software (but disabled)
- broadcast as a free service at many large-city FM & HD radio stations
- was planned for the 124 Spider (based on the owner’s manual)…

- Fiat websites and corporate materials (aside from the owner’s manuals) still claim that this feature is programmed into our Infotainment systems, as evidenced in this screen shot taken 3/25/2017 (click to enlarge)…

- When the ND MX-5 had been introduced, the decision had just been made to switch the traffic information source to XM, rather than WiFi, which performed very poorly because of Visteon’s inferior CMU units not having proper electromagnetic interference shielding (cost savings), combined with the loss of Mazda’s partner that was to handle the transmission of traffic updates for North America. It seems like the agreement fell through for the supplier for the WiFi data in North America, but not Europe (don’t know why). Since the early CMUs had the shielding defect, they decided to disable WiFi completely and not offer that service. Because of this decision, Mazda was able to avoid replacing all of the CMUs in North America for poor WiFi performance. Another result of that decision was that Bluetooth connectivity improved slightly, because while WiFi was active, the poor shielding had a negative effect on Bluetooth reception as well.It is my understanding that European and Japanese CMUs were significantly more expensive to manufacture and therefore the inferior CMU units were still being manufactured and installed into MX-5s and 124 Spiders for MY 2017 vehicles in North America. I still don’t know why the switch-over to FM, as the source for traffic data, was never made for our Spiders, but my guess is that XM put pressure on Fiat, because of the loss of many potential subscriptions (data via FM is free).
How does it work?
from Crutchfield.com
Real-time traffic data is compiled by a traffic-information provider, then broadcast over a radio frequency to equipment set up to receive it. Depending on the equipment you have, you’ll subscribe to a service that’s broadcast over terrestrial FM, or to one that’s broadcast along with satellite radio signals. Traffic information doesn’t interfere with FM or XM radio reception, so you can continue to listen to either source while you receive traffic signals.
The traffic information comes from a variety of sources, including commercial traffic data providers, departments of transportation, police and emergency services, road sensors, traffic cameras, and even aircraft reports. This information is compiled and delivered via radio frequency (FM/HD Radio or XM) to your navigation system. These providers work with the two main companies behind map data for the U.S., Tele Atlas and HERE (formerly known as NAVTEQ), to deliver accurate representation of traffic data on GPS map displays.
In terrestrial FM applications, the traffic signals are broadcast over the FM Radio Data System (RDS), a special application of the radio band for sending small amounts of digital information. Most car stereos support FM RDS signals, which is how you can see radio station call letters or artist and song title information on your display when tuned to certain stations.HD Radio signals broadcast traffic data in a similar fashion, but since HD Radio signals are able to carry more information, they can provide real-time updates more rapidly — up to four times more quickly than FM RDS in some cases.
Asked an expert…
Championway,
By any chance, would you know the TMC settings to enable traffic data in North America via FM/HD radio stations, as was planned for 2017 models (at least for the 124 Spider)?
✅ His answer…
If the CMU unit FM socket supports RDS, then disable [tmc-http] and enable [tmc]. This setting is at “data.zip/project_config” and at “data.zip/config/devices”. Also need the [appropriate] data.zip first [from the jci/nng/ux folder].
Unfortunately, I haven’t been successful in locating these settings.
Preserve your ability to Tweak in future firmware versions
[added 8/29/2017]
Because Mazda…
- was replacing so many “bricked” CMUs (that significantly added to Mazda’s warranty tab) due to haphazard hacking
- was wrongly accused that there were safety concerns with their CMUs being so easily hack-able
- was made aware that “NNG_Tool” and “NNG_patcher” hacks (at one time part of the MZD AIO package) allowed the use of pirated maps
they are now shipping Model Year 2018+ vehicles with firmware version 59.00.502 (or higher) that, by design, permanently disables the ability for scripts on USB drives from running, resulting in no known method to tweak those vehicles except by removing the CMU from the dashboard and truly hacking in via the serial pins.
Mazda is also gradually upgrading the older CMU firmwares to 59.00.502 (or higher) in prior-year Mazda vehicles, as they come in for service, in order to no longer allow tweaking in those vehicles either, *** UNLESS *** you have installed a “backdoor” tweak (called “ID7 autorun”) prior to that upgrade, which will then re-allow you to use AIO to install tweaks.
Not knowing what strategy Fiat is going to implement, I am proactively making available a free download to install (at your own risk) “ID7 autorun” along with Recovery scripts, which is a ‘set-it-and-forget-it’ tool that trezdog, id7 and others have developed (that will remain in the CMU through firmware upgrades, as will the touchscreen tweak), and essentially allows tweaks to be installed again.
I was notified by reader Greg B. on 4/22/2018 that some 2018 vehicles are being shipped with 59.00.524 firmware, which also prevents tweaks from being installed via the USB port, so apparently Fiat is slowly following the same path.
I’m also getting feedback in September 2018 that the ID7 autorun is even better than I initially thought, in that tweaks will be installable via the normal USB drive method, without having to rename tweaks.sh to run.sh, nor use the SD card in place of the USB drive.
“ID7 autorun” (along with Recovery scripts)
~ Installation Instructions ~
(while you still have 56.00.521 or 56.00.530 firmware)
(for even more detailed instructions, see this comment)
- Put an empty FAT32 formatted USB 2.0 or 3.0 drive (not larger than 32GB) in your Windows PC.
- Unzip the contents of the downloaded file to that USB drive and remove from your PC.
- Insert the USB drive into your car USB port.
- Tap your Start button once (without touching the brake pedal) to put the car in ACC mode.
- Be patient and wait for the first message (could take as long as 5 to 10 minutes)
- You will be presented with a menu: Install / Uninstall / Skip. Using the touchscreen, select Install. (I advise not uninstalling this tweak)
- You will be presented with a Reboot menu: Now / Later. Using the touchscreen, select Now.

- After the screen turns black (system reboot), remove the USB drive and fuggedaboudit
The autorun scripts are compatible with current Fiat firmware versions and they aren’t expected to be unique to Mazda (in other words, the scripts are expected to be compatible with future Fiat firmware versions as well). BONUS: Once Fiat decides to update our software to lock down our firmware (as Mazda has done), this solution should make a lot of my readers quite happy!
It sounds like there may be other advantages and programming alternatives after installing autorun*, as I discovered reading this comment from MechaBouncer today where he stated that instead of installing Android Auto (AA) using the AIO scripts, he installed a standalone AA onto a blank SD card, and in conjunction with autorun, he has an alternative to the factory Navigation…
Android Auto script – This is what I’m actually doing now and it minimizes the changes to the CMU itself because AA lives on the SD card instead of on the CMU [and autorun brings it up. By using Waze for navigation, you avoid the audio stuttering which Google Maps exhibits in AA because of the high CPU task load.]
So you can pop out the SD card and the system behaves like stock. Pop the SD card back in, use Nav+Mute to reboot the CMU, and AA comes back.
Until an all inclusive package is released, trezdog has just produced a sound configuration patch to fix the incorrect Bluetooth behavior during AA phone calls.
ajgonzales states:
When I get a call while in AA and the I am prompted with the question “Do you want to answer?”, I just press the HOME button, and then I can immediately start using the knob to make my selection.
Others have stated that they simply press the ANSWER button on the steering wheel. Regarding text messages, the HOME button should allow you to address those as well.
♦♦♦♦♦
* In my opinion, I would advise most of my readers to
- consider installing the backdoor tweak “ID7 Autorun” at some point (prior to Fiat upgrading our firmware)
- but not actually using it to install current versions of Android Auto at this time because as I’ve stated previously, that really isn’t a tweak, but more of a “hack which kinda works”.
If you are thinking of installing AA, your best bet might be to use the most recent MZD-AIO program, and install only that option (not mix other tweaks in at the same time), but you are on your own since I’m not sure if it will mess with our tweaks or not, as he keeps trying to automate the legacy quirks, but they are all Mazda reversions, not Fiat. This section of the Change Log is my biggest concern:
Fixed the NodeJS code to handle all errors and repair broken installations
Removed the short lived “Use legacy install” because the new method will repair errors if they exist.
This should solve the apps disappearing from the app list issues and fix all other app installation/uninstallation issues too.
One additional file (/jci/opera/opera_dir/userjs/aio.js) is installed with apps containing some global AIO helper functions
Separated from additionalApps.js to maintain backward and cross compatibility (with CASDK, cmu-opkg, and other older community developed mods/apps that install old versions of additionalApps.js will not break the new apps)
One reader, Christopher had issues with his Navigation card after trying out the SD version of Android Auto, and I haven’t heard back from him as to whether he’s resolved that or not.
Fixing a bricked CMU
[UPDATED 2/3/2021]
For future reference purposes, if the CMU ever becomes bricked (usually by allowing the CMU to power down prior to the firmware update process completing), there is an established procedure written up by raoulh to fix it, but it isn’t for the non-techies.
The CMU update process is indeed very badly designed, as it has plenty of failure points where it ends with a bricked device that will not boot anymore. The easiest way to do that is by shutting the CMU off after the failsafe package installation. Basically what happens is that a small flash chip that contains the boot program has a flag on it that decides on which partition to boot from. It can either be the normal Mazda system, or the «failsafe» software. When you install the failsafe update package without the 2nd reinstall package, the flash chip boot select mode is set to boot on the ibc1 partition, which does not match the current Mazda system. This ibc1 partition is updated by the reinstall package. So it’s bricked because it cannot boot anymore.
The easiest fix here is to change the boot select value on the flash chip to boot on ibc2 (the failsafe). This is normally done by the update process, after the reinstallation package is checked for integrity. Here we are going to do it by forcing the boot. It will start the «failsafe» installation software, that will tell us that installation fails and that we can retry by putting a USB key into the car with a correct reinstallation package. Then the installation will continue and finish.
Tutorial:
Here is a step by step tutorial on how to achieve this. Be aware that It can be hard to do this if you do not understand what you are doing. But in case your CMU is bricked (black screen after a failed upgrade or so) you have nothing to loose, right? Bringing the car to a dealer will not help, they will just charge you for a full CMU replacement, and that costs a lot…The flash chip is placed on the back of the CMU’s PCB. It’s a NOR SPI Flash. The idea is to directly connect to this chip and use a raspberry pi (that has an SPI bus) to reprogram the memory.
Required hardware:
- A Raspberry pi
- A Programmer Test Clip SOIC16 or 6x IC Test clips (I used test clips)
- A breadboard to do the connections
On the Raspberry pi, you need to install Raspbian (Lite version is ok). From a fresh install of Rasbian, setup the pi to have SPI enabled by running:
Code:sudo raspi-config (enable SPI in Interfacing Options*) sudo rebootInstall some required tools:
Code:sudo apt-get update sudo apt-get install build-essential libusb-1.0-0-dev libusb-dev git wget curl libpci-devGet a newer version of flashrom:
Code:git clone https://github.com/flashrom/flashrom cd flashrom make syncShut the power off of the raspberry.
Now the raspberry pi is ready. Unmount the CMU from your car (look on youtube for video on how to do it, it’s easy), unscrew the PCB from the CMU and plug the wires from the raspberry to the flash chip like here (see attached pic) and http://www.2x4logic.com/mcbot-annotated.jpg
Turn the raspberry pi on. And check if the flash is detected:
Code:cd flashrom ./flashrom -p linux_spi:dev=/dev/spidev0.0,spispeed=8000This will tell if a chip is detected or not. If not your wiring is not ok. When something is detected, flashrom may tell you that multiple different chips are detected. That’s because some chips from a same manufacturer can have the same protocol. You need to read the right device model from what is written on the chip. I had a MX25L6445E. I know that some other CMU may have a different chip model. It should also work if flashrom can detect it.
Then try to read the memory and do a backup:
Code:./flashrom -r backup-cmu.bin -c "MX25L6436E/MX25L6445E/MX25L6465E/MX25L6473E/MX25L6473F" -V -p linux_spi:dev=/dev/spidev0.0,spispeed=8000Carefully read what flashrom is doing to check of any failure. I had to use the option -c “MX25L6436E/MX25L6445E/MX25L6465E/MX25L6473E/MX25L6473F” to select the right chip model in flashrom as it was written when using the -p option (list all detected devices)
Once you have the backup, we modify the boot-select byte inside the file
Code:cp backup-cmu.bin cmu-mod.bin printf '\x00' | dd of=cmu-mod.bin bs=1 seek=65536 count=1 conv=notruncNow it’s time to write the modified file to the flash:
Code:./flashrom -w cmu-mod.bin -c "MX25L6436E/MX25L6445E/MX25L6465E/MX25L6473E/MX25L6473F" -V -p linux_spi:dev=/dev/spidev0.0,spispeed=8000Read back the flash to verify it worked
Code:./flashrom -r cmu.bin -c "MX25L6436E/MX25L6445E/MX25L6465E/MX25L6473E/MX25L6473F" -V -p linux_spi:dev=/dev/spidev0.0,spispeed=8000Check if the file matches by verifying the checksum
Code:sha1sum cmu.bin cmu-mod.binThe checksum should match, if they do, the procedure is done. It’s time to unplug everything and put the CMU back in the car. The CMU should boot into the failsafe recovery system and ask you for a USB key with the reinstall package.

click to enlarge
⇓ Method 2 Process (explained further down, in the same thread):
Basically, this is the required patch that changes the boot select value on the flash chip to boot on ibc2 (the failsafe), allowing the firmware update to proceed. If you wish to use an EEPROM writer instead, you only need to put 00 at address 10000h (in hex). The default value is FF.

click to enlarge
Tweak to free up space in the Firmware RootFS folder
[added 10/31/2022]
The folder that our ver 56 + 59 firmware tweaks are installed in (not ver 70 tweaks – those install in the Resources folder instead) was primarily intended for language and font files. If you’d like to free up some space in that folder (as well as some memory), there is an optional Delete Dumps Tweak ver 1.0.3 that deletes large files containing Chinese and Japanese fonts (if you don’t expect they will be needed; for those in the ADR region, it might be best to not use this tweak), as well as un-needed dump files.

Improving the accuracy of the Speedometer App
If you want the speed to be even more accurate and correlate exactly with the vehicle’s speedometer and Cruise Control (when it is in-fact “working”)…
The speedometer Java script uses the math function Math.ceil for speed calculations in the speedometer.js*file- “The*Math.ceil()*function returns the smallest integer*greater than or equal*to a given number”. I’ve changed mine to use Math.round for speed calculations and it now matches exactly with my cruise control setpoint in the gauge cluster.
The file to edit (with a proper text editor): …\FIAT\All-in-one_tweaks_V1.51Fiat\choose\config_all\speedometer \jci\gui\apps\_speedometer\js\speedometer.js
line 149: * var avgSpeed = Math.round(speedSumTotal / totalMoveCount);
Or you can simply copy the speedometer.js file from my AIO 1.51Fiat_d Updates Folder, into the choose\config_all\speedometer \jci\gui\apps\_speedometer\js folder of the AIO package on your PC, and re-install Option [F].
I’ve already fixed the Java script file for the alternative speedometer install mentioned here, on 12/13/2018 (I haven’t personally tested this version though). ⇓

Another speedometer install (version 5) known as the Digital Bar Speedometer is included in the MZD-AIO package (I haven’t personally tested this version, either) ⇓

An additional USB Audio Tweak is also available, and although it doesn’t update any codecs, it does improve the behavior of the selection and display of your USB audio files.


I added a section linking to a good thread for fixing a bricked CMU today, for those that may have allowed the unit to power down while upgrading the firmware (a no-no). It is for the geeks though…
https://21stcenturyfiat124spider.wordpress.com/ameridans-radio-silencer/common-tweaks-that-work-in-the-fiat-124-spider-infotainment-center-7-0/#fix
LikeLike
Amazing work. Thank you I have to check where I put my rasberry and will try it and hope that i will finally fix it. I was so frustrated I ordered a used one an everything works fine now I have an UK Screen and an bricked main unit that i can fix and hopefully resell one day. Many thanks.
LikeLike
Have any fellow computer novices tried to install these tweaks themselves? Eager to install some of these tweaks but haven’t done anything like this before and am wary of my limited knowledge of coding language.
Secondly – If I decide after installing changes that I don’t like any or it becomes time to sell the car and want to restore to original factory settings, is it fairly simple to do so or are all changes permanent?
LikeLike
While you are awaiting responses from computer novices 😉 , let me just say (assuming your system is tweakable via USB) that hundreds of blog readers have installed the tweaks, you don’t need to know coding language, and uninstalling the tweaks is just as easy as installing them (same menu).
LikeLike
Big question for Ameridan:
Is it possible to run AA with firmware version 70 (id7 patched), without hardware modifications? As well as I do now with AIO and ver. 56 firmware?
Thanks Dan for all your efforts!
LikeLiked by 1 person
Good question!
Before responding with NO (which was the case, as far as I knew), I Googled the subject, and was quite surprised to learn that a version of the Android Auto (AA) tweak has been released specifically for version 70! This allows you to run the unofficial “tweak” version of AA (touchscreen works!), without installing the new USB hub.
Apparently, Mazda AIO v2.8.6 tweak “No More Disclaimer” must be installed first, and the app is called AA Tru_go V1.15. If you’d like to install others tweaks e.g speedometer, video player, status bar, fuel consumption, and presumably, my Version 70 Mazda-to-Fiat package, etc.. You must install them after AA Tru_go V1.15, otherwise they will not work. Other notes:
Please review radarwild’s thread thoroughly, before proceeding – all the details can be found at:
https://www.mazda3revolution.com/threads/aa-tru_go-v1-15a-fw59-00-504-fw70-00-xx-fw70-00-352.242299/
His email address ⇒ Radarwild at hotmail.com
LikeLike
Hi Ameridan, is it possible to add a function to play a short .mp3 (audio file) when the car starts? Similar to Import Bible’s product in the link below:
LikeLike
An animation yes, but I’m not aware of a bootup audio tweak.
LikeLike
Hello, I’m sorry to ask this, but I’m not familiar with tweak section and I really can’t find out how to install the tweak for touch screen / speedometer ecc ecc with the os version 70.00.100 done for the apple carplay fit. Can you please tell me how can I do it and what do I need to install (with the link) thank you very much
LikeLike
See https://mazdatweaks.com/faq/
LikeLike
Thanks for all the great information you’ve gathered here! I made use of it a lot with my 2017 124 Spider. And I used the tweaks to add the Speedometer. But I’ve upgraded to the 2020 124 Spider and am really missing my speedo. I’ve searched through your site (and I’m afraid I know the answer), but is there any way to add the speedo with version 59.00.563 NA (without changing any hardware)?
LikeLike
Too bad you didn’t swap CMUs 😉
I think you mean “without messing with any hardware”, because you can do the serial method of installing version 70.00.100, as explained @ https://mazdatweaks.com/serial/ , but it is a lot of hassle. BTW, thank you so much for the generous donation!!
LikeLike
Yes, that’s what I mean. That’s more hassle than I think I’m prepared for. Do you happen to know if there is any way to get the carbon fiber top from a North American source? I know there is a fiberglass version but I don’t think I want that. So far it just looks like you have to order it from Europe.
LikeLike
I went to change my background using the tweaks and something must have happened because either I just get the animated fiat logo, or if I’m lucky I’ll get the main menu but it’s like none of the options are selectable. I may have done something extra dumb like enabled the cache file…but I don’t remember. I’m on the v70 firmware now. ..is there any way to hard reset (ie use the fail safe ) without using the factory default option? I’m stumped and hoping the CMU isn’t bricked.
LikeLike
If you installed the background tweak from this page – uninstall it, because it probably won’t work properly. Once you are on version 70, you need to use the MZD-AIO package to install select tweaks. I’m sure you aren’t bricked – because the worst state scenario involves reinstalling the firmware and universal version 70 tweak.
LikeLike
Boxhall Media, thank you for the donation. The email registered to your PayPal account doesn’t seem to be valid. Can you provide another?
LikeLike
is it possible to go from a 74 software back to a 70 or a 59?
LikeLike
Yes, but you’ll have to hook up a serial cable, as described in the [ADDED 4/11/2021] section of my article https://21stcenturyfiat124spider.wordpress.com/2019/02/18/universal-version-70-fiat-tweak/
LikeLike
Hi team
i am in australia and have a 2016 Abarth 124 Spider, i would like to know if the Tweeks eg: speedometer etc will work on my car, the ver: is OS VERSION 56.00.521 4A N
i am more than happy to donate to the the coffe fund.
Cheers
from Down Under
LikeLike
Cheers Lewis, yes they will work nicely, however for the Speedometer tweak specifically, I recommend using the MZD-AIO package.
LikeLike
I recently bought an used 124 Spider Abarth 2017 with Apple CarPlay/Android Auto on it. I really wanted to change the background that the previous owner installed. Am I going to lose CarPlay/Android Auto if I do that infotainment tweak?
LikeLike
No, all you are doing is substituting a file, but I recommend using MZD-AIO to install the background tweak.
LikeLike
Hi, Is there a tweak avaliblle to allow you to touch the clock to turn off the display & show the clock only? I frequently go into the menu to do this which is a bit annoying. It would be great to know if this could be implemented if it hasn’t already.
LikeLike
I’m on vacation, and can’t easily review my article, but if the tweak isn’t listed, it probably isn’t available.
LikeLike
ASH8 has posted some interesting information regarding Mazda firmware today:
*74.00.311A EU N is now available for Europe and UK*.
For those in Australia and NZ, S Africa you can now use this EU N version without any issues as it also has English language.
Many in Australia have installed EU N in place of 4A N for years, however if you are in Asia or a country that uses 4A N you may lose your native language, essentially that is the only difference between the two .up files which are the languages each offer.
EU N includes native languages for these countries..
England UK (English) Albania, Andorra, Austria, Belarus, Belgium, Bosnia, Bosnia Herzegovina, Bulgaria, Croatia, Czech, Denmark, Estonia, Finland, France, Germany, Gibraltar, Greece, Hungary, Ireland, Israel, Italy, Kazakhstan, Kosovo, Latvia, Liechtenstein, Lithuania, Luxembourg, Macedonia, Malta, Moldova, Monaco, Montenegro, Netherlands, Norway, Portugal, Poland, Romania, Russia, San Marino, Serbia, Slovakia, Slovenia, Spain, Sweden, Switzerland, Turkey, Ukraine.
4A N (ADR) includes languages for these countries..
Australia/NZ (English), South Africa (English), Fiji, Indonesia, Malaysia, M-East, New Zealand, Oceania, Papua New Guinea, Philippines, Qatar, Saudi, Singapore, South America (Most of), Asia (Not Japan or China), Thailand.
Remember IF you currently use English on screen then YES you can install EU N 74.00.311A.
Does NOT effect your Navigation on-screen or use (SD Card) if fitted in anyway
LikeLike
Thanks to 124ScottishAbarth, I updated the description/advice regarding Option [R], the standalone AA tweak, which has nothing to do with the official version that was released with the upgraded USB hub hardware.
LikeLike
Does anybody know of a tweak to disable navigation Street name notifications while in other apps like audio?
LikeLike
I’m quite sure that no tweak exists that does as you wish. I actually like that feature, and wish my Jeep uConnect displayed upcoming streets. If it bothers you that much, you can remove the SD card (with the power off, of course) until you need the Nav app.
FYI, I did prepare a tweak to display audio data in gold font (vs white) against a black background (vs grey) to improve readability and catch your attention better, but street names also appear in the same manner. Example in next comment.
LikeLike
LikeLike
I added a section today “Tweak to free up space in the Firmware RootFS folder”, in case it may be of use.
LikeLike
After installing CarPlay in my 2017 Classica back in August 2020, I also installed a couple of tweaks using the then current Mazda-AIO program. If I were to install an additional tweak using that or more current version would it affect those previously installed back in 2020?
LikeLike
No, you should be fine. Just curious, what new tweak are you going for?
LikeLike
Thinking about doing away with the blank album art border. Only displays for a small number of local FM stations. Never for XM. From my ipod (yes I still have one) only if I input a picture myself. So it’s mostly just an empty square even with the newest Gracenote.
LikeLiked by 1 person
I’ve got the same problem as Icedcornholio had a couple of years ago, I installed a background picture tweak on a 70 fw, then realised it doesn’t work.
I’ve uninstalled this now, but now I either get stuck on the boot screen, or I get to the main menu buttons but I cannot do anything.
Have I bricked it do you think?
LikeLike
I clearly stated in my email: P.S. This tweak package is intended for version 56 firmware (and 59 upgrades), but not for Version 70 firmware.
Since you seem to have v70 firmware, simply start over by reinstalling that. Then use MZD-AIO to install your background tweak.
LikeLike