GREAT PHOTOS COURTESY OF Cal from Calgary (CLICK THEM TO ENLARGE)
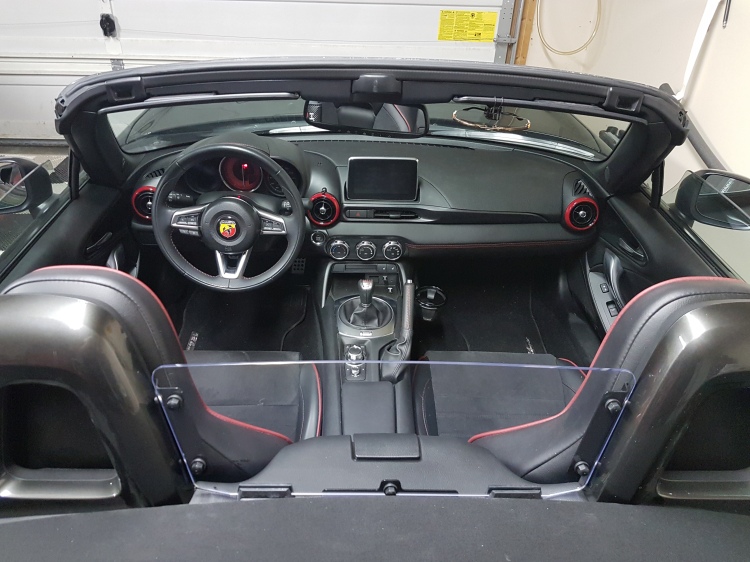
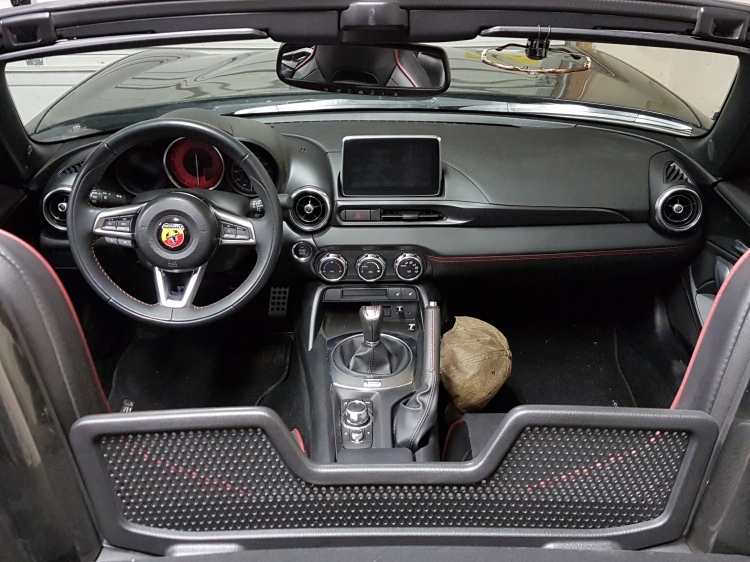
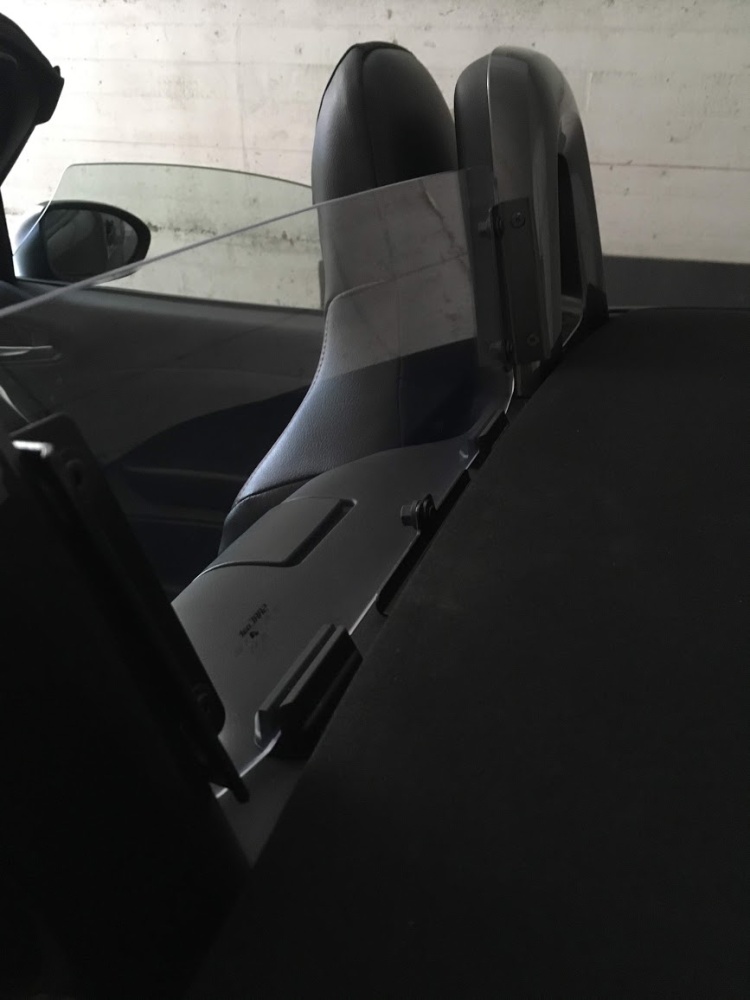
Cal from Calgary has installed the Mopar wind screen accessory item (# 68307694AA) that replaces the black OEM wind screen, and has sent me some photos and comments to share:
When you look at the product as listed on the MOPAR site, you get the impression it is tempered glass. It doesn’t actually say that, but for the cost, I wasn’t expecting polycarbonate. The package includes the poly “glass”, and all the necessary mounting hardware, and a sheet of paper which are the cut out templates for the hole locations you will need to drill. Complete job took me about an hour. Measure once… measure twice… measure three times…. Check the installation guide again. You definitely don’t want to bugger up where you drill those holes! Important points:
- Removal of the stock wind screen is dead simple. You just lift it straight up out of its two mounting slots. It’s a friction fit.
- The template is on metric A4 size paper, so that’s your indicator that you’re going to be using some metric sized equipment.
- The drilled holes are created in three stages, starting with a 2.5mm bit, then a 5mm, and then a 9.5mm. I have more imperial bits than metric, so I opted to use equivalent size imperial drill bits, and that worked like a charm. The final hole size should be 3/8”.
- You will end up mounting three metal brackets and two rubber cups. Although not super obvious in the instructions, you do not use washers with the two bolts that hold the centre bracket in place. You will use washers with the brackets on the sides of the headrests, and the five bolts that hold the actual glass in place.
- The bolts are all metric sized Allan heads. I honestly can’t tell you the size, but I can confirm imperial Allan wrenches will not work.
- Lastly, and this is very important. Because this glass is much larger than the plastic mesh that comes stock on the vehicle, and it doesn’t have a centre cut out, it means that lowering the roof from a seated position is going to be a challenge… especially for shorter drivers. I’m 6’-2”, and fortunately my arms are long enough I can still reach over the glass to put the top down. For drivers with shorter arms, it may mean you will have to slide up on your seat to do this, or do it before entering the car.
⇓ Check out this one that mx5things.com custom-made for Paul Spencer this past week.
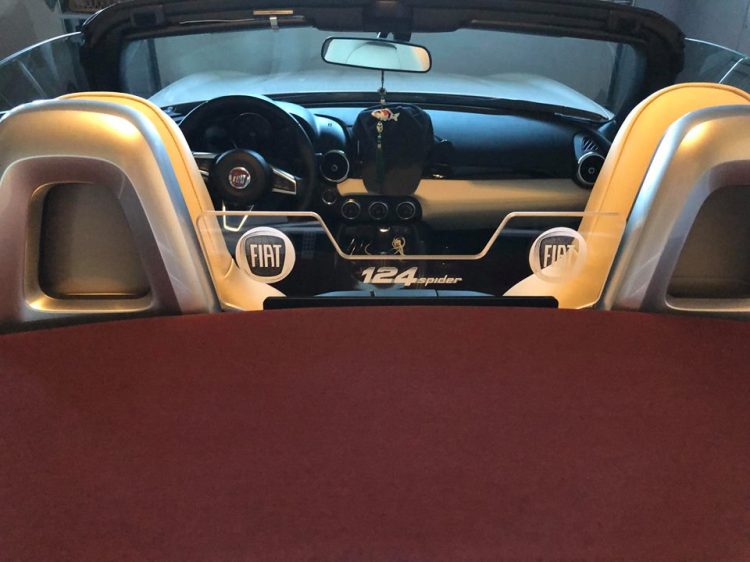
For comparison, here is Peter T’s installation of the Mopar windscreen (done by his dealer) ⇓
About the way they attached the windscreen. I hope I will never have to find out that the whole windscreen setup will simply fly away while driving as Cal suggested ‘might happen’; it would mean doing high speed stints of 215-230 km/h on the German freeway (there is a nice stretch fir doing that between Boden See on the border with Switzerland and Stuttgart…however I do not see myself doing that with the roof down..



I bought one of these from Mopar and never installed it. Have all the parts if anyone is interested since I no longer have the car…regrettably. Your install looks great [Cal]. Well done!
LikeLike
I have installed this as well and concur with the top. It is a reach now. I do believe the wind noise is reduced, but definitely not eliminated, with this product. Not sure if it’s worth the extra money as it was pricey when I bought it.
The install is pretty easy as mentioned, even for someone that is not a craftsman like me.
LikeLike
Cal, be sure to let us know how well it performs at keeping the wind out of the cabin. I’ve never removed the OEM wind screen to know how effective it actually is.
LikeLike
Compliments on the excellent job Cal! I was so stupid to ask my dealership to mount it. The mechanics succeeded in mounting the vertical brackets on the shiny part instead of the matt plastic side….should have done it myself. More so since I already made holes to mount the horizontal netting inside the cubby hole without encountering any problems…
Ok, it’s better to look at from the inside, mounting flushed. If ever I want to change the back part of the head rest, I know I can find those online. Silver, red or black. Have not seen the anthracite ones yet. They even scratched the perspex, but replaced it after I commented on it.
Furthermore, in taking if the carbon top and remounting it, the car mechanics left some scuff marks and made a small hole in the outer rubber seal(which I repaired).
After having it installed, I also discovered that for opening the soft top, I have to get out of the car [to engage the latch]. Whereas closing is no problem from the inside since it pops up high enough to grab one if the inner handholds. Also, sitting inside and looking backwards through the plexiglass, you see more. Also the frontedge and into the space underneath the stowed top; there’s a huge vertical gap of about 3 cm’s. With the plastic windscreen this is not visible.
All in all it does look nice and is functional.
LikeLiked by 1 person
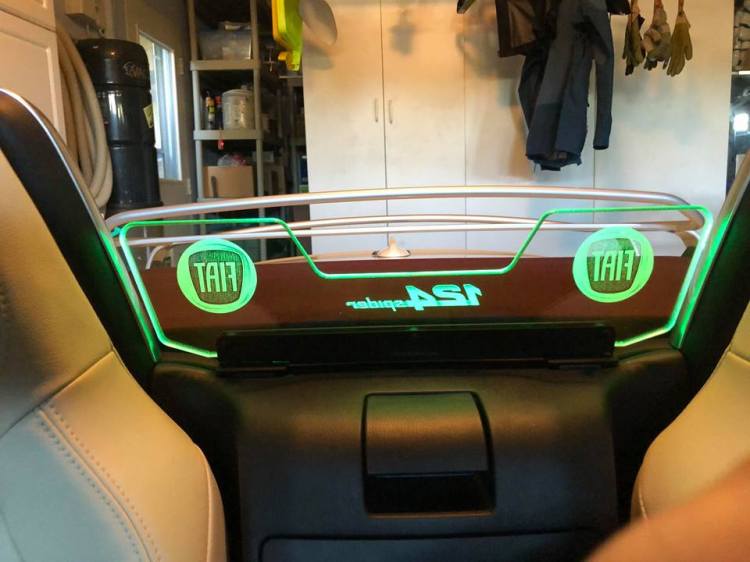
I don’t believe that mx5things version requires any drilling (“Full” size is 9″ tall, has additional Velcro loops for more secure mounting), it’s cheaper, better looking install in my opinion, uninstalls easily (like the OEM unit), and he offers size and logo options (including 124 Spider or Abarth if you ask), as well as an optional LED lighting option.
LikeLiked by 1 person
It looks like the mx5things version takes advantage of the two holes that the tab of the OEM wind screen tabs slide into, and to make it more secure, he’s created a near-full width bracket using them to support the base of the windscreen. At least that’s what it looks like when I look at the photos. By any chance have you figured out how he’s providing the illumination for the plexy? It looks pretty slick. Thanks for providing the link Dan, it really helps to know all the options that are out there.
LikeLike
The LED unit mounts underneath the trim and lights up the plexiglass from the underside edge. More details are here.
LikeLike
Didn’t know this existed, Thx Dan. With the 9″ version you’ll get good coverage from backdrafts, but it will be really difficult to close the hood from the inside. The 6″ one is esthetically nice compared to the one Cal and I installed(let install)
LikeLiked by 1 person
I do think I feel a reduction in wind buffeting with the higher wind screen in place, but then again, maybe that’s a visceral reaction to paying the outrageous price for the component to begin with. And yes, it’s still crazy expensive for a piece of plastic. I did look at this when I first bought the car, and decided not to do it then. I later changed my mind. I do wish the mounting gear was a little less “Frankensteinish”. That’s a whole lot of nuts and bolts and brackets, given that the OEM is just clipped in place by two plastic tabs. Then again, the OEM is a mesh, and the plexi will generate a bit more wind loading. But wind loading considered, this thing’s mounts are over-engineered to the extreme. Peter, I think your dealership may have chosen a better solution than the one that the installation instructions from MOPAR describe, as, like you noted, if you decide to get rid of it, you can replace the seat back coloured panels. I can close the roof easily enough, but opening it requires a bit of an arm throw over the top of the plexy to get the top to latch into the folded position.
Long term, I may consider going to a local glass shop and see if they can create an automotive safety glass replacement for the plexy. I know it’s going to be a maintenance challenge down the road, as that plastic will be prone to scratches and could be marred simply by cleaning it.
The only rationale I can think of that would lead MOPAR to suggest mounting the brackets to the forward part of the seat back is based on how easily (or not) that coloured back piece comes off the seat. If it doesn’t take much to remove it, that might be the reason they went with a forward mount. Wind loading would push it more firmly in place, whereas a rear mounting might have the potential to pop the seat back cover off. Pure rampant speculation on my part, so please take the assessment with a huge grain of salt.
Dan, I do kind of like that one the guy is making in the US, especially the LED lighting option. Hmmmmm…. another red accent piece… 🙂 But the most attractive part is the price. It’s about a third of the cost of the MOPAR item. Wow!
At least for those that have considered this OEM wind screen replacement, they will now know what it looks like installed and can make an informed decision whether to proceed or not. The one the fellow is crafting in the US is a great value, and most assuredly a lighter duty install.
LikeLiked by 1 person
Hi Cal, [edited by ameridan, hopefully as intended]
Last week I decided to take off the front part of the seat back. For some time I heard squeaking noises behind my head. I found out why and something interesting. First; did you notice there are 5 longer hexagonals and 6 shorter ones? I found out that the the side bracket on my side was fixed with one long hexagonal on the topside and a shorter one on the bottom side (as should be). The longer one connected with the head bar and as such created that annoying sound. Second; the back part of the seat back is physically fastened to the bar and as such it’s improbable that things will fly away. For the moment I dismounted the plexiglass and put the mesh one in place. It’s about time to take of the hardtop and I want to experience being able to close the
hardtopsoft top while staying inside the car. Never had the opportunity, since I immediately opted for the (I thought glass too) wind screen. The plexiglass piece is hefty though..👋 PeterLikeLike
Thx Dan!
LikeLike
Cal, Peter observed yet another difference between European Abarths and the North American version – the floor mats. I’ve added his picture of the plaque attached to his carpet floor mats in place of the embroidered “124 Spider” on ours, to the ABARTH 124 UNIQUE PARTS article (it’s quite a long list).
LikeLike
I added 2 pics of Peter’s Mopar windscreen install for comparison.
LikeLike