Photos by Mark Booth (used with permission; click on images to enlarge)

[UPDATED 7/18/2020]
I found Mark Booth’s posting on Miata.net’s forum regarding his windshield replacement experience to be very informative and felt that it merited a “bookmark” and might someday prove to be helpful to Spider owners, should they ever need to get their windshield replaced. He strongly advises becoming familiar with the instructions so that, while observing the process, you can verify that the garnishes are installed properly. Although Mark gave me permission to use his photos, I thought it best to point my readers to the thread, as you will find his detailed comments added to each of the many descriptive photos he’s provided, further along in that thread.
According to Redline Auto Parts (they did a teardown analysis of Miata + Spider):
Windshield: The windshield on the Fiat is apparently thicker than the one on the Miata. We have yet to verify on our own if they are cross-compatible, but would be willing to guess that they are as long as the corresponding windshield seal is used as well.
Plastic Windshield Surround Trim (3 pieces): Physically the same, although the Fiat ones come in more diverse colors. These are directly compatible, but it’s nearly impossible to remove the trims (especially the center one) and keep their mounting tabs intact for reuse. And remember you can always do what Amerigo Miko Gatti did- order any color you can find, and wrap them in a choice color (I like his gold on black scheme)…
Garnish Part Numbers
According to the parts diagram, the following part numbers are for # 11 (side garnishes) and # 12 (the header garnish), which include the trim pieces, as well as all of the required clips and hardware needed for installation. For reference purposes; please double-check before ordering.
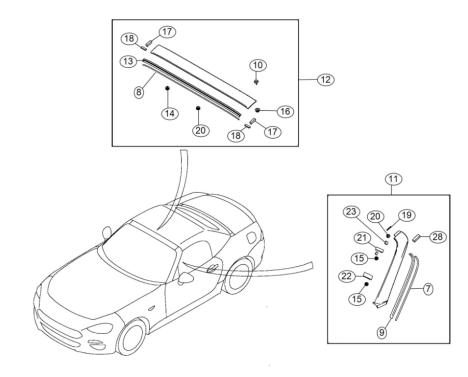
♦ The Mopar part #s for the Abarth Gun Metal trim pieces are: set of all 3 > 68307693AA,
top (Front Pillar Bar Bezel) > ?, A-pillar Left Molding > 68464388AA, A-pillar Right Molding > 68464387AA
♦ The Mopar part #s for the (Lusso) Premium Silver trim pieces are: set of all 3 > 68307692AA,
top (Front Pillar Bar Bezel) > 68417236AA, A-pillar Left Molding > 6YM56UFWAA, A-pillar Right Molding > 68461097AA
♦ The Mopar part #s for the Piano Black trim pieces are: set of all 3 > 68328781AA
♦ The Mopar part #s for the Brillante White [Arctic White (Solid)] trim pieces are: top (Front Pillar Bar Bezel) > 6SC79UF0AA, A-pillar Left Molding > 6YL16UFWAA, A-pillar Right Molding > 6YK64UFWAA
♦ The Mopar part #s for the Bianco Perla (Tri-Coat White) [Crystal White Pearl Mica (Metallic)] trim pieces are: top (Front Pillar Bar Bezel) > 6LR97RWSAA, A-pillar Left Molding > ?, A-pillar Right Molding > 6VC37UF1AA
♦ The Mopar part #s for the Bronzo Magnetico Titanium [Titanium Flash Mica (Metallic)] trim pieces are: top (Front Pillar Bar Bezel) > 6SC36UFUAA, A-pillar Left Molding > 6JW47RDFAA, A-pillar Right Molding > 7EJ17UFUAA
♦ The Mopar part #s for the Forte Black Metallic [Jet Black (Metallic)] trim pieces are: top (Front Pillar Bar Bezel) > ?, A-pillar Left Molding > 6JW25RXCAA, A-pillar Right Molding > 6JW20RXCAA
♦ The Mopar part #s for the Grigio Argento (Aluminum) [Aluminum Metallic (Metallic)] trim pieces are: top (Front Pillar Bar Bezel) > 6NX28UFTAA, A-pillar Left Molding > 6JW24RSLAA, A-pillar Right Molding > 6JW43RSLAA
♦ The Mopar part #s for the Hypnotique Red [Hypnotique Red] trim pieces are: top (Front Pillar Bar Bezel) > ?, A-pillar Left Molding > 6YK72UFWAA, A-pillar Right Molding > 6YK76UFWAA
♦ The Mopar part #s for the Moda Gray Metallic [Silver Mist Clear Coat] trim pieces are: top (Front Pillar Bar Bezel) > 6LR95RA5AA, A-pillar Left Molding > 6JW23RA5AA, A-pillar Right Molding > 6JW18RA5AA
♦ The Mopar part #s for the Prima Azzurro Italia (Dynamic Blue) [Blu Venezia (Blue Metallic)] trim pieces are: top (Front Pillar Bar Bezel) > 6SC32UFWAA, A-pillar Left Molding > 6JW45RB1AA, A-pillar Right Molding > 7FH65UFWAA
Windshields
Should your glass shop state that replacement Mopar windshields are on an extended “backorder”, you might consider the Mazda or Pilkington equivalent (around $300) if time is of the essence, as I have found nothing specifically proving that there is a difference in the construction. The “Lamipane” windshields for both Miatas and Spiders, are all manufactured in Osaka, Japan by Nippon Sheet Glass (NSG)/Pilkington.
Pilkington’s own branding is $3,000+ cheaper!!!)…

photo courtesy of Gregory K. Lipscomb
Alongside the Mopar logo, my 2017 Classica windshield has the following markings:
Lamipane GGN
DOT 23
Nippon Safety
AS1 NSG M31A
//
E6 43R-010445
I don’t know what particular markings are on a Miata windshield, but I’ve found out:
- the // signifies “Regular Multiple Layer Windshield”
- GGN means that you have to buy the molding separate and install it on the glass yourself
- E6 means the windshield was certified for Europe in Belgium
- I could not find any acoustic glass designations on either the windshield, nor the rear glass (look for the word “Acoustic”, or “SoundScreen”, or a capital “A”, or the image of an ear with a curved arrow passing by it), unless the A in the manufacturer code M31A plays that role. Rather than only one layer of PVB (Polyvinyl Butyral) between the two layers of glass, acoustic glass is laminated with two layers of Standard PVB, and one layer of acoustic PVB resin in between the Standard PVB layers
, so a strong probability exists that the Miata glass is actually no different. Anyone have the Miata markings?
Keep in mind, that the correct trim level needs to be taken into account when ordering though:
- The Classica (and MX-5 Sport) windshields only have masking and an installed bracket for the rear-view mirror
- There are Lusso/Abarth (and MX-5 Club/GT) windshields that have additional masking to accommodate sensors for rain-sensitive wipers and automatic headlights
- There is a third alternative for Lusso/Abarth (and MX-5 Club/GT) windshields that also have additional masking and another installed bracket, to accommodate the lane-departure monitoring camera.
Also, be aware that Mazda issued a Technical Service Bulletin to the dealers several months ago stating that all three exterior trim pieces (1 upper and 1 for each side), which they call pillar garnishes, need to be replaced following a windshield replacement, and logic would dictate that Fiat has done the same, but I don’t know if that has actually occurred. The side garnishes can not be reused, and chances are one or more of the 4 snap clips in the upper garnish will not survive removal either, in which case, the upper garnish can not be reused. Again, should Mopar claim these parts are on an extended “backorder”, you might consider a Mazda equivalent (either matching, or complementing the car’s primary color), using this post to assist in determining which colors will be available from Mazda.
Aside from insuring that the replacement glass matches the trim level of the vehicle, the 3 garnishes (which will add an additional $400 to the repair bill), need to be ordered and on-hand, before allowing the windshield replacement to take place.
The entire garnish replacement procedure is spelled out in both:
- Mazda’s Technical Service Bulletin E001/17
- and in Mopar’s Pillar Garnish Instructions
Garnish Replacement Instructions
The only way the upper garnish can be removed (and installed) properly is by first removing:
- the interior A-pillar trim pieces (don’t forget to disconnect the tweeter)


- the two wedges that engage the soft-top (you will need a T-40 Torx bit to remove the four wedge bolts) {see #4}

- {see #5} which then will allow the interior header trim to be removed (you will need a T-30 Torx bit to remove the two header bolts). Don’t forget to disconnect the map light connector.
- {see #6} this will expose the two 10 mm nuts that mechanically attach the upper garnish. DO NOT ALLOW the window replacement technician to pry the trim off, without first removing these 2 nuts!

- Now, the upper garnish can be pried from the 4 clips {see #7}
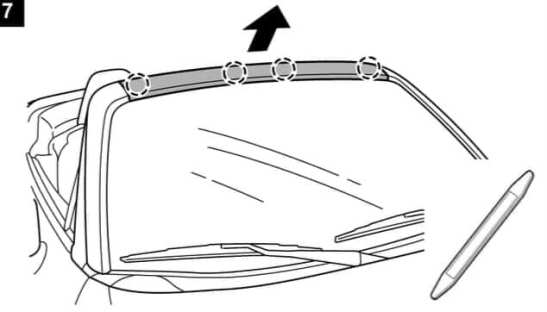
 After all these bits, the upper garnish can be pried off at the four snap clips, and if the tabs survive, all four clips must be reused (or new clips if they don’t survive) when reinstalling that garnish to keep it from flying off at some point.

It’s too bad the blades can’t simply be flipped up in “winter snow-storm” mode, but apparently, the wipers and the cowl grille panels* also need to be removed. Per mechrick:
Taking the wipers off meant having to pull the black plastic covers in front of the windshield. Only two screws and the rest just pops off by pulling forward, as there are sliding clips under the rear and under the front edges. I added [the illustration from the MX-5 manual that pertains to] reinstalling the wiper blades. The detents in the splines seem to adjust the blade tips plus or minus about half an inch.


Reassembly Process
[Gregory Lipscomb also presents the Mopar guide as another reference, along with photos detailing the windshield replacement in his vehicle here.]
Here is Mark’s time-lapse video of his windshield replacement.
etcthorne added:
Of additional note to others having the top garnish replaced….. If you notice the garnish popped up in the middle a bit after the installer is finished putting it on, it’s because they didn’t set the middle fasteners. It takes quite a bit of pressure on the center to get them seated. I had to do that part myself while standing in the car. I heard them both click in securely, but I was worried about the amount of pressure I had to apply. I’ve had no issues with the top garnish since.
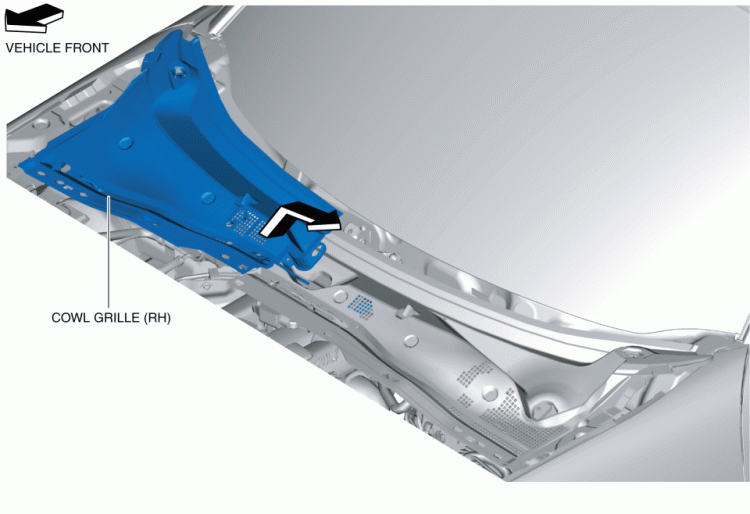
* COWL GRILLE PANELS REMOVAL/INSTALLATION
1. Remove the wiper arm and blade.
2. Disconnect washer hose B from joint pipe A.
3. Detach the weatherstrip clips A and B from the cowl grille.

4. Remove the weatherstrip.
5. Remove the hole covers.

6. Remove the screws.

7. Pull the cowl grille in the direction of the arrows shown in the figure and detach the cowl grille hooks from the body.

8. Pull the cowl grille in the direction of the arrows shown in the figure and remove the guides from the windshield.

9. Detach windshield washer hose B from the cowl grille hook.

10. Move the cowl grille (RH) in the direction of the arrow shown in the figure.
11. Move the cowl grille (LH) in the direction of arrow (1) shown in the figure.

12. Remove both cowl grilles (LH and RH) in the direction of arrows (2) as a single unit.
13. Install in the reverse order of removal.

Holy mackerel. My Fiat 124 Spider’s windshield has been cracked since early August, about 2 months, due to all 3 garnishes / moldings being back ordered. I’m told they’re produced by a third party vendor and that there’s a nationwide shortage. With no shipment date
in sight. I’ve called other dealerships inside & outside my area (Arkansas) to find parts, without success.
I wonder if this is a worldwide phenomenon, and if I could order them from overseas? Since it’s going to be an insurance claim- because the total cost is over $2000- and it’s taken so long to do the windshield/garnishes replacement, I wonder if I have recourse looking outside the U.S.
or if possibly Mazda MX-5 Miata parts might work. I’ve not had success omg getting a straight answer about this.
I’m more than ready to aid Safelite or Chrysler in getting this thing done!
Any helpful suggestions are appreciated.
LikeLike
Lamar, like the glass, the Mazda trim pieces are the exact same thing (provided the color coincides). Red won’t be available from Mazda, but some other colors like white are. See my Paint specs for help in that regards, but really you’ll just need the Mazda paint code.
LikeLike
Thanks very much! I’m a little concerned about color matching but black or silver might be just the thing for my magnetico bronze metallic color. I’ll check into it asap!
LikeLiked by 1 person
If you have a Lusso, or Abarth, with trim pieces not in the body color, but rather the silver or black, that should be even easier to find at a Mazda dealer, because I think some versions of the MX-5 use those as well.
LikeLike
Hello – This is a follow up post; plea for help:
my 2018 Fiat 124 Spider, Magnetico Bronze, has had a broken windshield since August 2019. In order for either my dealership or Safelite to replace it, I need 3 garnishes that surround it. I was told last week that expected arrival of parts is now February 2020. Meanwhile the crack has spread across my file of vision and is almost side to side.
Does Anyone here know of a company who carries these or knows of a source?
I am completely baffled.
thank you.
Lamar Allen
LikeLike
Lamar,
I’ve already answered your question. There is no magical source for new trim parts other than Mopar or Mazda suppliers, of which there are many online that might have some inventory, but you may need to do some research.
If you are indeed open to them being a different color, head to a Mazda dealership and see what they’ve got. Perhaps you might find Black, Piano Black, Silver, etc. easy to obtain.
LikeLike
This blog is an amazing resource. I want to thank you so much for everything you post here!
LikeLiked by 1 person
I added a paragraph today regarding windshield trim levels, and the usage of MX-5 versions, should Mopar claim they are on “backorder”.
LikeLike
Thanks for all your help and insight, ameridan. I was just told by my NW Arkansas Fiat Chrysler dealership and the Safelite corporate shop that the garnishes are not interchangeable. I would appreciate any knowledge that would help me convince them otherwise. (I’m being quoted sometime in November before all parts will be available. It seems that they have the Classico windshield and two garnishes already. Just need a second side garnish.)
LikeLike
What color?
LikeLike
If I understand correctly, I’d be happy with Black or Silver garnishes, but the garnishes on order are magnetico bronze.
LikeLike
If this post is correct, then what you were told is correct.
42S / Titanium Flash Mica (the Mazda equivalent) was offered on the NC Miata, but since that color isn’t offered for the ND, pre-painted trim bits in that color wouldn’t be available from Mazda.
LikeLike
I believe I understand. Update: It’s looking like late November before the last garnish will be here. Praying for no drastic weather!
Please tell me: What does NC stand for? ND? Thanks.
LikeLike
NC was the previous generation of Miatas, and ND is the current generation starting with Model Year 2016 (explained further in my Specs section).
LikeLike
Just throwing this out there for some added experience. Here in Florida, I’ve had two cracked windshields. The first one was from a rock chip. It took three months to get it approved with insurance. So this is something to be aware of. Because of the price, my insurance company threw a fit, until they realized why it needed to be done.
To further add to thins, I don’t think the technician knew about the extra pressure needed to get the center to snap in properly. About 10 months later, the center popped up (doing about 75 due to our higher speed limits). I didn’t know what happened, and then on my way home, the panel flew off. Took it to FIAT to get it done under warranty, only to have them crack the windshield in the process. Had to go through the whole insurance thing again. This time, a week later, getting on the highway, I heard it pop.
As far as anyone having issues with getting the parts, I think it really has to do with the colors. I have the dark metallic blue, and the parts came in no time.
Just to add, the first incident happened between Sept. 2018 and Nov. 2018. The second was much quicker in Nov 2019. The parts may be scattered across the country, especially if you’ve seen just how few of these have been sold.
LikeLike
My RFID in my keys stopped functioning after having a collision shop replace my window and trim pieces allong with painting the hood. I don’t see anywhere where it could have caused this to happen. I’m concerned someone may have been trying to steal my car from the collision center. The bad part is the collision center didn’t even let me know any of this happened. They played it off. So I have the insurance people on it now. It’s been really frustrating and my keyfob still works if i hit the button on the fob however it only recognizes the fob if i push the start button with it, all be it the key indicator stays red in the vehicle. Somethings really fishy about all this and frustrating. Have any of you had a similar issue?
LikeLike
I have a feeling they left the keys in the car while in the shop, killing the fob battery. Try replacing the battery.
LikeLike
I added cowl grille panel removal instructions to the article, since those too need to be removed for installation of a new windshield.
LikeLike
I added Mopar part numbers for the windshield garnish trim pieces to aid in Google searches for replacements.
LikeLike
I added a photo to the trim pieces paragraph, along with:

And remember you can always do what Amerigo Miko Gatti did- order any color you can find, and wrap them in a choice color (I like his gold on black scheme)…
See https://21stcenturyfiat124spider.wordpress.com/2022-posts-%e2%9e%a4/ for another shot of his car.
LikeLike