Project #3 – Cubby Light
The Fiat 124 Spiders do not come with CD players, so in comparison to Mazda Miatas, the cubby (glove box) between the seats in the rear bulkhead is extra deep. Because it will hold more items, they can be more difficult to find, especially in the dark since the one interior light in the car doesn’t do much back there. These ideas can be just as useful in the MX-5s though…
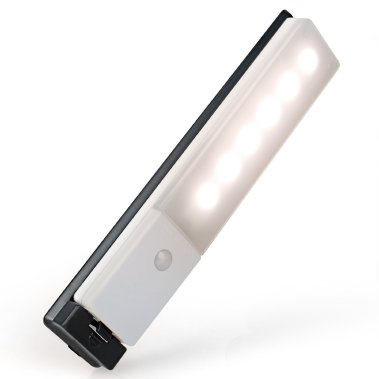
At Amazon *, for $10, I found a USB rechargeable, wireless, PIR motion-sensor activated LED light with a base plate bracket that it snaps into. It contains 6 bright 5000K SMD 2835 Epistar LED chips and a 600mah polymer lithium battery. I was glad I purchased a two-pack, as I was so impressed with the first LED light in my cubby, that I installed the other one in my trunk to supplement the inadequate factory “trunk light”.
I cleaned the top interior surface of the cubby with rubbing alcohol and attached the bracket with the included 3M double-sided adhesive strip. With the switch in the AUTO position, the light comes on for 15 seconds automatically as soon as you open the door and do something that triggers the motion detector, like reaching for an item with your hand. If you’d like it to stay on for a longer duration, either keep the motion detector happy or select the ON position instead. No wiring required!
To recharge the unit, simply unsnap it out of the bracket and plug it in with the included USB power cord (or any other micro USB cord already available). The brochure for this light stated:
If you want to use the LED unit elsewhere, for instance for a night-time tire repair, unsnap it from it’s bracket and attach the unit to a fender via the built-in magnet.
This sounded practical until I realized that, other than the door panels and the rear quarter panels which are steel, the rest of our car exterior is plastic and aluminum.
* The Amazon merchant I bought from must have sold out as the link no longer worked, so I’ve updated the link to a different Amazon merchant that hopefully keeps these is stock, but in case that link fails in the future, use Google to search for:
Rechargeable Wireless LED Night Light, PIR Motion Sensor

click to enlarge
Cubby Shelf
I also had a shelf laser cut from .220″ clear acrylic so that the light could pass through to the rest of the cubby. It snugly fits into the 3 cutouts in the rear of the cubby and the front rests on the shelf supports already molded into the cubby side panels. It is very sturdy and does not flex. If it were made of .118″ acrylic, I can only guess that it might not be as sturdy. Right now, I’m using the shelf to store my clip-on sunglasses which are very light anyways, so the thinner material would have been fine.
[UPDATED 11/1/2016, 11/20/2016, 10/18/2017]

If you would like to have a shelf made, Sergio (ssh16) has made a file available for FREE here that is even better than the file I had used originally, in that it gives you several options. After setting up an account at Ponoko, you can submit his file for laser cutting, and you will end up with 3 shelf cutouts – one with tabs and 2 without tabs. The cutouts are to scale so no dimensions are necessary and the thickness is determined by the material you order. Your first laser cutting project is free, so you only need to select a 15″ x 15″ piece of material and pay S/H for the entire piece to be mailed to you with your shelf pieces all cut out.
The tabs can not be thicker than .120″, so if you choose .220″ material as I did, you’ll need to remove the top half of the tabs that are included in one of the cutouts, down to .120″. A fine-tooth trim saw worked really well for me. Leave the protective film on the acrylic until you are finished with the modifications and make sure you have the shelf oriented properly before trimming, as the center tab favors the LHD passenger side of the vehicle (if you turn it upside down it will not mate properly with the cubby holes). According to the designer, no trimming need be done to the tabs if you order the .118″ material, since they would only be included on the bottom layer and you can glue together one or both of the other cutouts to that bottom piece (might not look good in clear though). Again, make sure your pieces are oriented properly, as the center tab favors the LHD passenger side of the vehicle and the tabs should be on the bottom layer.
As an example, they have .106″ thick bamboo material, which is already the right thickness for the tabs, so you probably only need to glue one of the other cutouts on top of the tabbed cutout.

Credit for the pattern goes to ssh16 on the mazda.net forum
This entire project cost me considerably less than the fabric shelf that Mazda sells as an option, and no riveting / drilling holes in the sides of the cubby is required.
[UPDATE 10/18/2017]
I see that Sergio (ssh16) is now selling these shelves for only $17 ($20 with felt covering) made with .0905″ black Delrin (reported to be much more robust than acrylic) and at that price point, may be the best option available.
[UPDATE 1/12/2020]
Santtu has published this drawing of a slightly different variation, for those wanting to fabricate their own shelf…


ssh16 has just released an alternate template available for free on his Ponoko site that can be ordered in the thin material as 3 pieces are cut out that you can glue together (might not look good in clear) either 2 or 3 layers thick. This way no sawing or sanding need be done to the tabs, since they are only included on the bottom layer.
Here is a pic of a shelf in .264″ bamboo material from Ponoko using the template in my main blog. He filed the tabs down to .125″ to fit in his Miata (note the cubby is not as deep).

Here is a pic of the original shelf ssh16 made with .125 clear acrylic and covered with adhesive-backed felt for his Miata.

LikeLike
Hi when i print the template it is too small, can you advise?
LikeLike
Un-checking “Fit to Page” allows the image to be 100% and go outside the normal margins and that should do the trick.
LikeLike
Good morning and thanks for you post! Love the shelf for my new Abarth! Just tried to order the clear shelf from Ponoko using Santtu’s drawing (the other links are broken), but Ponoko says “You have ended up with unnecessary objects in your design” and “I’ll need to revise my design”. Would be grateful for your help. Mike
LikeLike
I’m sorry, but 5 years ago the design worked, and I no longer remember, nor do I even have the software any longer.
You could order it from mx5things @ https://mx5things.com/products/central-console-shelf?variant=34919545405604
LikeLike
Would you mind sharing more info about the led light for the glovebox?? Amazon link doesn’t work, I looked for it but failed.
I’d like to get one for my ND.
Thanks
LikeLike
The Amazon store I bought it from is apparently sold out. I found the same item at another Amazon store here.
I’ll try to put a generic description in the blog so that it might be searchable via Google when this link too may fail.
LikeLike
Pingback: Organizing space – Gadgets for my MX-5 2016(ND)
These LED lights are genius for this purpose!
LikeLiked by 1 person
The LED light continues to please. But I’m applying my sense of humor to it after my recent 3100 mile road trip from Tacoma to San Diego and back. The light has a photocell to prevent it from working when no light is needed. So when you open the cubby in the dark, the photocell and motion sensor combined turn it on, but in full daylight – not. Around home a full battery charge lasts many weeks. But on my trip it was dead in just days (or less). A puzzle. Of course it’s always dark inside the cubby with the lid closed. So if you have a bottle of sunscreen loose in the cubby and you spend most of a day on very twisty roads bouncing that bottle around, the motion sensor and photocell apparently are fooled into turning on the light. With the lid closed. Often. All day. Until the battery goes dead. And needs about 12 hours plugged into a computer to fully recharge. I had already made a small visible label for the manual switch (On-Off-Auto). I’ll be using that feature on future fun drives!
LikeLike
I discovered the same thing. My polarized clip-ons that were on my shelf slid around and apparently ran my batteries down too, so I keep them below the shelf now – we’ll see if that helps…
LikeLike
Dan went to Ponoko and ordered the shelf in clear acrylic. I got it in the .118″ size and it appears to be sturdy for most of the small items that would fit in that area. I did have to sand a bit on the back corners to get the door to close smoothly (not a lot and it was easy to do). The shelf along with the light really make the cubby much more usable.
Matt (wlcmlc)
LikeLiked by 1 person
Dan – Did putting the sun clip-ons below the shelf keep your light battery charged? I don’t have a shelf but might have to get one if that helps the light work better. I have a long road trip coming up.
LikeLike
The light is easily released from the bracket for USB charging when required (once or twice a year, in my case).
Not sure I understand the question, but there isn’t a solar charger built-in.I read you previous comment and I get it now. Yes, the battery lasts longer now that nothing is on the shelf sliding around. Could be that the pile of stuff under the shelf just doesn’t move around much though.
LikeLike
Thanks – I guess I should have mentioned the June 2017 date of the original dialogue – it’s been quite a while! I’m thinking about adding a shelf because without one, sliding stuff in the box does seem to run down my light battery in a very short time while enjoying active/interesting twisty roads.
LikeLike
Great post, thanks! Quick note that the links to the shelf template on Ponoko (Sergio’s?) appear broken.
LikeLiked by 1 person
Thanks Thomas. The first 2 of 3 links were good yet, but I updated the 3rd link now.
LikeLike